
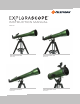
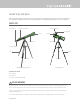
Instructions / Assembly


4 | ENGLISH
THE EYEPIECES
Your telescope comes with two eyepieces, a low power (20 mm eyepiece) and a higher power eyepiece (4 mm
eyepiece). Whenever you set up your telescope, always start with the 20 mm eyepiece. Once you have your target
centered in the 20 mm eyepiece, you can switch to your higher power 4 mm eyepiece to get a more detailed view.
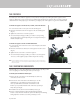
To install an eyepiece on the 60 mm, 70 mm, or 80 mm refractor:
1. Loosen the setscrews on the open end of the star diagonal.
2. Insert the silver barrel of the 20 mm eyepiece into the star diagonal
(Fig. 5).
3. Tighten the setscrews to secure the eyepiece
4. To see the sharpest image possible, you need to focus by looking
through the eyepiece and slowly turning the focusing knobs until you
fi nd the sharpest image.
To install an eyepiece on the 114 mm Newtonian:
1. Loosen the two silver setscrews on the focuser and pull out the small
plastic dust cap.
2. Insert the silver barrel on the bottom of the eyepiece into the focuser
(Fig. 6).
3. Tighten the two setscrews to secure the eyepiece.
4. To see the sharpest image possible, you need to focus the eyepiece.
To focus, look through the eyepiece and slowly turn the focusing
NOTE: The 114 mm Newtonian comes with a special 20 mm eyepiece that gives you a correctly oriented image for
daytime terrestrial viewing. The 4 mm is designed for astronomical observing and will give an inverted image.
This is perfectly normal.
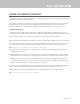
THE STARPOINTER FINDERSCOPE
The ExploraScope comes with a StarPointer red-dot fi nderscope that you will
use as a sighting tool when aiming the telescope at a target.
To install your StarPointer fi nderscope:
1. Remove the two silver nuts from the threaded posts at the top
of the tube, near the focuser.
2. Place the two holes in the base of the fi nderscope over the
threaded posts so the fi nderscope base sits fl ush on the
telescope tube. Make sure that the round window on the
fi nderscope is pointed toward the end of the telescope that you
will point at your target.
3. Thread the two nuts back onto the threaded posts (Fig. 7)
4. There is a small clear plastic tab inserted between the battery
and the contact. This was included to prevent the battery from discharging
during shipment. Pull this out to allow your battery to work.
Fig. 5
Fig. 6
Fig. 7
Fig. 5