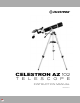
CELESTRON AZ 102 T E L E S C O P E INSTRUCTION MANUAL Model #22159 -DS
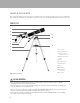
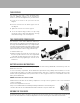
WHAT’S IN THE BOX We recommend saving your telescope box so it can be used to store the telescope when it is not in use. Unpack the box carefully as some parts are small. Use the parts list below to verify that all parts and accessories are present. PARTS LIST 1 2 9 3 10 4 5 6 11 7 8 NOTE: Smartphone not included. 1. Telescope Tube 2. StarPointer Finderscope 3. Smartphone Adapter (Smartphone not included) 4. Bluetooth Remote Shutter Trigger 5. Eyepiece 6. Erect Image Diagonal 7. Slow Motion Knobs 8.
ASSEMBLING YOUR TELESCOPE THE MOUNT The AZ mount and tripod come fully assembled, so setting it up is easy. 1. Remove the tripod and mount from the box. 2. Loosen the hand knobs at the bottom of each leg and extend the inner section of the leg to the desired length. Tighten the knobs to secure the legs, being careful not to over tighten. 3. Stand the tripod upright and pull the tripod legs apart until the center brace snaps into place. 4.
THE SLOW MOTION KNOBS To attach the slow motion knobs to your mount: 1. Locate the supplied hex key hidden inside the slot in the front of your mount. 2. Place the slow motion control knob over the D-shaped gear shaft and push inward to make sure it is fully seated. 3. Use the hex key to tighten the setscrews onto the gear shaft. 4. Return the hex key to its storage position in the front of the mount. THE TELESCOPE TUBE To attach the telescope tube to your tripod and mount: 1.
THE EYEPIECE Your telescope comes with a 10mm and 20mm Kellner eyepieces. Additional eyepieces can be purchased to increase or decrease the magnification to your desired level. 1. Loosen the set screws on the open end of the star diagonal. 2. Insert the silver barrel of the 20mm eyepiece into the star diagonal. 3. Tighten the setscrews to secure the eyepiece 4.
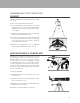
ALIGNING THE STARPOINTER FINDERSCOPE The StarPointer finderscope helps you aim your telescope by looking through its round glass window and covering your target with the red recticle projected in the window. The first time you assemble your telescope, you’ll need to align the finderscope with the main optics of the telescope. Although this step can be done at night, it is significantly easier during the day.
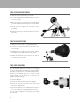
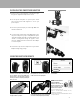
INSTALLING THE SMARTPHONE ADAPTER 1. Open the eyepiece clamp and place it around the body of the eyepiece. Tighten the clamp unit it is secure. 2. Use the phone clamp knob to open the phone holder until your phone fits inside. Tighten it to secure your phone in place. 3. Turn on the phone and open your camera app. Make sure the flash is turned off. 4. Loosen the knob on the bottom of the adapter that secures the phone clamp to the eyepiece clamp.
CELESTRON TWO YEAR LIMITED WARRANTY A. Celestron warrants your product to be free from defects in materials and workmanship for two years. Celestron will repair or replace such product or part thereof which, upon inspection by Celestron, is found to be defective in materials or workmanship. As a condition to the obligation of Celestron to repair or replace such product, the product must be returned to Celestron together with proof-of-purchase satisfactory to Celestron. B.