INSTRUCTION MANUAL ● Laboratory Model # 44100 ● Laboratory Model # 44102 ● Advanced Model # 44104 ● Advanced Model # 44106
Table of Contents Introduction …………………………………………………………………………………. 2 Laboratory Model # 44100 …………………………………………………………………. 3 Laboratory Model # 44102 …………………………………………………………………. 5 Advanced Model # 44104 …………………………………………………………………… 8 Advanced Model # 44106 …………………………………………………………………… 13 Care and Maintenance ……………………………………………………………………… 18 Warranty …………………………………………………………………………………….. 19 Introduction Congratulations on your purchase of a Celestron microscope.
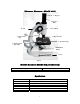
Laboratory Microscope – Model # 44100 1. Eyepiece 2. Eyepiece Tube 3. Focus Knob 10. Arm 9. Safety Rack Stop 4. Objective Lens 5. Specimen Stage 8. Spring Loaded Stage Clips 6.Illumination Mirror 7.
Setting Up Your Microscope 1. 2. 3. 4. 5. 6. 7. Take the Styrofoam container out of the cardboard carton. Remove the tape from the Styrofoam container holding the two sections together. Carefully remove the microscope and other parts and set them on a table, desk, or other flat surface. Remove the plastic bag covering the microscope. Remove the protective paper from the stage (5). Remove the plastic cap from the eyepiece tube (2). Insert the 10x eyepiece in the eyepiece tube (2).
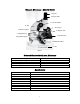
Laboratory Microscope – Model # 44102 1. Eyepiece 2. Eyepiece Tube 3. Coarse Focus Knob 10. Arm 11. Fine Focus Knob 12. Nosepiece 9. Safety Rack Stop 4. Objective Lens 5. Specimen Stage 8. Spring Loaded Stage Clips 6. Illumination Mirror 7.
Setting Up Your Microscope 1. 2. 3. Take the Styrofoam container out of the cardboard carton. Remove the tape from the Styrofoam container holding the two sections together. Carefully remove the microscope and other parts from the container and set them on a table, desk, or other flat surface. 4. Remove the plastic bag covering the microscope. 5. Remove the protective paper from the stage (5). 6. Remove the plastic cap from the eyepiece tube (2). 7. Insert the 10x eyepiece in the eyepiece tube (2). 8.
Condenser Disc Diaphragmc Diaphragm Figure 2a Viewing a Specimen Carefully place a specimen slide under the spring loaded stage clips (8) and center the specimen directly over the hole in the center of the stage (5). You are now ready to focus and view the specimen, but first you must take some precautions so as not to damage the specimen slide or objective lens. Your microscope is equipped with a safety rack stop (9) which allows you to regulate the range of travel on the focuser.
Advanced Microscope – Model # 44104 1. Eyepiece 2. Eyepiece Tube 3. Coarse Focus Knob 10. Arm 12. Nosepiece 11. Fine Focus Knob 4. Objective Lens 9. Safety Rack Stop 5. Specimen Stage 8. Stage Holder Clamp 6. Illumination Mirror 7. Base Figure 3 Standard Accessories with your Microscope • • • • • • • • • 10x Huygens Eyepiece 12.
Magnification Table Use the following table to determine the magnification of the different eyepiece/objective lens combination of your microscope. Objective Lens 4x 10x 40x 10x Eyepiece 40x 50x 100x 125x 400x 500x 12.5x Eyepiece Setting Up Your Microscope 1. 2. 3. 4. 5. 6. 7. 8. 9. 10. Take the Styrofoam container out of the cardboard carton. Remove the tape from the Styrofoam container holding the two sections together.
Adjusting the Arm Angle The normal viewing position is at 0°. However, you can view at any angle from 0° to 60°. To change the viewing angle: 1. With one hand hold the base (7). 2. Then, with your other hand, tilt the arm (10) by pulling it backward or forward to the desired viewing angle. Using the Electric Illuminator Figure 3a Figure 3b Figure 3c Figure 3d For more direct and intensive light, you should use the supplied electric illuminator. To install the electric illuminator: 1.
Stage Holder Clamp Note: The top stage movement knob moves in the X axis (forward and backward) whereas the bottom stage movement knob moves in the Y axis (side to side). A vernier scale on both axes allows the exact marking and replication of an object in the field of view that the user may want to come back to. Stage Movement Knobs Figure 3e Tip: To position the specimen directly under the objective lens, close the opening on the iris diaphragm (see Figure 3f) until it is almost completely closed.
Adjusting the Lighting Specimens of different size, thickness, and color variations will require different levels of illumination. There are two ways to change the amount of illumination when viewing a specimen; adjusting the Abbe condenser and adjusting the iris diaphragm (see Figure 3f): 1. When viewing with lower power (4x and 10x) objective lenses you will need to lower the condenser lens in order to spread the light over the larger field of view.
Advanced Microscope -- Model # 44106 1. Eyepiece 2. Eyepiece Tube 14. Head 12. Nosepiece 10. Arm 4. Objective Lens 9. Safety Rack Stop 5. Specimen Stage 8. Stage Holder Clamp 6. LED Illuminator 3. Coarse Focus Knob 13. On/Off Switch 11. Fine Focus Knob 7.
Setting Up Your Microscope 1. 2. 3. Take the Styrofoam container out of the cardboard carton. Remove the tape from the Styrofoam container holding the two sections together. Carefully remove the microscope and other parts from the container and set them on a table, desk, or other flat surface. 4. Remove the plastic bag covering the microscope. 5. Remove the protective paper from the stage (5). 6. Remove the four objective lenses (4) from their containers.
Using the LED Illuminator Figure 4a Figure 4b Figure 4c For more direct and intensive light, you should use the supplied LED illuminator. The LED illuminator is powered by three AA batteries (user supplied). 1. Remove the mirror illuminator by pulling it outward from its sleeve. 2. The LED illuminator tube will thread counterclockwise on over the LED’s in the base of the microscope – see Figure 4a. Turn the tube until finger tight – see Figure 4b. 3. Install the batteries – see the next section below.
Viewing a Specimen Your instrument is provided with a mechanical stage with a stage holder clamp and directional knobs –see figure 4g and 4h. A vernier scale on both axes allows the exact marking and replication of an object in the field of view that the user may want to come back to. 1. Use the clamp lever to open the clamping arm of the stage holder clamp. 2. Place a specimen slide (3” size) inside the holder and gently close the clamping arm against the slide. 3.
Adjusting the Lighting Specimens of different size, thickness, and color variations will require different levels of illumination. There are three ways to change the amount of illumination when viewing a specimen; adjusting the brightness control on the on/off knob (13), adjusting the Abbe condenser (Figure 4g) and adjusting the iris diaphragm (see Figure 4h): 1.
Care and Maintenance Your Celestron microscope is a precision optical instrument and should be treated with care at all times. Follow these care and maintenance suggestions and your microscope will need very little maintenance throughout its lifetime. • • • • • • • • • • • • • • When you are done using your microscope, remove any specimens left on the stage. Turn off any electric illuminator knobs or switches. Unplug any power cords being used.
Celestron Two Year Warranty A. Celestron warrants this microscope to be free from defects in materials and workmanship for two years. Celestron will repair or replace such product or part thereof which, upon inspection by Celestron, is found to be defective in materials or workmanship. As a condition to the obligation of Celestron to repair or replace such product, the product must be returned to Celestron together with proof-of-purchase satisfactory to Celestron. B.
Celestron 2835 Columbia Street Torrance, Ca 90503 U.S.A. Tel. 310-328-9560 Fax. 310-212-5835 Web www.celestron.com Copyright 2007 All rights reserved Products or instructions may change without notice or obligation. Printed in China $ 10.