LCM Series INSTRUCTION MANUAL 60LCM • 70LCM • 76LCM • 80LCM • 90LCM • 114LCM ENGLISH
Table of Contents INTRODUCTION . . . . . . . . . . . . . . . . . . . . . . . . . . . . . . . . . . 1 Filter Limits . . . . . . . . . . . . . . . . . . . . . . . . . . . . . . . . . 13 Warning . . . . . . . . . . . . . . . . . . . . . . . . . . . . . . . . . . . . . . . 1 Direction Buttons . . . . . . . . . . . . . . . . . . . . . . . . . . . . 13 ASSEMBLY . . . . . . . . . . .
Introduction Congratulations on your purchase of the Celestron LCM telescope! The LCM ushers in a whole new generation of computer automated technology. Simple and friendly to use, the LCM telescope is up and running after locating just three bright celestial objects. It’s the perfect combination of power and portability.
13 1 12 11 10 9 2 3 8 7 4 5 6 60/70/80/90 LCM Telescope 1. Objective Lens 6. Tripod Leg Extension Clamp 10. Eyepiece 2. Motorized Base 7. Hand Control 11. StarPointer Finderscope 3. On/Off Switch 8. Focuser Knob 12. Altitude Clutch Knob 4. Tripod 9. Star Diagonal 13. Telescope Mounting Bolt 5.
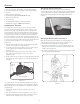
1 11 10 9 2 3 8 4 7 5 6 76/114 LCM Telescope 1. Eyepiece 6. Accessory Tray 10. Telescope Tube 2. Focuser Knob 7. Hand Control 11. Telescope Mounting Bolt 3. StarPointer Finderscope 8. Motorized Base 4. On/Off Switch 9. Altitude Clutch Knob 5.
Assembly The LCM comes partially assembled and can be operational in a matter of minutes. The LCM is conveniently packaged in one reusable shipping carton that contains the following accessories: Attaching the Hand Control Holder The LCM comes with a snap-on hand control holder that conveniently attaches to any of the tripod legs. To attach the hand control holder simply position the holder with the square plastic tab facing up and push against the tripod leg until it snaps in to place.
Leveling the Telescope 2. Slide the chrome portion of the star diagonal into the focuser barrel. Now that the base is attached to the tripod, it is a good idea to use the included bubble level to more accurately level the telescope. 3. Tighten the thumbscrew on the focuser barrel to hold the star diagonal in place. If you wish to change the orientation of the star diagonal, loosen the thumbscrew on the eyepiece adapter until the star diagonal rotates freely.
Eyepieces are commonly referred to by focal length and barrel diameter. The focal length of each eyepiece is printed on the eyepiece barrel. The longer the focal length (i.e., the larger the number) the lower the eyepiece power or magnification; and the shorter the focal length (i.e., the smaller the number) the higher the magnification. Generally, you will use low-tomoderate power when viewing. For more information on how to determine power, see the section on “Calculating Magnification.” 2.
2. Gently remove the battery holder from inside the battery compartment. 3. Place 8-AA batteries (user supplied) inside the battery holder. 4. Return the battery holder back inside the base and replace the cover. 5. Flip the power switch to the “On” position. The light on the power button and hand control should come on. In case of a loss of power, the optical tube can be moved by hand in altitude (up and down) only. However, when powered on, the telescope should always be controlled via the hand control.
. Scroll Keys: Used to scroll up and down within any of the menu lists. A double arrow symbol on the right side of the LCD indicates that the scroll keys can be used to view additional information. 1. Power on the LCM by flipping the switch located on the side of the base, to the “on” position. Once turned on the hand control display will say LCM Ready. Press ENTER to choose Sky Align.
3. Use the arrow buttons on the hand control to slew (move) the telescope towards any bright celestial object in the sky. Align the object with the red dot of the finderscope and press ENTER. information is entered, the hand control will prompt you to select and point the telescope at one known star in the sky. The LCM now has all the information it needs to automatically choose a second star that will assure the best possible alignment.
5. Then, center the star in the eyepiece and press ALIGN. 1. Select Solar System Align from the alignment options. In order to accurately center the alignment star in the eyepiece, you may wish to decrease the slew rate of the motors for fine centering. This is done by pressing the RATE key (11) on the hand controller then selecting the number that corresponds to the speed you desire. (9 = fastest, 1 = slowest). 2.
6. Use the UP and Down scroll keys to select the alignment star to be replaced, and press ENTER. It is usually best to replace the star closest to the new object. This will space out your alignment stars across the sky. If you have used one of the single object alignment methods then it is always best to replace the object that is “unassigned” with an actual object. LCM hand control will only display objects that are below the horizon if the Filter Limits are set below 0º in altitude.
Direction Buttons Tracking Rate — In addition to being able to move the telescope with the hand control buttons, the LCM will continually track a celestial object as it moves across the night sky. The tracking rate can be changed depending on what type of object is being observed: The LCM has four direction buttons in the center of the hand control which controls the telescope motion in altitude (up and down) and azimuth (left and right). The telescope can be controlled at nine different speed rates.
To replace the contents of any of the user defined objects, simply save a new object using one of the existing identification numbers; LCM will replace the previous user defined object with the current one. azimuth and altitude directions and press ENTER after each one to save these values. The LCM will remember these values and use them each time it is turned on until they are changed. Slew Limits — Sets the limits in altitude that the telescope can slew without displaying a warning message.
Utility Features Sun Menu Scrolling through the MENU options will also provide access to several advanced utility functions such as anti-backlash compensation and slew limits. For safety purposes the Sun will not be displayed as a database object unless it is first enabled. The enable the Sun, go to the Sun Menu and press ENTER. The Sun will now be displayed in the Planets catalog and can be used as an alignment object when using the Solar System Alignment method.
LCM Ready LCM Series Hand Control Menu Tree: Menu tree showing the sub-menus associated with the primary command functions 15
Telescope Basics A telescope is an instrument that collects and focuses light. The nature of the optical design determines how the light is focused. Some telescopes, known as refractors, use lenses. Other telescopes, known as reflectors, use mirrors. The LCM 60, 70, 80 and 90 telescopes are refractor telescopes that use an objective lens to collect its light. The LCM 76 and 114 are reflecting telescopes with a primary and secondary mirror to gather and focus light.
under these conditions is greatly reduced. Also, when photographing under these conditions, the processed film may come out a little grainier than normal with lower contrast and underexposed. • If you wear corrective lenses (specifically glasses), you may want to remove them when observing with an eyepiece attached to the telescope. When using a camera, however, you should always wear corrective lenses to ensure the sharpest possible focus.
Seeing Conditions Viewing conditions affect what you can see through your telescope during an observing session. Conditions include transparency, sky illumination, and seeing. Understanding viewing conditions and the effect they have on observing will help you get the most out of your telescope. skies found around major urban areas. LPR filters enhance deep sky viewing from light polluted areas by blocking unwanted light while transmitting light from certain deep sky objects.
fixed optical systems that should not come out of collimation. The LCM 76, and 114 however has three collimation screws that can be used to adjust the alignment of the primary mirror. centered in your view. DO NOT loosen or tighten the center screw in the secondary mirror support, because it maintains proper mirror position. To check if your telescope is in collimation the following diagram will help you.
Optional Accessories Filter, Solar 114LCM (#94229) — The AstroSolar® filter is a safe and durable filter that covers the front opening of the telescope. View sunspots and other solar features using this double-sided metal coated filter for uniform density and good color balance across the entire field. The Sun offers constant changes and will keep your observing interesting and fun. You will find that additional accessories enhance your viewing pleasure and expand the usefulness of your telescope.
Appendix A - Technical Specifications Optical Specifications LCM 60 LCM 70 LCM 76 LCM 80 LCM 90 LCM 114 Design Refractor Refractor Reflector Refractor Refractor Reflector Aperture 60 mm 70 mm 76 mm 80 mm 90 mm 114 mm Focal Length 700 mm 900 mm 700 mm 900 mm 660 mm 1000 mm F/ratio of the Optical System 12 13 9 11 7 9 Optical Coatings Fully Coated Fully Coated Aluminum Fully Coated Fully Coated Aluminum Highest Useful Magnification 142x 165x 180x 189x 213x 269x
Mechanical Specifications Motor: Type / Resolution DC Servo motors with encoders, both axes / 0.
M– multiple systems. Systems with individual components that can be seen separately by a telescope are called visual binaries or visual multiples. The nearest “star” to our solar system, Alpha Centauri, is actually our nearest example of a multiple star system, it consists of three stars, two very similar to our Sun and one dim, small, red star orbiting around one another. Magnitude Magnitude is a measure of the brightness of a celestial body.
Parfocal Parsec Point Source U– Refers to a group of eyepieces that all require the same distance from the focal plane of the telescope to be in focus. This means when you focus one parfocal eyepiece all the other parfocal eyepieces, in a particular line of eyepieces, will be in focus. Universe The totality of astronomical things, events, relations and energies capable of being described objectively. V– Variable Star The distance at which a star would show parallax of one second of arc.
Appendix C – Maps Of Time Zones 25
26
Sky Maps 27
28
29
30
31
32
www.celestron.com FCC Statement This device complies with Part 15 of FCC Rules. Operation is subject to the following two conditions: 1. This device may not cause harmful interference, and 2. This device must accept any interference received, including interference that may cause undesired operation. 2835 Columbia Street • Torrance, CA 90503 U.S.A. Telephone: 310.328.9560 • Fax: 310.212.5835 ©2011 Celestron All rights reserved. • Printed in China • 01-11 22050-INST • $10.