
Instruction manual


9
3.Usethearrowbuttonsonthehandcontroltoslew(move)
the telescope towards any bright celestial object in the sky.
Align the object with the red dot of the finderscope and
press ENTER.
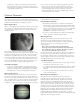
4. If the finderscope has been properly aligned with the
telescope tube, the alignment star should now be visible
inside the field of view of the eyepiece. The hand control will
ask that you center the bright alignment star in the center of
the eyepiece and press the ALIGN button. This will accept
thestarastherstalignmentposition.(Thereisnoneedto
adjust the slewing rate of the motors after each alignment
step. The LCM automatically selects the best slewing rate for
aligningobjectsinboththenderscopeandtheeyepiece).
5. For the second alignment object, choose a bright star or
planet as far as possible from the first alignment object.
Once again use the arrow button to center the object in the
finderscope and press ENTER. Then once centered in the
eyepiece press the ALIGN button.
6. Repeat the process for the third alignment star. When the
telescope has been aligned to the final stars, the display will
read “Match Confirmed.” Press UNDO to display the
names of the three bright objects you aligned to, or press
ENTER to accept these three objects for alignment. You are
now ready to find your first object.
Tips for Using Sky Align
Remember the following alignment guidelines to make
using Sky Align as simple and accurate as possible.
• Be sure to level the tripod before you begin
alignment. The time/site information along with a
level tripod will help the telescope better predict the
available bright stars and planets that are above
the horizon.
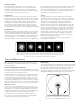
• Remember to select alignment stars that are as far
apart in the sky as possible. For best results make sure
that the third alignment star does not lie in a straight
line between the first two stars. This may result in a
failed alignment.
• Don’t worry about confusing planets for stars when
selecting alignment objects. SkyAlign works with the
four brightest planets (Venus, Jupiter, Saturn and Mars)
as well as the Moon. In addition to the planets, the hand
control has over 80 bright alignment stars to choose
from (down to 2.5 magnitude).
• Rarely SkyAlign will not be able to determine what
three alignment objects were centered. This sometime
happens when a bright planet or the Moon passes
near one of the brighter stars. In situations like these,
it is best to try to avoid aligning to either object
if possible.
• Be sure to center the objects with the same final
movements as the direction of the GoTo Approach.
For example, if the scope normally nishes a GoTo with
the front of the scope moving right and up, you should
center all three alignment objects in the eyepiece using
the right and up arrow buttons (the up/down arrows
reverse at slew rates of 6 or lower). Approaching the star
from this direction when looking through the eyepiece
will eliminate much of the backlash between the gears
and assure the most accurate alignment possible.
Auto Two-Star Align
As with Sky Align, Auto Two-Star Align requires you to enter
all the necessary time/site information as before. Once this
information is entered, the hand control will prompt you to
select and point the telescope at one known star in the sky.
The LCM now has all the information it needs to automatically
choose a second star that will assure the best possible
alignment. Once selected, the telescope will automatically slew
to that second alignment star to complete the alignment. With
the LCM set up outside with all accessories attached and the
tripod leveled, follow the steps below to align the telescope:
1. Once the LCM is powered on, Press ENTER to
begin alignment.
2.UsetheUpandDownscrollkeys(10)toselectAuto Two-Star
Align and press ENTER.
3. The hand control will display the last time and location
information that was entered into the hand control. Use the
Up and Down buttons to scroll through the information. Press
ENTER to accept the current information or press UNDO
tomanuallyedittheinformation(seeSkyAlignsectionfor
detailedinstructiononenteringtime/siteinformation).
4. The display will now prompt you to select a bright star from
the displayed list on the hand control. Use Up and Down
buttons(6and9onthekeypad)toscrolltothedesiredstar
and then press ENTER.
5. Use the arrow buttons to slew the telescope to the star
you selected. Center the star in the finderscope and press
ENTER. Finally, center the star in the eyepiece and
press ALIGN.
6. Based on this information, the LCM will automatically display
the most suitable second alignment star that is above the
horizon. Press ENTER to automatically slew the telescope
to the displayed star. If for some reason you do not wish to
selectthisstar(perhapsitisbehindatreeorbuilding),you
can either:
• Press the UNDO button to display the next most suitable
star for alignment.
• Use the UP and DOWN scroll buttons to manually select
any star you wish from the entire list of available stars.
Once finished slewing, the display will ask you to use the
arrow buttons to align the selected star with the red dot of the
finderscope. Once centered in the finder, press ENTER. The
display will then instruct you to center the star in the field of view
of the eyepiece. When the star is centered, press ALIGN to accept
this star as your second alignment star. When the telescope
has been aligned to both stars the display will read Align
Success, and you are now ready to find your first object.
Two Star Alignment
With the two-star alignment method, the LCM requires the user
to know the positions of two bright stars in order to accurately
align the telescope with the sky and begin finding objects. Here
is an overview of the two-star alignment procedure:
1. Once the LCM is powered on, use the Up and Down scroll
keys(10)toselectTwo-StarAlign,andpressENTER.
2. Press ENTER to accept the time/site information displayed
on the display, or press UNDO to enter new information.
3. The SELECT STAR 1 message will appear in the top row of
thedisplay.UsetheUpandDownscrollkeys(10)toselect
the star you wish to use for the first alignment star.
Press ENTER.
4. The LCM then asks you to center in the eyepiece the
alignment star you selected. Use the direction arrow buttons
to slew the telescope to the alignment star and carefully
center the star in the finderscope. Press ENTER
when centered.