AstroMaster Series Telescopes INSTRUCTION MANUAL ● AstroMaster 70AZ # 21061 ●AstroMaster 90AZ # 21063 ● AstroMaster 114AZ # 31043
Table of Contents INTRODUCTION .......................................................................................................................... 3 ASSEMBLY ................................................................................................................................... 6 Setting up the Tripod .................................................................................................................. 6 Moving the Telescope Manually ...........................................
Congratulations on your purchase of an AstroMaster Series telescope. The AstroMaster Series of telescopes come in several different models and this manual covers three models mounted on the Alt-AZ Mount ((an altazimuth is the simplest type of mount with two motions – altitude (up & down) and azimuth (side-to-side)))-- 70mm refractor, 90mm refractor, and 114mm Newtonian. The AstroMaster Series is made of the highest quality materials to ensure stability and durability.
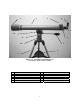
1 3 2 4 5 12 6 11 10 7 8 9 Figure 1-1 AstroMaster 90AZ Refractor (AstroMaster 70AZ refractor similar) 1. 2. 3. 4. 5. 6. Objective Lens Telescope Optical Tube Star Pointer Finderscope Eyepiece Diagonal Focus Knob 7. 8. 9. 10. 11. 12.
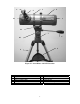
1 4 3 2 5 12 11 7 6 10 8 9 Figure 1-2 AstroMaster 114 AZ Newtonian 1. 2. 3. 4. 5. 6. Star Pointer Finderscope Eyepiece Tube Ring Telescope Optical Tube Primary Mirror Pan Handle 7. 8. 9. 10. 11. 12.
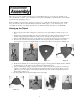
This section covers the assembly instructions for your AstroMaster telescope. Your telescope should be set up indoor the first time so that it is easy to identify the various parts and familiarize yourself with the correct assembly procedure before attempting it outdoor. Each AstroMaster comes in one box. The pieces in the box are – optical tube with attached sky pointer and tube rings (114 AZ only), Alt-Az mount with attached pan handle, 10mm eyepiece – 1.25”, 20mm eyepiece – 1.
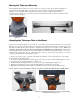
Moving the Telescope Manually The AstroMaster Alt-Az mount is easy to move wherever you want to point it. The up and down (altitude) is controlled by the pan handle (Figure 2-10). The side-to-side (azimuth) is controlled by the azimuth lock (Figure 2-9). The pan handle and the azimuth lock are both loosened by turning the handle and lock counterclockwise. When loose you can find your objects easily and then lock the controls. To lock the controls in place, turn them clockwise.
Installing the Diagonal & Eyepieces ( refractor refractor)) The diagonal is a prism that diverts the light at a right angle to the light path of the refractor. This allows you to observe in a position that is more comfortable than if you looked straight through. This diagonal is an erect image model that corrects the image to be right side up and oriented correctly left-to-right which is much easier to use for terrestrial observing.
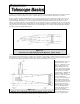
A telescope is an instrument that collects and focuses light. The nature of the optical design determines how the light is focused. Some telescopes, known as refractors, use lenses, .and other telescopes, known as reflectors (Newtonians), use mirrors. Developed in the early 1600s, the refractor is the oldest telescope design. It derives its name from the method it uses to focus incoming light rays. The refractor uses a lens to bend or refract incoming light rays, hence the name (see Figure 3-1).
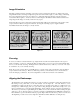
Image Orientation The image orientation changes depending on how the eyepiece is inserted into the telescope. When using a star diagonal with refractors, the image is right-side-up, but reversed from left-to-right (i.e., mirror image). If inserting the eyepiece directly into the focuser of a refractor (i.e., without the diagonal), the image is upside-down and reversed from left-to-right (i.e., inverted).
On/Off Switch Battery Compartment Figure 3-4 Figure 3-5 To align the Star Pointer finderscope: 1. 2. 3. To turn on the Star Pointer, turn the switch to the “on” position – see Figure 3-4. Locate a bright star or planet and center it in a low power eyepiece in the main telescope. With both eyes open, look through the glass window at the alignment star. If the Star Pointer is perfectly aligned, you will see the red LED dot overlap the alignment star.
Determining Field of View Determining the field of view is important if you want to get an idea of the angular size of the object you are observing. To calculate the actual field of view, divide the apparent field of the eyepiece (supplied by the eyepiece manufacturer) by the magnification. In equation format, the formula looks like this: Apparent Field of Eyepiece True Field = ⎯⎯⎯⎯⎯⎯⎯⎯⎯⎯⎯⎯⎯ Magnification As you can see, before determining the field of view, you must calculate the magnification.
Up to this point, this manual covered the assembly and basic operation of your telescope. However, to understand your telescope more thoroughly, you need to know a little about the night sky. This section deals with observational astronomy in general and includes information on the night sky and polar alignment. For telescopes with equatorial mounts, the users have setting circles and polar alignment methods to help them find objects in the sky.
Motion of the Stars The daily motion of the Sun across the sky is familiar to even the most casual observer. This daily trek is not the Sun moving as early astronomers thought, but the result of the Earth's rotation. The Earth's rotation also causes the stars to do the same, scribing out a large circle as the Earth completes one rotation. The size of the circular path a star follows depends on where it is in the sky.
With your telescope set up, you are ready to use it for observing. This section covers visual observing hints for both solar system and deep sky objects as well as general observing conditions which will affect your ability to observe. Observing the Moon Often, it is tempting to look at the Moon when it is full. At this time, the face we see is fully illuminated and its light can be overpowering. In addition, little or no contrast can be seen during this phase.
Observing Deep Sky Objects Deep-sky objects are simply those objects outside the boundaries of our solar system. They include star clusters, planetary nebulae, diffuse nebulae, double stars and other galaxies outside our own Milky Way. Most deep-sky objects have a large angular size. Therefore, low-to-moderate power is all you need to see them. Visually, they are too faint to reveal any of the color seen in long exposure photographs. Instead, they appear black and white.
Star hopping to the Andromeda Galaxy (M31) is a snap, since all the stars needed to do so are visible to the naked eye. Star hopping will take some getting used to and objects that don’t have stars near them that are visible to the naked eye are challenging. One such object is M57 (Figure 5-2), the famed Ring Nebula. Here's how to find it: 1. Find the constellation of Lyra, a small parallelogram visible in the summer and fall months. Lyra is easy to pick out because it contains the bright star Vega. 2.
Seeing Conditions Viewing conditions affect what you can see through your telescope during an observing session. Conditions include transparency, sky illumination, and seeing. Understanding viewing conditions and the effect they have on observing will help you get the most out of your telescope. Transparency Transparency is the clarity of the atmosphere which is affected by clouds, moisture, and other airborne particles.
The AstroMaster series of telescopes was designed for visual observing. After looking at the night sky for a while you may want to try your hand at photography of it. There are several forms of photography possible with your telescope for celestial as well as terrestrial pursuits. Below is just a very brief discussion of some of the methods of photography available and suggest you search out various books for detailed information on the subject matter.
While your telescope requires little maintenance, there are a few things to remember that will ensure your telescope performs at its best. Care and Cleaning of the Optics Occasionally, dust and/or moisture may build up on the objective lens or primary mirror depending on which type of telescope you have. Special care should be taken when cleaning any instrument so as not to damage the optics. If dust has built up on the optics, remove it with a brush (made of camel’s hair) or a can of pressurized air.
Aligning the Primary Mirror Now adjust the primary mirror screws to re-center the reflection of the small secondary mirror, so it’s silhouetted against the view of the primary. As you look into the focuser, silhouettes of the mirrors should look concentric. Repeat steps one and two until you have achieved this. Remove the collimating cap and look into the focuser, where you should see the reflection of your eye in the secondary mirror.
With Polaris or a bright star centered within the field of view, focus with either the standard ocular or your highest power ocular, i.e. the shortest focal length in mm, such as a 6mm or 4mm. Another option is to use a longer focal length ocular with a Barlow lens. When a star is in focus it should look like a sharp pinpoint of light. If, when focusing on the star, it is irregular in shape or appears to have a flare of light at its edge, this means your mirrors aren’t in alignment.
You will find that additional accessories for your AstroMaster telescope will enhance your viewing pleasure and expand the usefulness of your telescope. This is just a short listing of various accessories with a brief description. Visit the Celestron website or the Celestron Accessory Catalog for complete descriptions and all accessories available. Sky Maps (# 93722) – Celestron Sky Maps are the ideal teaching guide for learning the night sky.
AstroMaster Specifications 21061 AM 70 AZ 21063 AM 90 AZ 31043 AM 114 AZ Optical Design Aperture Focal Length Focal Ratio Secondary Mirror Obstruction -- Dia. - Area Optical Coatings Finderscope Diagonal 1.25" Eyepieces 1.25" Apparent FOV -- 20mm @ 50° Refractor 70mm (2.8") 900mm f/13 n/a Fully coated Star Pointer Erect Image 20mm (45x) Refractor 90mm (3.5") 1000mm f/11 n/a Multi-coated Star Pointer Erect Image 20mm (50x) Newtonian 114mm (4.
Celestron 2835 Columbia Street Torrance, CA 90503 U.S.A. Tel. (310) 328-9560 Fax. (310) 212-5835 Website www.celestron.com Copyright 2007 Celestron All rights reserved. (Products or instructions may change without notice or obligation.) Item # 21061-INST Printed in China $10.