
Operation Manual

6
This section covers the assembly instructions for your Celestron Telescope. Your telescope should be set up indoor the first
time so that it is easy to identify the various parts and familiarize yourself with the correct assembly procedure before
attempting it outdoor.
#11086
#11087
#11088
#11089
CGE Pro 925 CGE Pro 1100 CGE Pro 1400 CGE Pro 1400
Fastar
Diameter
235mm (9.25") Schmidt-
Cassegrain
280mm (11") Schmidt-
Cassegrain
356mm (14") Schmidt-
Cassegrain
356mm (14") Schmidt-
Cassegrain
Focal Length
2350mm F/10 2800mm F/10 3910mm F/11 3910mm F/11
Eyepiece
25mm - 1.25" (94x) 40mm - 1.25" (70x) 40mm - 1.25" (70x) 40mm - 1.25" (70x)
Finderscope
6x30 9x50 9x50 9x50
Diagonal
90° - 1.25" 90° - 1.25" 90° - 2" w/1.25" adapter 90° - 2" w/1.25" adapter
Fastar Compat.
No No No Yes
Mount
CGE Pro Equatorial
CGE Pro Equatorial
CGE Pro Equatorial CGE Pro Equatorial
Tripod
2.75" Stainless Steel
2.75" Stainless Steel
2.75" Stainless Steel 2.75" Stainless Steel
Software
NexRemote Telescope
Control Software
NexRemote Telescope
Control Software
NexRemote Telescope
Control Software
NexRemote Telescope
Control Software
Counterweights
1-22lb 2-22lb 3-22lb 3-22lb
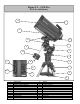
The Celestron CGE Pro Series telescopes are shipped in three main boxes plus counterweights. In separate boxes are the
following:
Optical Tube Assembly and Standard Accessories
Equatorial Mount with Hand Control, and Counterweight Bar
Tripod
Additional Counterweights
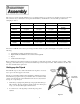
Remove all the pieces from their respective boxes and place on a flat, clear work area. A large floor space is ideal. When
setting up your Celestron telescope you must start with the tripod and work up from there. These instructions are laid out in
the order each task must be performed.
S
S
e
e
t
t
t
t
i
i
n
n
g
g
u
u
p
p
t
t
h
h
e
e
T
T
r
r
i
i
p
p
o
o
d
d
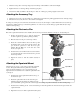
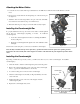
The CGE Pro tripod comes with an all metal center leg brace / accessory
tray to give rock solid support to the mount.
The tripod comes fully assembled with a metal plate, called the tripod head
that holds the legs together at the top. In addition, there is a central rod that
extends down from the tripod head that attaches the accessory tray between
the legs. To set up the tripod:
1. Stand the tripod upright and pull the tripod legs apart until each leg is
fully extended. The tripod will now stand by itself. Once the tripod is
set up, you can adjust the height at which it stands.
2. Loosen the lever on the leg clamp so that the tripod leg can be
adjusted.
Figure 2-1
Leg Clamp
Lock Levers
Accessory
Tray / Leg
Support