Table of Contents Quick-Start and Tutorial Imaging Basics Registax User’s Guide Troubleshooting
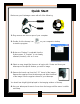
Quick Start Make sure your NexImage comes with all of the following: 1.25” Barrel USB Cable Installation CD Rom 1. Plug camera into the USB port of your computer. 2. Double click the Amcap icon to start the program. on your computer’s desktop 3. Make sure “Preview” is selected from the Options menu. If “Preview” is not already selected (checked), click on it once. 4. Select an easy target like the moon to begin with. Center and focus your telescope on the specific feature you wish to image. 5.
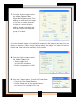
7. From the Options menu select the Video Capture Filter. Adjust the Brightness and Gain settings to make sure the image is not over or under exposed. In order to control the gain setting, deselect (uncheck) the Auto box under the Exposure group of controls. Once the desired image is focused and centered in the imaging window you are ready to capture a video image. Before taking the image you must first set the frame rate, time limit and resolution for the video. 8.
10. From the Capture menu, choose Set Time Limit. This determines how long of a video image will be recorded. • Check the Use Time Limit box • Set the time limit to the desired amount of time. For example 20 seconds. Now you are ready to capture the image. 11. From the Capture menu select Start Capture • Select OK to begin image capture. The bottom of the imaging window will display the amount time of video recorded and the number of frames captured. 12.
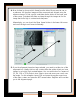
RegiStax Tutorial Your NexImage CD ROM comes with a sample .AVI file which you can use to learn and experiment with the features of the included RegiStax software. This tutorial will guide you through the steps you need to align, stack and process video frames into a single high quality image. 1. Start RegiStax by clicking the icon on your desktop. Press the Select Input button to select the directory where the NexImage CD is located. 2. Select the file called Lunar Tutorial.
4. Now its time to choose which frame from the video file we want to use as a reference. All the other images will be compared and aligned using the reference-image. To find a good candidate use the slider on the lower part of the screen. Just select the slider and step through the images to find an image that looks high in contrast and sharpness. Alternatively, you can check the Show frame list box in the lower left corner and scroll through each frame individually. 4 5 5.
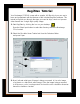
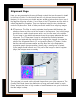
Alignment Page Here you are presented with many different controls that are discussed in detail in the User's Guide. For this tutorial we will only discuss the most important features. On this screen you should see two smaller windows that are on top of the RegiStax Aligning window. One of them is the FFT-spectrum and the other is called Registration properties. They are displayed using the two checkboxes under the Options box. Both of these panels are useful when aligning images. 6. FFT-spectrum.
7. Set the "start" quality filter to 10. This will position the two green lines so that one is to the left of the blue line and one is to the right of the blue line. Setting the band “width” filter to 9 defines the area under the Registration Properties graph that is calculated as a proportion of the total area below the graph. Ideally one of the vertical green lines should lie on the lower part of the red curve while the other is positioned where the red-curve nearly touches the bottom. 7 8 8.
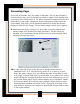
Processing Page The power of RegiStax sits in the usage of Wavelets. This is a special filtering technique that is very good for enhancing details in images. Each wavelet layer carries part of the image within it. The lower numbered wavelets control the fine detail stored in the image whereas the larger numbered wavelets control the coarse detail. Each layer can be adjusted individually to reveal the desired amount of detail for your image. The processing page is where it all happens! 9.
11. On the lower bottom there are two additional sliders called Contrast and Brightness, these can be used to prevent the image from becoming too bright. Notice that when you enhance the image with the layer-sliders the image contrast increases. You can control this by reducing the overall contrast with the contrast slider. 11 Once you are happy with the appearance of your image you can save it as a BMP, JPEG, TIFF or FITS file. Or you can “tweak” the image further on the Final processing page.
Imaging Basics Congratulation on your purchase of the Celestron NexImage solar system imaging camera. Parts list Your NexImage comes with the following: • NexImage Camera with 1.
The Basics Focusing As with all astrophotography, sharp focus is essential for high quality results. Although there are many techniques and devices for focusing your telescope, the human eye still remains one of the best detectors in subtle changes in detail. One advantage that video imaging has over imaging with more sophisticated (and expensive) CCD cameras is the speed in which it can display its image. Focusing NexImage is more similar to focusing a eyepiece than a CCD camera.
How long to take Streaming Video On first thought you may think that the more frames you record the better. However there are some limitation to the duration of video and the amount of frames you can acquire. Rotational speed of the planets Since the NexImage will combine as many sharp frames as possible to achieve one high quality image, you don’t want to take so many images that you start to detect the rotation of the planet.
User’s Guide 13
Input Screen 11 13 12 14 15 18 1 2 3 16 17 5 4 6 7 8 9 10 Controls/Features 1. Select Input (Button) – Press this button to start selecting images (bmp, jpeg, fits, tiff) or video sequences (avi) for processing. After the button is pressed a standard windows file-dialog (#4) will open. You can select single avi-files or multiple (use ctrl or shift) bmp’s, jpg’s, fit’s, tiff.
6. LRGB (checkbox) – This is disabled for B/W processing so only becomes available when you process in color. LRGB allows you to have less color-artifacts during processing. 7. Processing Area (setting) – This is the size of the area of an image (width & height) that will automatically be processed during later stages. RegiStax is designed to handle very large images but wavelet-processing them completely is often not recommended. So during wavelet-processing a part of the image will only be processed.
Remember it is not necessary (or practical) to manually deselect the low quality frames from your sequence. Registax has built-in features that will automatically filter out low quality images based on individual frame quality and alignment differences. However, viewing the frame list will allow you the ability to scroll through and select a high quality, high contrast image to compare and align with all the other frames in the sequence (See Aligning Screen in next section). 10.
17. Load Flatfield – Pressing this opens a dialog where the user can select a flatfield (bmp, fits) to use in processing. After selecting flatfield a checkbox will appear that needs to be set to actively use the chosen flatfield. (See #16) 18. Additional Options – If you have interlaced images they need to be set before image alignment starts. During alignment RegiStax creates a luminance channel (not with FITS since they are single-colour files).
Aligning Screen The Aligning Screen contains all the controls needed to accurately and automatically register (align) each frame in your series. 1 11 2 7 3 15 4 5 6 8 9 10 12 13 14 1. Alignment Filter – The Alignment (FFT) filter is used to improve the initial alignment estimation. It reduces the noise from images that otherwise can be problematic during alignment. See Setting the FFT filter below) 2. Show FFT (Checkbox) – Checking this box displays the FFT Spectrum graph 3.
6. Resampling – This control allows you to enlarge the images by interpolation to achieve sub-pixel quality alignment. This will however reduce processing speed greatly. In the processing page the images can be down sampled to their original size.
During optimization the program searches for the "best fit" in a box with a dimension set by the search area control. At every optimization run (through all the frames) the program searches the best possible shift for every frame versus the reference frame you selected. Every run starts with the latest optimal shift. When you choose a small search path the program will process faster but the optimizer might miss the perfect alignment position.
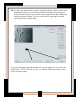
Setting the FFT Filter The Registration Properties graph shows a power-spectrum histogram (red- line) where the resolution increases from left to right. The rightmost part deals with the finest details of the image. Sharp images have a longer tail (to the right) than blurred images. The FFT filter line (blue) should be positioned well to the right of the middle of the bend in the curve, but not to where the red line reaches y=0.
Stacking Screen The stacking phase aims at increasing the signal to noise ratio in the final images. When you have used Align & Stack on the Align Page you will automatically pass through the stacking page and advance directly to the Image Processing page. You can however return to this page from the processing page. 1 2 3 1. Stackgraph (dropdown panel) • Quality-cutoff: This slider sets the lower-edge of the image quality used during stacking.
The effect of both sliders on the total number of images to be stacked will be shown in the lower part of the screen (text). 2. Show Stacklist – When this checkbox is set, it will open a window that allows you to select/deselect images of a sequence at will. The images are ordered by image quality therefore limiting the de-selection process to the best images. Due to the fact that the image-estimation is not always effective this will allow you to weed out the worst of the images before stacking.
Image Processing Screen This is the most interesting phase of RegiStax. This is where your stacked image is processed with wavelets. Wavelet processing is similar to a series of unsharp masks applied to an image to strip information from that image into separate layers. Upon entry in this page you will see the previously stacked image.You can reach this page either by pressing Align & Stack in the Align Frames page or pressing the Stack in the Stack Frames page.
2. Wavelet sliders – The sliders run from -5 to 100 in steps of 0.1. The information available for a layer can be seen by pressing the button above the slider. This will shows the "information" in the layer. High-intensity red means that the pixel-intensity of this area will decrease when the slider is moved to the right, high-intensity green means an increase in value will result from that action. All red values will result in a decrease and all greens in an increase.
is done with one of the re-sampling filters and you can choose it directly in the Resize window. Also you can go back to the original input image scale by pressing "original". The Resize window has an easy system to resize by %'s 25, 50, 75, 100, 150 and 200 are pre-programmed settings 11. Process button – When auto-processing is off, you can process the images at will by pressing this button. 12. Show wavelet filter (under options panel) – this opens the heart of the wavelet processing system.
14. Noise reduction (options panel) – Noise reduction is an advanced feature of Registax. At the wavelet-page under options you can set the checkbox "Noise reduction". The noise reduction window will appear. This has a set of sliders and checkboxes for every corresponding wavelet layer. The sliders control the "cutoff"- pixel values in a layer, values below this cutoff are not used in the images (the preview buttons do show this too). The checkbox allows you to decide which layer(s) you want to de-noise.
16. Gamma Curve checkbox and Gamma thumbwheel control – In addition to the gamma-control this curve allows you to set the gamma-response yourself. By default the relation between image-intensity and output is set to 1 (straight line) equalling a gamma=1 setting. But you can change the shape of the curve by dragging the anchor (red circle) or adding new anchors (right-click) to the line. The curve settings overrules the thumbwheel control until the latter is used again.
Final Processing Screen Many users wanted to do some simple additional processing after the wavelets before saving the images. 1 2 3 4 5 6 7 8 9 1. Controls – Flip X and Flip Y: These are easy ways to flip images around the X and Y axes 2. Rotation – A set of three controls allow easy rotation of the image (the image will be clipped when it shifts over the edge!).
4. Advanced HLS – This allows the change of hue/saturation/lightness for the different colour-bands in the image. You can for instance only saturate the red-orange colours in an image. Or you can make those bluish parts of the image have a lower lightness and become less obvious. The control is alike the gamma control and allows you to add/delete control points at will. You can hover the mouse over the image and see what hue's are under the cursor.
Troubleshooting The Registax screens are cutoff on the monitor display. Registax software is best viewed with you monitor set to 1024 x 768 screen resolution or higher. To check or change your screens resolution, select Display Properties from your computers Control Panel. Registax software can not open my video file? Make sure that the video file you are trying to open has the .avi extension after the file name. If the extension is missing, the software may not be able to recognize the file format.
The normal audio setting on my computer do not work correctly after installing the software? If you experience any problems with audio devices used with your computer, it may be necessary to change your recording device back to their original default setting. From your computer’s Control Panel, select “Sound and Audio Devices Properties” Select the “Audio” and “Voice” tabs and set the recording device back to the original default device that came with your computer.