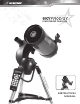
COMPUTERIZED TELESCOPE gy 6 di Pro Sky 76 110 M# ITE SkyProdigy 102 ITEM #22090 INSTRUCTION MANUAL
INSTRUCTION MANUAL TABLE OF CONTENTS INTRODUCTION 4 Warning 4 SkyProdigy Models 5 ASSEMBLY 7 Assembling SkyProdigy 7 Attaching the Hand Control Holder 7 Attaching the Fork Arm to the Tripod 7 Attaching the Telescope to the Fork Arm 8 The Star Diagonal 8 The Eyepiece 8 Focusing 9 Attaching the Hand Control 9 Powering SkyProdigy 9 The StarPointer Finderscope 10 StarPointer Installation 10 StarPointer Operation 10 HAND CONTROL 11 The Hand Control 11 Aligning SkyProdigy 11
Advanced Level Menu Items 16 Database Setup 16 Telescope Setup 17 Tracking 17 Slew Limits 17 Direction Buttons 17 Cordwrap 17 Backlash Compensation 17 StarSense Camera 17 SKYPRRODIGY MENU TREE 19 TELESCOPE BASICS 20 Focusing 20 Image Orientation 20 Calculating Magnification 20 Determining Field of View 20 General Observing Hints 20 CELESTIAL OBSERVING 21 Observing the Moon 21 Lunar Observing Hints 21 Observing the Planets 21 Planetary Observing Hints 21 Observing th
INSTRUCTION MANUAL [Continued] INTRODUCTION SkyProdigy’s Computerized Hand Control has built-in instructions to guide you through all the features needed to have the telescope up and running in minutes. Use this manual in conjunction with on-screen instructions provided by the hand control. The manual gives detailed information regarding each step as well as needed reference material and helpful hints guaranteed to make your observing experience as simple and pleasurable as possible.
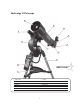
SkyProdigy 102 Telescope 12 1 2 11 3 10 4 6 5 7 9 102 8 1. Optical Tube 7. Tripod 2. StarPointer Finderscope 8. Accessory Tray 3. Eyepiece 9. Hand Control 4. Diagonal 10. Fork Arm 5. Focus Knob 11. StarSense Camera 6. Tube Clamp Knob 12.
SkyProdigy 6 Telescope 1 2 10 3 4 5 9 8 6 7 6 1. Optical Tube 6. Tripod 2. StarPointer Finderscope 7. Accessory Tray 3. Eyepiece (Not Shown) 8. Hand Control 4. Diagonal (Not Shown) 9. Fork Arm 5. Tube Clamp Knob 10.
INSTRUCTION MANUAL [Continued] ASSEMBLY 4MJEF UIF JOOFS QPSUJPO PG FBDI MFH EPXO w UP w JODIFT 3. Adjust the tripod height until the bubble level on the tripod leg is centered (See figure 2-2). 4. Tighten the tripod locking bolts to hold each leg in place. SkyProdigy comes partially assembled and can be operational in a matter of minutes.
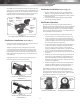
Attaching the Telescope to the Fork Arm The Eyepiece The eyepiece, is the optical element that magnifies the image focused by the telescope. To install the eyepiece: Your telescope optical tube has a built on dovetail mounting bar used to attach the tube to the fork arm. To attach the telescope tube (See figure 2-5). 1. Loosen the thumbscrew on the star diagonal so it does not obstruct the inner diameter of the eyepiece end of the diagonal. 2.
INSTRUCTION MANUAL Eyepieces are commonly referred to by focal length and barrel diameter. The focal length of each eyepiece is printed on the eyepiece barrel. The longer the focal length (i.e., the larger the OVNCFS UIF MPXFS UIF FZFQJFDF QPXFS PS NBHOJöDBUJPO BOE UIF shorter the focal length (i.e., the smaller the number) the higher the magnification. Generally, you will use low-to-moderate power when viewing. For more information on how to determine QPXFS TFF UIF TFDUJPO PO i$BMDVMBUJOH .
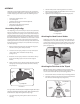
EJPEF -&% JU JT OPU B MBTFS CFBN BOE XJMM OPU EBNBHF UIF HMBTT window or your eye. The StarPointer comes equipped with a variable brightness control, two axes alignment control and mounting brackets. Before the StarPointer is ready to be used, it must be attached to the telescope tube and properly aligned. ! ON/OFF Brightness Control Altitude Adjustment Control Battery Compartment (not shown) StarPointer Installation (SkyProdigy 102) 1.
INSTRUCTION MANUAL HAND CONTROL The Computerized Hand Control t SkyProdigy’s hand controller is designed to give you instant access to all the functions SkyProdigy has to offer. With automatic slewing to over 4,000 objects and common sense menu descriptions, even a beginner can master its variety of features in just a few observing sessions. Below is a brief description of the individual components of SkyProdigy’s hand controller: 5.
Tips for Aligning SkyProdigy Remember the following alignment guidelines to make using SkyProdigy as simple and accurate as possible. t t t 1. Start out by facing the front of the telescope towards an unobstructed part of the sky, free of any bright lights. t 2. Make sure the cap is removed from the camera lens. 3. Press the ALIGN button on the hand control to begin the alignment process.
INSTRUCTION MANUAL SkyProdigy also provides two other alignment methods that can be used instead of the StarSense Auto Alignment. To access the additional alignment methods, Press and hold the OPTION Key and press the ALIGN button. This will display the StarSense Manual Alignment and Solar System Alignment options. Use the UP/DOWN Scroll keys to select either option.
brightest stars, double (Binary) stars, variable stars, and selected asterisms. Refine Alignment Once the telescope is aligned using Solar System Align, you have the option of adding additional alignment objects (either other planets or stars from the Named Star Catalog) in order to improve pointing accuracy. To add an alignment object: 1. 2. 3. 4. 5. 6. t Select the desired object from the Named Star or Solar System database and slew to it. Press the ALIGN button on the hand control.
INSTRUCTION MANUAL 5IF IBOE DPOUSPM IBT B iEPVCMF CVUUPOw GFBUVSF UIBU BMMPXT ZPV to instantly speed up the motors without having to choose a speed rate. To use this feature, simply press the arrow button that corresponds to the direction that you want to move the telescope. While holding that button down, press the opposite directional button. This will increase the speed to the maximum slew rate. coordinates of the object. Press it again to display the text description.
The Basic functions, which are displayed on the hand control when initially powered on, are the commonly used functions that you may need to use every time you use your telescope. These features include updating the time and location information and many utility functions such as changing the backlighting and contrast of the hand control display. Get Version Info o 4FMFDUJOH UIJT PQUJPO XJMM BMMPX ZPV UP TFF the current version and build number of the hand control, camera and motor control software.
INSTRUCTION MANUAL displayed when the IDENTIFY button is pressed. This will not only allow you to set the brightness of the object you want SkyProdigy to identify but also the distance away from its current location. t t Cordwrap o $PSEXSBQ TBGFHVBSET BHBJOTU UIF UFMFTDPQF TMFXJOH more than 360º in azimuth and wrapping cables around the base of the telescope. This is useful any time that the telescope is powered using an external power supply. By default, the cord wrap feature is turned on.
SkyProdigy will then take an image of the sky and calibrate the center of the camera sensor with the star seen in the eyepiece. Note: In order to manually slew the telescope and center a bright star in the eyepiece it may be necessary to first align the StarPointer finderscope with the eyepiece. For instructions on aligning the finderscope, see StarPointer Operation in the Assembly section of this manual.
INSTRUCTION MANUAL SKYPRODIGY MENU TREE The following figure is a menu tree showing the sub-menus associated with the MENU functions.
TELESCOPE BASICS Multiplying 4 by 60 gives a maximum useful magnification of 240 power. Although this is the maximum useful magnification, most observing is done in the range of 20 to 35 power for every inch of aperture which is 80 to 140 times for SkyProdigy 102 . A telescope is an instrument that collects and focuses light. The nature of the optical design determines how the light is focused. Some telescopes, known as refractors, use lenses. Other telescopes, known as reflectors, use mirrors.
INSTRUCTION MANUAL CELESTIAL OBSERVING Other fascinating targets include the five naked eye planets. You can see Venus go through its lunar-like phases. Mars can reveal a host of surface detail and one, if not both, of its polar caps. You will be able to see the cloud belts of Jupiter and the Great Red Spot (if it is visible at the time you are observing). In addition, you will also be able to see the moons of Jupiter as they orbit the giant planet.
urban areas washes out most nebulae making them difficult, if not impossible, to observe. Light Pollution Reduction filters help reduce the background sky brightness, thus increasing contrast. Seeing conditions directly affect image quality. These drawings represent a point source (i.e., star) under bad seeing conditions (left) to excellent conditions (right). Most often, seeing conditions produce images that lie some where between these two extremes.
INSTRUCTION MANUAL TELESCOPE MAINTENANCE position relative to the celestial pole means that it moves very little thus eliminating the need to manually track it. While your SkyProdigy telescope requires little maintenance, there are a few things to remember that will ensure your telescope performs at its best. Before you begin the collimation process, be sure that your telescope is in thermal equilibrium with the surroundings.
4. Use the hand control buttons to move the de-focused star image to the edge of the field of view, in the same direction that the central obstruction of the star image is skewed. 5. While looking through the eyepiece, use a screw driver to turn the collimation screw you located in step 2 and 3. Usually a tenth of a turn is enough to notice a change in collimation.
INSTRUCTION MANUAL APPENDIX A - TECHNICAL SPECIFICATIONS Optical Specification SkyProdigy 102 SkyProdigy 6 Design Refractor Schmidt-Cassegrain Aperture 102 mm 152 mm Focal Length 660 mm 1500 mm F/ratio of the Optical System 6.5 10 Optical Coatings Fully Multi Coated StarBright Coating Highest Useful Magnification 241x 354x Resolution: Rayleigh Criterion Dawes Limit 1.37 arc seconds 1.14 arc seconds .93 arc seconds .
APPENDIX B - GLOSSARY OF TERMS A Absolute Magnitude The apparent magnitude that a star would have if it were observed from a standard distance of 10 parsecs, or 32.6 light-years. The absolute magnitude of the Sun is 4.8. at a distance of 10 parsecs, it would just be visible on Earth on a clear moonless night away from surface light. Airy Disk The apparent size of a star’s disk produced even by a perfect optical system.
INSTRUCTION MANUAL D Declination (DEC) The angular distance of a celestial body north or south of the celestial equator. It may be said to correspond to latitude on the surface of the Earth. E Ecliptic The projection of the Earth’s orbit on to the celestial sphere. It may also be defined as “the apparent yearly QBUI PG UIF 4VO BHBJOTU UIF TUBSTw A telescope mounting using two independent rotation axes allowing movement of the instrument in Altitude and Azimuth.
P Parallax Parallax is the difference in the apparent position of an object against a background when viewed by an observer from two different locations. These positions and the actual position of the object form a triangle from which the apex angle (the parallax), and the distance of the object can be determined if the length of the baseline between the observing positions is known, and the angular direction of the object from each position at the ends of the baseline has been measured.
INSTRUCTION MANUAL APPENDIX C - TIME ZONE MAP 29
INSTRUCTION MANUAL 31
Celestron 2835 Columbia Street Torrance, CA 90503 Tel. (310) 328-9560 Fax. (310) 212-5835 Web site at http://www.celestron.com Copyright 2012 Celestron All rights reserved. (Products or instructions may change without notice or obligation.) This equipment has been tested and found to comply with the limits for a Class B digital device, pursuant to part 15 of the FCC Rules. These limits are designed to provide reasonable protection against harmful interference in a residential installation.