ENGLISH INSTRUCTION & INSTALLATION MANUAL DUCTLESS MINI SPLIT AIR CONDITIONING SYSTEMS © Céliera Corporation. All rights reserved. Unauthorized duplication, reproduction prohibited.
CONTENTS SAFETY PRECAUTIONS................................................................ 1 NAMES OF THE PARTS................................................................ 3 INDOOR UNIT DISPLAY............................................................... 4 EMERGENCY FUNCTION & AUTO-RESTART FUNCTION.................. 5 REMOTE CONTROL.................................................................... 6 MODES OF OPERATION............................................................. 9 PROTECTION.......
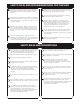
SAFETY RULES AND RECOMMENDATIONS FOR THE INSTALLER Read this guide before installing and using the appliance. Do not install the appliance closer than 50cm from flammable substances (alcohol, etc.) or pressurized containers (e.g. spray cans). During the installation of the indoor and outdoor units, access to the working area should be off limits to children. Unforseeable accidents can occur.
SAFETY RULES AND RECOMMENDATIONS FOR THE USER This appliance has been made for air conditioning domestic environments and must not be used for any other purpose, such as for drying clothing, cooling food, etc. Disable automatic functions if you foresee not using the device for an extended period of time. The air flow direction must also be properly adjusted. The flaps should be directed downwards in heating mode and upwards in cooling mode.
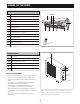
NAMES OF THE PARTS INDOOR UNIT No. Description 1 Front Panel 2 Air Filter 3 Optional Filter (if installed) 4 LED Display 5 Signal Receiver 6 Terminal Block Cover 7 Ionizer Generator (if installed) 8 Deflectors 9 Emergency Button 10 Indoor Unit Rating Label 11 Airflow Direction Flaps 12 Remote Control 6 11 Description 13 Air Outlet Grille 14 Outdoor Unit Rating Label 15 Cover 16 Gas Valve 17 Liquid Valve 9 10 8 7 12 OUTDOOR UNIT No.
INDOOR UNIT DISPLAY 1 No.
EMERGENCY FUNCTION AND AUTO-RESTART FUNCTION AUTO-RESTART FUNCTION The appliance comes equipped with a preset AutoRestart function by the manufacturer. Using this function, the air conditioner can keep the selected settings after a blackout or a voltage drop. To deactivate the Auto-Restart function, perform the following: Emergency Button 1. Switch the air conditioner off and unplug it. 2. Press and hold the emergency button while while plugging it back in. 3.
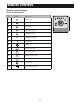
REMOTE CONTROL NOTE: The Remote controls all functions of the system. If it is lost, the system can still function using the EMERGENCY BUTTON, but certain functions will not be accessible. ON/OFF Button Starts and stops operation TIMER Button Selects TIMER operation Setting Display Transmitting Icon (ÝC ÝF ) Temperature ( h ) Timer Setting Mode Signal Transmitting Window Transmits signals to the system.
REMOTE CONTROL Remote Control Display Guide to LCD Symbols No.
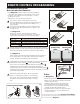
REMOTE CONTROL PROGRAMMING Preliminary Instructions How to Insert the Batteries 1 See Diagram 1: Remove the cover from the battery compartment by sliding it in the direction of the arrow. Insert the new batteries, ensuring that the (+) and (-) symbols are correct. Replace the cover by sliding it into place. Use 2 LRO 3 AAA (1.5V) batteries. Do not use rechargeable batteries. Replace the old batteries with new ones of the same type when the display is no longer legible.
MODES OF OPERATION This air conditioner is designed to create a comfortable climate for individuals in the affected room. All models can cool and dehumidify the air completely automatically and some models can also provide heat using either a heat pump or electric heat. Filter Heat Exchanger Air pulled by the fan enters through the grill of the front panel and passes through the filter, which traps dust inside.
MODES OF OPERATION COOLING MODE The cooling function allows the air conditioner to cool the room while dehumidifying the air at the same time. To activate the cooling function (COOL), press the MODE button until the symbol (COOL) appears on the LCD display. The cooling cycle is activated by using the or keys to set the system to a temperature lower than that of the room. To adjust the system to an optimal level, set the temperature, the speed, and the direction of air flow using the correct keys.
MODES OF OPERATION TIMER MODE - TIMER ON The TIMER function allows the system to automatically switch on. To set timed start, the system should be turned off. Press TIMER, set the desired temperature by pressing the or buttons. Press TIMER again and set the amount of time, again using the or buttons. Press TIMER again until the display shows the amount of time entered until the programmed TIMER start. The timer is now set.
MODES OF OPERATION FAN MODE The system can be set to run in FAN mode, providing ventilation only. To run the system in FAN mode, press the MODE button until the FAN symbol appears on the display. Pressing the FAN button while in this mode changes the fan speed to LOW, MEDIUM, HIGH, or AUTO. The remote control will automatically save the last fan speed setting from the previous time the system was in operation.