CellarMate The Key to Wine Cellar Climate Control Installation, Operation, and Maintenance Manual Please read the following information, especially the safety information, to ensure that you receive the maximum benefits of owning a CellarMate,
CUSTOMER WARRANTY REGISTRATION Please complete and mail the Product Registration Card with a copy of your purchase receipt. By registering your product, you will automatically be enrolled in our Consumer Protection Program and receive the following: Product Safety Notification Registering your product allows us to contact you with updates and notifications about your CellarMate model. Confirmation of Ownership We store model numbers, serial numbers, and owner information in our archives for ten years.
Table of Contents OVERVIEW OF THE CELLARMATE UNIT............................................................................................................. 4 DIMENSIONS.................................................................................................................................................................. 5 PRODUCT SPECIFICATIONS.....................................................................................................................................
Overview of the CellarMate Unit Evaporator Section Cool air is supplied to the wine cellar through any of three outlets. Return air from the cellar enters the evaporator coil section. A drain pan is located directly below the evaporator coil to capture condensate and is fabricated from aluminum to prevent corrosion. Condensing Section Ambient air is circulated through the condenser section, and can be discharged through any of three outlets.
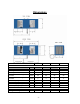
Dimensions Model Number Dimensions - Nominal A - Width B - Height C - Length D – Condenser Discharge Location E - Evaporator Discharge Location F - Inlet Opening Width G - Drain Opening Location H - Discharge Opening Width I - Inlet Opening Height Weight Refrigerant charge - 134a 25 50 88 200 Inches Inches Inches 14 14.5 36 22 14.5 40 22 14.5 40 22 18 43 Inches 23 25 25 26 Inches Inches Inches Inches Inches 5 10.63 19 8 11.28 5 10.63 21 10 11.28 5 10.63 21 10 11.28 5 18.88 24 11.
Product Specifications The CellarMate is designed to operate at or above its rated capacities for total BTUH and CFM under recommended conditions.
Safety Considerations When performing maintenance, always use the following Lockout/Tag-out Procedure. More than one power source may be present. Disconnect all power sources. Lockout/Tag-out Procedure • Turn power switch to OFF. • Lights should be off. • Unplug unit from electrical outlet. WARNING • • • • • • • • • • • • • • • • • Never reach into a unit while the fan is running. Never open an access door downstream of the fan while the fan is running. Do not expose the unit to rain or moisture.
Pre-installation Procedure Pre-installation Test Before installing your CellarMate unit, use the following procedures to test for non-visible shipping damage. • Set the unit on the floor or on a sturdy level surface. • Confirm that both blower impellers spin freely. Spin both blowers and observe any interference; blowers are lubricated and should spin rapidly when spun. • Plug the power cord into an outlet. • Turn the main power switch to ON. The power indicator light should be on.
• • output from the system. Total duct work is recommended not to exceed 50’. If longer runs of duct are required, secondary fans must be used to maintain CFM output. o The condensate drain line needs to be considered when selecting an installation site. o Unit should be level with the top side up during operation. The unit is designed to operate with an ambient (air intake) temperature of 40 deg to 90 deg F. All required parts are on-hand. o The electrical plug and outlet have the correct configuration.
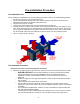
Mechanical Installation Options The following installation instructions and diagrams are for general ideas only. They are not intended to be a complete and detailed guide for installation. The Cellarmate 025 model is designed to fit between studs. Floor Mounting Elevate the CellarMate on a 2”x4” frame with a plywood surface to protect it from water. This will allow adequate space for the external drain.
Installing the Ductwork The following installation instructions and diagrams are for general ideas only. They are not intended to be a complete and detailed guide for installation. DO NOT EXCEED A TOTAL OF 25’ FOR EACH LENGTH OF DUCTWORK RUN, OR 50’ TOTAL. Place the unit as close to the wine cellar as possible to reduce the length of the duct runs. Use straight, short ducting. To prevent transmitting vibration and noise, add ¼” thick rubber pads.
• • • • • • • • • • • • • Support the flexible duct often to prevent sags or bends. (Place supports close enough to prevent the flexible ducting from sagging or bending). Stretch the duct to create a smooth interior and reduce air resistance. Rigid ductwork is best. Insert a metal elbow in the flexible duct at 90° bends to maintain form. Use straight and short lengths of ductwork. Review the Air Flow Illustration on page 8 for duct connection options.
Schematic - 13 -
Maintenance General Maintenance WARNING Before performing maintenance on the unit, read the safety information contained within the safety chapter of the CellarMate Manual. High voltages are present in the cabinets. Turn all power OFF. Use the Lockout/Tagout procedure before opening panels. Maintenance on CellarMate units requires working with high voltage and sheet metal with sharp edges. Only qualified personnel should perform maintenance.
Troubleshooting IMPORTANT This section is intended as a diagnostic aid, only. For detailed repair or parts replacement procedures, contact a qualified service company. Check the following table before calling a service technician. PROBLEM POSSIBLE CAUSE SOUTION Start Up General Problems Loose, improper, or defective thermostat or humidistat wiring Check power and thermostat or humidistat wiring.
Power Switch Light is On and the Thermostat Light is On Thermostat is not setup properly Check wiring for loose, broken, or frayed connections. Check thermostat setup in the included guide. Press fan ON switch to manually check evaporator fan. Compressor not operating Wait several minutes. Compressor has a timer installed on access panel to delay start up (factory set: 5min).
Cellar Humidity Humidity Too Low or Supply Air is Too Cold, Without Optional Humidifier Not enough evaporator air flow Remove blockage in supply or return ductwork Check and clean filter and coil Coil frozen—shut-off unit for two hours Defective Thermal Expansion Valve If under warranty, call for service If not under warranty, call a refrigeration technician No moisture being added to cellar Add CellarMate humidifier or a room humidifier Defective Thermal Expansion Valve If under warranty, call for
High Pressure Switch in the Refrigeration System Switch Shuts off Unit The head pressure is above 275 psi Restricted air flow through the condenser caused by an obstruction blocking the air flow in the ductwork or grille Dust covering the filter Contact a refrigeration technician Advanced Troubleshooting IMPORTANT This section is for qualified refrigeration service technicians, only. The technician should repeat the previous troubleshooting steps before these more technical solutions.
CellarMate Warranty General CellarMate LLC warrants to the original buyer its goods and all parts there of to be free from defects in material and workmanship for one year from the date of invoicing assuming NORMAL USE AND SERVICE. Liability CellarMate LLC liability shall be limited to the repair or replacement (at its option) of any part, which, at our sole discretion, is determined to be defective. The purchaser shall pay all transportation costs.