LED C19EFF-LED C22EFF-LED C24EFF-LED
4 5 6 7- 8 9 9 10 10 11 11 12 12 13 14 14-15 15 16 16 16 16 16 16-17 18 18-19 19 20 20-21 21-22 22 23 23 23 24 Block Program 25 25 25 26 26-27 27 28 28 28 29 29 30 30 31 1
32 32 32 33 33 33 33 34 35 35-36 36-37 37 38 39 39-40 40 DVD Operation General Setup Audio Setup Dolby Setup Preference Setup Disc Care 41 41 42 42 43 44 45 45-46 46 46 46 46 47 48-49 50 2
your new 19"/ 2 2 " / 2 4 " HD Ready LED TV.
LED LED To install the base stand first make sure you position the front of the base stand facing towards the front of the TV and then use the 4 supplied screws to fix the base stand to the TV. The screw holes will only align if the front of the base stand is facing towards the front of the TV Remove the stand base before wall mounting the TV. Remove the 4 screws that secure the stand base to the TV. Remove the stand base by sliding it out.
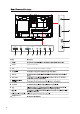
STANDBY 9 SOURCE MENU 8 7 6 5 PVR timer 8 EJECT Eject PLAY Play SOURCE ATV,DTV,USB,AV,PC,YPbPr,DVD,SCART,HDMI1,HDMI2.
Headphone out STANDBY SOURCE Power PC Audio in Mini AV Mini YPbPr Digital Audio out TV Aerial Power Connect to power supply. VGA Connect to the PC VGA output to display PC graphics.
Mute Mute sound Power Turn on or standby DTV Switch to Freeview Digital ATV Switch to Analog TV CHANNEL PICTURE SOUND TIME LOCK SETUP This displays a page that gives telephone numbers for service. Press to enter, press again to exit. Exit from any menu Increase and decrease the volume Increase and decrease the channel number The action is shown on the menu and changes for each menu.
Radio Switch between TV and Radio Quickstart Searches all ATV and DTV channels NUMBER BUTTONS Press 0-9 to select a TV channel directly when you are watching TV. The channel change after 2 seconds. HDMI Select the HDMI mode directly. Thumb stick ( / / / Back to last channel / OK) Allows you to navigate the on-screen menus and adjust the system settings to your preference.
9
Mini YPbPr Mini AV Headphone out USB HDMI Common Interface 10
SCART Power VGA PC Audio in Mini AV Mini YPbPr Digital Audio out TV Aerial 19"(1366 x 768) 22"/24"(1920 x 1080).
SCART Power VGA PC Audio in Mini AV Mini YPbPr Digital Audio out TV Aerial Mini AV SCART 12 Power VGA PC Audio in Mini AV Mini YPbPr Digital Audio out TV Aerial
SCART Power VGA PC Audio in Mini AV Mini YPbPr Digital Audio out TV Aerial 13
Connect your headphones to the TV’s Headphone out socket.
Please ensure your aerial is plugged into the TV.
ATV,DTV,USB,AV,PC,YPbPr,DVD,SCART,HDMI.
17
18
Programme Edit Programme Edit 19
Programme Edit 20
Headphone out USB HDMI1 CI HDMI2 21
30 22
NICAM STEREO Sound Sound 23
24
25
Block Program Block Program Block Program 26
27
DVD SETUP Software Update(USB) DVD SETUP Software Update(USB) 28
DVD SETUP Software Update(USB) DVD SETUP Software Update(USB) 29
DVD SETUP Software Update(USB) Just scan (in HDMI mode only) This selection will detect the resolutionof the HDMI signal and display an image. with the same number of pixels This selection will detect the resolution of the HDMI signal and display an image.
Fist Time Installation DVD SETUP Software Update(USB) Please ensure your aerial is plugged into the TV. Country DVD SETUP Setup the DVD menu. DVD SETUP Software Update(USB) 0845 6040105.
39-40 32
33
Headphone out USB HDMI1 CI HDMI2 USB output: DC 5V 34 500mA
35
MUTE Info. Audio-1KHz0dB.
Slow Forward / Step Forward / Goto Time / Zoom in / Zoom out / Aspect Ration.
38
Rec Rec PROGRAMME GUIDE Rec 39
40
DVD Operation DVD SETUP Software Update(USB) 41
42
43
2 44
Mute 45
0i 576i 1080i 480i 576i Just Scan 1080i 46
C19EFF-LED 18.5 inch LED Panel C22EFF-LED 21.5 inch LED Panel 1366 (H) x 768(V) pixels 1920 (H) x 1080(V) pixels PAL I / BG / DK / SECAM BG / DK PAL I / BG / DK / SECAM BG / DK 200 200 1000:1 600:1 B 47 23.6 inch LED Panel 1920 (H) x 1080(V) pixels PAL I / BG / DK / SECAM BG / DK 230 1000:1 B (18.5 inch) 32 W 35.04 0.5 W Vesa Wall mounting size / Screw size C24EFF-LED 55 B (21.5 inch) 38 W 43.8 0.5 W 60 (23.6 inch) 44 W 51.1 0.
LED LED LED LED 48
This TV is fitted with the latest ECO friendly power saving technology. If whilst viewing the TV remote control is not used for a period of 4 hours, the Auto Standby feature will operate and power down the TV. A warning message will be displayed to inform you that the TV isabout to power down.
It fullfils the following EU regulations: 50