C39222DVB-DLED
8 9 9 0 0 Selecting Input Source..................................................................................................................................................................................................16 Auto Installation...............................................................................................................................................................................................................16 Picture Menu..........................................
Feature Menu..............................................................................................................................................................................................................22-27 - Lock...........................................................................................................................................................................................................................23 - Language..................................................
12
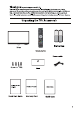
Limit Front Base cover Screw holes Screws 5 M 6
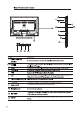
2/3/4 To connect to the audio sockets on the audio system.
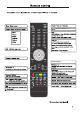
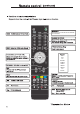
Switch to Satellite TV * Sound options
Searches all TV channels for the selected TV connection.
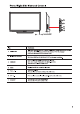
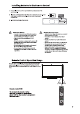
Plug the connected devices into the mains socket before powering on the TV. Press the STANDBY button on the right hand side rear of the TV or the button on the remote control to turn on your TV.
Plug the connected devices into the mains socket before powering on the TV. Press the STANDBY button on the right hand side rear of the TV or the button on the remote control to turn on your TV. on the right hand rear of the 1920x1080. on the right hand rear of the TV Plug the connected devices into the mains socket before powering on the TV. Press the STANDBY button on the right hand side rear of the TV or the button on the remote control to turn on your TV.
HDMI1 Plug the connected devices into the mains socket before powering on the TV. Press the STANDBY button on the right hand side rear of the TV or the button on the remote control to turn on your TV. Plug the connected devices into the mains socket before powering on the TV. Press the STANDBY button on the right hand side rear of the TV or the button on the remote control to turn on your TV.
Plug the connected devices into the mains socket before powering on the TV. Press the STANDBY button on the right hand side rear of the TV or the button on the remote control to turn on your TV.
HDMI1 Ariel socket on the rear right of your TV. Power on the TV , the TV switches to the standby mode. The red LED indicator will illuminate on the front panel of the TV. The STANDBY button is located on the right hand rear of the TV.
Plug the connected devices into the mains socket before powering on the TV.
7. Menu Operation Select Input Source Input DTV ATV AV SCART YPBPR HDMI1 HDMI2 HDMI3 PC Media Press the SOURCE button on the remote control to display the input list. Press the ▼/▲ buttons on the remote control to select the source. Press the OK button or the ► button to activate the source. Quick Start When you initially power on the TV, you will see the Quick Start menu as below. Navigate with the ▼/▲ buttons and Press the OK button to confirm your option. 1.Choose your Language. 2.Choose your country.
5.Ensure all cables are connected. 6. Choose your power saving mode. Quick Start Quick Start -4- -2Home Mode: QUICK START: Please ensure the aerial is plugged Max Brightness Home into the TV. Now choose “OK”, the TV will tune all Max Economy channels, pls wait OK Cancel OK OK Target Region Descriptor During tuning your TV may have received signals from more than one transmitter. If this has occurred the Target Region Descriptor screen will be displayed.
Sharpness Press ▼/▲ button to select Sharpness, then press OK button or ► button to enter and press◄/► button to adjust. Colour Press ▼/▲ button to select Colour, then press OK button or ► button to enter and press◄/►button to adjust. Tint (NTSC mode only) Press ▼/▲ button to select Tint, then press ◄/► button to enter and press ◄/► button to adjust. Colour Temperature Press ▼/▲ button to select Colour Temperature, then press / button to select standard, warm, cool.
Balance Press ▼/▲ button to select Balance, then press OK button or ► button to enter and press ◄/► button to adjust. SRS TruSurround HD Press ▼/▲ button select SRS TruSurround HD, then press OK button or ► button to enter and press ▼/▲ button to select On or Off. Channel Menu Press MENU button to display the main menu. Press ▼/▲ button to select Channel in the main menu, then press OK button or ► button to enter.
Press red button to set the current channel to lock. if the current channel already lock, press red button again will unlock. Press green button to set the current channel to delete. if the current channel already delete, press green button again will delete cancel. Press yellow button to skip the current channel. Use the cursor buttons to select the channel you wish to skip. Press yellow button and will be shown at the channel selected. To remove the skip function, press the yellow button again.
Note: Channel name is 8 characters. Press green button to switch the size of the letters. Press▼/▲ or /◄/►button to select the character, then press OK button to confirm selection. Press EXIT button, the menu will appear as follows: Message TV Please confirm saving? Save successful OK Cancel Exit the entire menu if select “Cancel ” and press OK button. Save successful if select “ OK ” and press OK button.
Channel Tuning ATV channels found: 5 DTV channels found: 21 Radio ch annels found: 6 Picture Sound Channel 270.00 MHz Feature Setup ATV 30% Process 15% Mennu Skip Exit Exit When auto search finish, the save successful menu will appear a few second. DTV Manual Search Press ▼/▲ button to select DTV Manual Search, then press OK button or ► button to enter.
Feature Picture ENTER ENTER Clock ENTER Sleep Timer Off Auto Standby 4 Hours Sound Channel Lock Language Hearing Impaired Off CI Info ENTER PVR/Timeshift ENTER Feature Setup Move Enter OK ok Exit Exit MENU ► ► ► ► ► ► ► ► Return 1. Press ▼/▲ button to select the option that you want to adjust in the Feature menu, then press OK button or ► button to enter. 2. Press ◄/► button to adjust or press ▼/▲ button to select. 3.
Press ▼/▲ button select the Hotel Mode, then press OK or ► button to enter Hotel Mode. Hotel Lock Channel Lock Picture Lock Sound Lock Feature Lock Setup Lock Key Lock Source Lock Set Source Channel Number Max Volume Default Volume Off Off Off Off Off Off Off --> Off Off Off Off Next Page --> Hotel Lock Use ▲▼ to select the Hotel Lock, use ◄►to select On/Off. On: Select Hotel Lock the following sub-menu. Off: Unable to select Hotel Lock submenu.
Language Press ▼/▲ button to select Language, then press OK button or ► button to enter submenu. Feature - Language Picture Sound Channel OSD Language English Preferred Subtitle English Preferred Audio English DTV Teletext Language English ATV Teletext Language West ► ► ► ► ► Feature Setup Move OK ok Enter Exit Exit MENU Return OSD Language :Press ▼/▲ button to select OSD Language, then press OK or ► enter and press ▼/▲ button to adjust.
Feature - PVR/Timeshift Picture Timeshift Buffer Auto Timer Enter Record List Enter ► ► ► ► ► Recorder Start Enter ► Sound Channel Partition Select ENTER Auto Timeshift Off Feature Setup Move OK ok Enter Exit Exit MENU Return OK Partition Select: Press OK button enter the submenu , then press ▼/▲ button to select partition. Auto Timeshift: Select the Auto (Start auto Timeshift) /Off (Stop auto Timeshift). Timeshift Buffer: Select the Auto, 30Mins, 1hr or 2hr.
Recorder Start Press OK button to enter the recording menu and start record. Press or select Stop to stop record. Message Message Do you want to start Recording? OK button on the remote control Initializing Recorder... Cancel (Confirm record window) (Initializing recorder window) 0002 YLE TV2 REC MB Free: 5295 00:02:58 Setup Menu Press MENU button to display the main menu. Press ▼/▲ button to select Setup in the main menu, then press OK button or ► button to enter.
PC Setup(Select the source in PC) Setup Picture Auto Adjust ENTER H Position 50 V Position 50 Phase 50 Clock 50 Sound Channel Feature Setup Move OK Enter MENU Return EXIT Exit Auto Adjust: Press ▼/▲ button to select Auto Adjust, then press ► button, the menu will appear a few second. H Position: Press ▼/▲ button to select H Position, then press ► button to enter and press ◄/► button to adjust. Adjusts the picture horizontally.
1. Press ▼/▲ button to select the option that you want to adjust in the Media menu, then press ENTER or ► button to enter. 2. Press ▼/▲ button to adjust or press ▼/▲ button to select. 3. After finishing your adjustment, press MENU button to save and return back to the previous menu and press EXIT button to exit the entire menu. Press ▼/▲ to select the photos, press ENTER or button or ► button to view.
You can see the information of the current playing sonny at the left of the menu. Moive Menu Press ◄/► button to select Movie in the main menu, then press ENTER button to enter. Press EXIT button to return back to the previous menu. Press ▼/▲ button to select the folder that you want to view. Press ENTER button to select the sub folder.
Andrew Sixty Unknown Press ENTER button or button to play, Press button or EXIT button to stop playing. Press the button to return back to previous page. You can see the information of the current playing media at the first flew second or after press INFO button. e-book Press ◄/► button to select Music in the main menu, and then press ENTER button to enter. Press EXIT button to return back to the previous menu. Press ▼/▲ to select the Video, press ENTER or button or ► button to play.
32
33
1366 x 768 34
C39222DVB-DLED 39 1920 1080 280 1500:1 99cm(39 inch) 90W 200x200mm / M6x 8 8W + 8W 889 *227.4*592.4mm 889 *100*527.4 mm 8.
36
SRS TruSurround HD™ creates an immersive, feature-rich surround sound experience from two speakers, complete with rich bass, high frequency detail and clear dialogue. TruSurround HD, SRS and the symbol are trademarks of SRS Labs, Inc. All trademarks are the property of their respective owners and all rights are acknowledged.
38