TTX38 User Manual 1
YOUR PHONE ................................................................................................................................ 5 STANDBY MODE .............................................................................................................................. 6 GETTING STARTED ....................................................................................................................... 6 INSTALLING THE SIM CARD AND THE BATTERY ..................................................
MESSAGING ................................................................................................................................ 16 WRITE MESSAGE ......................................................................................................................... 16 INBOX.......................................................................................................................................... 16 DRAFTS .............................................................................
NETWORK SETTINGS .................................................................................................................... 24 SECURITY SETTINGS ..................................................................................................................... 24 CONNECTIVITY ............................................................................................................................. 24 Bluetooth (BT)................................................................................
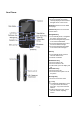
Your Phone Left/Right soft Key • Press to perform the function currently displayed in the bottom left/right corner of the screen. Home Key Press to access WAP homepage Camera Key Press to access the camera menu. Navigation Key • In the standby mode, Navigation Key UP to access the STK • Press the Navigation Key Down to access the Multimedia. • Press the Navigation Key Left to access the write message • Press the Navigation Key Right to access the File manager.
Standby mode In the main display, you may see several icons displayed on your status bar. The meaning for each icon is explained below: Vertical bars indicate the signal strength of the GSM network signal. Indicates the battery charge level. Indicates your phone is locked. Indicates your phone uses the alert type of “Ring”. Indicates your phone uses the alert type of “Vibrate and ring”. Indicates your phone uses the alert type of “Vibrate then ring”. Indicates your phone uses the alert type of “Vibrate”.
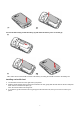
(1) (2) 2. Insert the SIM card (3), install the battery (4) and attach the battery cover as shown (5). (3) (4) (5) Note: make sure that the metallic contacts of the battery are facing the metallic contacts in the battery slot. Installing a microSD Card 1. The microSD card slot is on the right side of your phone. 2. With the metal contacts facing to the metal contacts in the slot, gently slide the SD card into the slot and press down until the card locks into place (6).
(6) Charging the battery You must fully charge the battery before using your phone for the first time. 1. Connect Charger cable to the micro charger port on the right of your phone. 2. Connect charger to an AC wall outlet. When all the battery scroll bars are steady, the battery is fully charged. You can then disconnect the charger. Switching the phone on and off • Press and hold the Power Key. Notes: 1. You can also use the phone without SIM card.
Call Waiting If you want to answer another incoming call, you should activate the call waiting function for the SIM at first. During a call, press the Answer Key to answer the new incoming call. You can swap back anytime by pressing the Left Soft Key (LSK) and select Swap. Input Method You can key in text by pressing the keypad. To select an input method Before you key in text, press Options and select Input Method, or you can press shift key to switch input Method.
Dialed Calls To view Dialed Calls In Call center menu, choose Call history > Dialled calls, and press the Navigation Key up and down to view the records. Received Calls To view Received Calls In Call center menu, choose Call history > Received calls, and press the Navigation Key up and down to view the records. Delete call logs Your phone allows you to delete Records from the Missed Calls list, Dialed Calls list, Received Calls list, or All Call lists.
• Call Barring: Allows you to restrict incoming calls and outgoing calls from your phone. • Closed user group: This is a network service. Advance settings • Blacklist: Allows you to filter and block incoming calls for certain contacts you defined. • Auto redial: If it is on, your phone will make a maximum attempts to connect the call after an unsuccessful call attempt. • Background sound: Allows you to set the background sound when you make a call.
You may choose to view your images in List Style or Matrix Style. To change the storage, please select Options and select Storage. Video Recorder You can record a video clip through the built-in camera. The status of your video recorder setting will be displayed on the top of the preview mode. To start using Video Recorder 1. In Multimedia menu, select Video Recorder. 2. Press the Left Soft Key to personalize your setting; otherwise, you might start video recording by press the Camera Key. 3.
Audio Player Your phone provides you a friendly music player device for entertainment purpose. You may also download the music content via USB or other connection. Music tracks must be saved in My Music folder in File Manager in order to be automatically detected and added into the default play list. You may listen to the music through the headset or loudspeaker. The user-friendly interface is specially designed to enable users to control, play, pause, and stop the music player as you wish.
2. From main menu, choose Multimedia >FM Radio. 3. If FM is off, press the Navigation Down Key to turn on the FM radio. 4. You can choose to either turn on or off the auto search by pressing the Navigation Up Key. 5. Press the Navigation Left or Right Key to start searching. Your phone provides the following selections for your option: • Channel list: Allows you to bookmark up to 9 radio stations by entering the channel name and frequency. You can have quick access to 9 radio stations by Numeric Key.
1. From the main menu, select File Manager. You may see one more drive named Memory Card if you insert the T-Flash card in. 2. Scroll to the menu to Phone and press Options to open options list. 3. When you choose Open, you will see a list of the folders. Note, some folder, such as My Music may be hidden until you enter the menu of Music Player. Note, the Java applications folder lists the JAVA applications you have installed.
• Speed dial: If you assign the number to one of the speed dialing Keys (from the key 2 to key 9) saved in the phonebook list, you can dial the phone number by pressing and holding the key in the standby mode. First, you should turn this feature on, and then set the number by associating with a contact. • My Number: Allows you to define number or name. • vCard version: Allows you set the vCard version.
Outbox Your phone saves the messages Unsent in the Outbox folder. Sent messages Your phone saves the messages sent successfully in the Sent messages folder. Archive Archive box lists all the messages you’ve moved from other boxes to the message archive. Delete messages You are able to delete all messages in a folder or even all messages at once. Email To create an account 1. 2. 3. 4. 5. First, you must create the data account.
1. Press the option key, select the option 1: Install 2. Enter the security certificate name 3. Select Done. Note: If you sent email trough Gmail, you have to install the certificate, please contact your Gmail operator for more information. Voicemail server Your phone allows you to access your voice mailbox quickly if your operator supports this function. Your voice mail number will be provided by your service provider and displayed in the phone.
• • • • Creation Mode: If you select Restricted, the device prevents you from sending messages that may not be supported. To include content in your message without notifications, select Free. Picture Resizing: Define the size of the image in an MMS. Auto Signature: Define whether you want to add a signature at the end of an MMS automatically. Signature: Define the signature that you want to be added. • Sending: This setting contains the options, such as priority, delivery report, and so on.
2. Select Edit to set alarm time. First, you should turn it on. 3. To set the alarm, directly input the hours and minutes via the Numeric Keys. 4. Choose Once/Everyday/Custom in Repeat option for your ring mode. 5. In Alarm Tone option, you may customize the alarm tone from Tone selections provided or from an FM Radio channel. Press the Navigation Left/Right Keys to switch between Tone / FM radio options. 6.
Pedometer Pedometer is a tool that gauges the approximate distance traveled on foot by registering the number of steps taken. 1. Select Organizer > Pedometer > Step length setting. 2. Enter the approximate distance of one step. Then select OK to save your settings. 3. Select the submenu Start to start.
Input Address You can key in the URL address. When you are done, select Options > Done. Your phone will connect the URL you just keyed in. After the address is entered, you may select the URL and select Options > Go to to connect next time. Service Inbox WAP push messages are saved here. Settings GPRS (General Packet Radio Service) is a technology that use for sending and receiving data over the mobile network. WAP Setting If the settings have made by the service provider, you may begin immediately.
Settings Phone Setting Time and date This function allows you to set your home city, view and change the time and date settings in your phone. You can also choose to auto update the date and time. Schedule power on/off You are allowed to schedule the power on and off time for 4 different time settings. Language This phone allows you to set a language for the display in this phone. In Settings menu, choose Phone settings > Language.
Auto update of date and time You can set on or off. Flight mode Select from Normal mode, Flight mode and Query when power on . Misc. settings This menu allows you to set the LCD backlight. Silent motion If Silent motion is on, you can set the silent mode in standby mode by motion. Network Settings Here you can search the network, set your preferred network, change the GPRS connection. Security settings This function allows you to activate password to protect your phone against unauthorized use.
• Remote control • My device • Active devices • Settings • About Power 1. In Settings > Connectivity. 2. Select Bluetooth. 3. Select Power to switch on/off the Bluetooth connectivity. Inquiry Audio Device To pair with BT audio device, follow the steps below: 1. In Settings menu, choose Connectivity > Bluetooth. 2. You will have to power on the Bluetooth connectivity of your phone and the device you wish to connect first. 3.
To receive data using Bluetooth connectivity When you receive data through Bluetooth, a notification message will be popped up to ask if you are willing to accept. If you decide to receive the message, press Yes and the data will be saved in Received folder of File Manager. To listen to stereo music 1. In Settings menu, choose Connectivity > Bluetooth. 2. If you have already paired the stereo Bluetooth headset, please go to My Device and select the headset you wish to connect.
Shortcuts This function allows you to set the shortcuts feature. User profiles Your phone provides 6 different profiles, including general, meeting, outdoor, indoor, headset, and Bluetooth profiles. Note: If you customize the alert type, the indication icon may be changed. The Headset profile can only be activated when the headset is plugged in. The Bluetooth profile can only be activated when the Bluetooth headset is connected. To activate a Profile 1. In Profile menu, select a profile. 2.
GENERAL Information Accessories There are various accessories for your mobile phone. Your pack will include standard battery x 1, headset x 1, and travel adapter x 1. Please note: • Use only accessories and charging devices approved by the phone manufacturer otherwise you would risk serious damage to health and property. • Failure to do this may invalidate your warranty. • Accessories may be different in different regions. GPRS/EDGE Note, Only RX supports EDGE, only TX supports GPRS.
Use qualified after sales service Only a qualified technician can repair your cellular phone. Accessories and batteries Only use the authorized accessories and batteries and do not connect to incompatible products. Waterproof Your cellular phone is not waterproof. Please keep it away from water. Backup Remember to make a backup or keep a written record of all important information saved in your cellular phone.
good, please temporarily shut off your phone. Need to change battery. Insert a new battery. When you cannot receive signals, your cellular phone will continue to send to find a basis. A lot of battery power is used, so as to limit idle time. Please move to an area where the signal is strong or temporarily turn off your phone. Cannot switch on Battery is drained. Check battery volume or charge battery. Wrong SIM card SIM card is damaged. Contact your operator. SIM card is not inserted properly.
SAFETY INFORMATION AND NOTICES Using the Cellular Phone and Charger Danger: Only use the battery and charger approved by the manufacturer. Using other brands may cause battery leakage, overheating, explosion or even fire. Caution: Keep the phone away from dust, water and damp areas. Dust, water or other liquids may cause overheating, electrical leakage, and/or phone failure. The phone, battery, charger and AC adapter are not waterproof. Keep them away from liquid.
or even fire. Battery liquid is severely harmful for your eyes. If battery liquid gets in your eyes, do not rub them. Instead, wash your eyes with water first and then go directly to a doctor for help. Do not use or store your phone in high temperature areas. This may cause battery leakage, overheating, explosion or even fire. Warning: Replace the battery when the normal usage time begins to decrease or if you notice the battery is overheated or has changed shape or color.
Requirements for the Charger and AC Adapter Do not charge your phone under the following circumstances: sunlight, temperatures equal to or lower than 0ºC, temperatures equal to or higher than 40ºC, high humidity, dust, high vibration areas, or near a TV, a radio, etc. Specific Absorption Rate (SAR) information The SAR limit of USA (FCC) is 1.6 W/kg averaged over one gram of tissue. This model (FCC ID: T38UT2097B) has also been tested against this SAR limit.
Product subjected to abnormal use or conditions, accident, mishandling, neglect, unauthorized alteration, misuse, improper installation or repair or improper storage; Product whose mechanical serial number or electronic serial number has been removed, altered or defaced.
5535 Eglinton Avenue West Suite# 234 Toronto, ON M9C 5K5 (800) 465-9672 35