Preface Thank you for purchasing this cellular phone. To guarantee your cellular phone works properly, please follow the instructions in this manual to prevent any possible incidents or malfunctions. Follow all safety warnings to avoid injury or property damage. Screen displays and illustrations in this user’s manual are designed to help you to operate your phone. We continuously strive to improve our products.
Contents CAMERA & CAMCORDER ...............................................35 PREFACE ................................................................................. 1 FM RADIO .............................................................................37 INTRODUCTION ................................................................... 3 PALRINGO ............................................................................39 GETTING STARTED .............................................................
SOUND RECORDER............................................................ 71 SAFETY INFORMATION AND NOTICES ......................75 VIDEOS .................................................................................. 72 12 MONTH LIMITED WARRANTY .................................80 TROUBLESHOOTING ........................................................
Important safety precautions Failure to comply with the following precautions may be dangerous or illegal. Please carefully read and observe the terms below: Safe power on Do not use your mobile phone where it is forbidden to use or you might cause a disturbance or danger. Safe transportation first Please observe all related local laws and regulations. Please drive with both hands. Transportation security should be considered when driving.
Waterproof Your mobile phone is not waterproof. Please keep it away from water. Turn off around exposure Area Please observe related limitations and do not use your mobile phone around an area where explosions can occur. Backup Do remember to make a backup or keep a written record of all important information saved in your mobile phone. Proper use As described in this manual, your mobile phone can be used only in right location. If possible, please do not touch the antenna area on your phone.
Introduction Phone Display Packaging There are various accessories for your cellular phone. Your pack will include standard battery x 1, charger x 1, data cable x 1, and user manual x 1. Please note: Only use accessories and charging devices approved by the phone manufacturer, otherwise there is a risk of serious damage to health and property. Failure to do this may invalidate your warranty. Accessories may vary by region.
Key Key Function HOME Key - MENU Key - BACK Key - - Search Key - Power / Lock key Press to return to the Home screen from anywhere on your phone. Press and hold to bring up the recent applications window. Press to open a list of actions available in the current screen. Within a menu, press to return to the previous screen, or to dismiss a dialog box or menu. When the onscreen keyboard is open, press to close the onscreen keyboard.
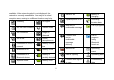
available. If the network symbol is not displayed, the network is currently unavailable. You may be in a bad reception area; moving to a different location may help.
phone memory full An open Wi-Fi network is Connected to VPN Phone is connected via USB cable Disconnected from VPN Song is playing Notifications When you see a notification in the status bar, touch the bar and slide your finger down the screen to open the list of notifications displayed in the sliding window. Note: You can also open the Notification panel in the Home screen by pressing MENU and then touching Notifications.
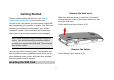
Remove the back cover Getting Started Make sure that the phone is turned off. You need to remove the back cover of your phone before you can insert the SIM card. Lift the back cover up to remove it (1). Please read the safety instructions in the "Safety Information and Notices" section before use. In order to use your phone, you must insert a valid SIM card supplied by your operator or retailer.
Insert the SIM card Make sure that the clipped corner of the SIM card is facing the correct direction and the metallic contacts are facing downwards. Slide the SIM card into the card slot until it stops (3).. Install the battery Align the battery’s exposed copper contacts with the battery connectors inside the battery compartment, press the battery down into its slot until it locks into place (4).
Power on/off To power on the phone, press and hold the Power Key. Enter the PIN code if required (the 4 to 8 digit secret code of your SIM card). It is preconfigured and provided to you by your network operator or retailer. If you enter an incorrect PIN code 3 times in succession, your SIM card will be locked. To unlock it, you must obtain the PUK code from your network operator. To power off your phone, press and hold the Power Key. On release, the phone options menu opens, select Power off.
The battery symbol indicates the charging status. During charging, the charge indicators will scroll; are steady, the battery is When all the scroll bars fully charged. You can then disconnect the charger. The only way to turn off the charger is to unplug it, so it is advisable to use an easily accessible AC power socket. If you do not intend to use your phone for several days, we recommend that you remove the battery.
connections will be disabled. Transfer files to the SD card To transfer music, picture, and other files from your computer to your phone’s SD card, you need to set the phone’s SD card into a USB drive. 1. Connect the phone to the computer using a USB cable. A notification icon appears in the status bar. 2. Open the notifications panel by touching it and drag it down. 3. In the notifications panel, touch USB connected and then touch Turn on USB storage>OK. 4. Transfer the files to the SD card. 5.
To scroll up or down in a list or page on the screen, you can slide your finger up/down on the screen. Dragging your finger to scroll will not choose or activate anything on the screen. Touch screen Your mobile phone features a touch screen which provides a faster and more intuitive way for you to navigate through lists and menus. The controls on the touch screen change dynamically depending on the task you are performing.
2. 3. 4. Select Location & security, then scroll down to the Screen unlock section. Set or change your unlock pattern by selecting Set up screen lock > Pattern, as applicable. Follow the prompts to define your pattern. Note: you must slide your finger along the screen to create the pattern, not select individual dots. Connect at least four dots. Screen sleep After a period of inactivity, your screen will go to sleep (display will turn black). In sleep, your phone uses less battery power.
Home Screen 2. The Home screen is your starting point for using all the applications on your phone. You can customize your Home screen to display applications, shortcuts, and widgets as you like. Press the HOME button to return to the Home screen. Tip: To create an application shortcut quickly, touch the application tab to reveal all the application icons, then touch & hold an application icon and drag it to the home screen. Its shortcut is added to the Home screen.
touch and hold the item to enter “move mode”. The supplied for your choice, such as clock, picture frame, and search. Select one of them and touch it to confirm. application tab turns into a Trash button . Drag the item to the Trash button. When the icon and application tab turn red, release it. Set wallpaper 1. 2. 3. 4. Move objects on the Home screen Start from the Home screen; press MENU to access the context menus.
Wallpaper: Select wallpaper from the pictures album, Live wallpapers or wallpaper gallery. Search: Shortcut to Google search. This feature may involve the transmission of large amounts of data through your service provider’s network. Contact your service provider for information about data transmission charges. Notifications: Select to view notifications. Settings: Shortcut to the settings menu. Please refer to “Settings” section.
Key operations: Delete Key: Press to delete previous character. Press and hold to delete the whole line. FN Key: Press to activate FN mode to enter digits printed on the top part of the Keys. Press the FN Key once to activate it once, press the FN Key twice can activate FN mode all the time, in this case, to deactivate the FN mode, press the FN key. Symbol Key: Press to activate symbol mode to enter symbols printed on the top part of the Keys. Space Key: Press to enter space.
Adjusting keyboard settings Before you start using the onscreen keyboard, we recommend you set the onscreen keyboard options such as vibrate and/or emit a sound when you touch a key, auto-capitalization, auto-complete, etc. 1. Press HOME, then touch the application tab, select Settings > Language & keyboard. 2. Touch Android keyboard, you can choose the type method as your favorite, and then set the options you want to use for the onscreen keyboard. 3.
The available keys on the keyboard will be different depending on the type method you select. Settings > Language & keyboard. Smart Onscreen Keyboard Smart Onscreen keypad is an intelligent text editing mode for typing, which includes a comprehensive dictionary. It allows you to quickly enter text. When you enter the first or second letter, the word suggested may be displayed on the screen. Note: Smart Onscreen Keyboard may not be available on your phone.
Adjusting speaker/earpiece volume Calling During a call, press the Volume Side Keys up / down to increase or decrease the volume. Making a Call Note: You can make a call only when the network is available. Speaker During a call, select Speaker on. 1. 2. 3. Tap the Dialer icon on the HOME screen. Enter the phone number, select a contact, or a call log. Press the Call icon Making an International Call 1. Touch and hold the 0 key on the Dialer tab to enter "+". 2. Enter the country code. 3.
between the two calls. in sleep mode, press the power key to wake up the phone and then unlock the screen. Making a Conference Call Making a Second Call When there is a call waiting while you are already on the phone, you can carry out the following operations to establish the multi-party call: 1. Drag the green phone icon to the right to answer the second call. The first call will be put on hold automatically. 2. Select Merge calls. The two calls will be combined and a conference call is established.
During a call, select Speaker. Ending a Call Answering a Call Press the End Call icon Drag the green phone icon to the right. If you were already on a call, the first call is placed on hold while you answer the new call. To silence the ringer before answering the call, press the Volume Down button. Rejecting a Call Drag the red phone button to the left. Answering a Second Call If you have activated Call Waiting, a new incoming call screen is shown to inform you when there is a second incoming call.
Bluetooth Discoverability By default, your phone is not “discoverable”. This means other Bluetooth devices will not see your phone in their scans for Bluetooth devices. If you make your phone discoverable, it will be visible to other Bluetooth devices for up to 120 seconds. To make your phone discoverable: 1. Make sure you have turned Bluetooth on. Refer to the above chapter for details. 2. Press HOME, and tap the application tab. Then select Settings > Wireless & Networks > Bluetooth Settings. 3.
3. Scan For Devices. Type the name for your device in the dialog box, then select OK. Pair & connect with Bluetooth devices Before your phone communicate with a Bluetooth headset, your phone should “pair” at first. 1. Make sure you have Bluetooth turned on. 2. Go to Settings > Wireless & Networks > Bluetooth Settings. 3. Select Scan For Devices to have your phone start scanning for Bluetooth devices. As they are found, the devices will appear in the list of Bluetooth devices. 4.
Function Menu How to Use Main Menu Select application From the Home screen, tap the application tab Please read the following sections for a detailed . description of the main menu. Slide your finger to scroll through the menus and touch a particular destination to enter the selected menu. Note: The functions described below only appear when a SIM card is inserted. If you power on your phone without a SIM card, you will have limited access to menu functions when you press the Menu Key.
and then touch Set when finished. Touch and hold the + or – buttons to move through the numbers quickly. Repeat: Press to set the repeat day, from Monday to Sunday. Ringtone: Select one ring tone for your alarm. The ring tone plays when selected. Vibrate: Press to set the vibration on or off. Label: Touch it to set a name for the alarm. 4. Finally, press Done to save the settings. In the alarm, verify that you’ve activated either Saturday or Sunday on the Repeat area.
2. 3. Browser To open the browser, press HOME, touch the application tab and then touch the Browser. The first time you enter the Browser after powering on, your home page will display. You can change your home page by pressing MENU and selecting More > Settings > Set Home Page. 4. 5. Note: Browser automatically opens when you touch a web link in an email or text message. It may involve the transmission of large amounts of data through your service provider’s network.
2. Type the URL of the page you want to set as the homepage, and then touch OK. Zoom and navigation in web pages While viewing a Web page, take advantage of the following zoom and navigation techniques: 1. Slide your finger to one direction on the screen to activate the zoom controls. 2. 3. Touch the + control to zoom in. With each touch, you will zoom in closer. Touch the – control to zoom out. With each touch, you will zoom out further.
3. 4. 5. To paste text on an email or SMS/MMS message, touch and hold the text box on a message or email and then touch Paste on the options menu. To add new windows, click New Window. To close the window, touch the “X” in the right corner of the window that you want to close. On the windows view, you can press MENU to add a new window, go to bookmarks, and exit. Bookmark 1. To find text within a web page 2. While viewing a web page, press MENU and then touch More > Find On Page.
websites from opening windows unless you request it. Refresh the web page Press MENU in web page browsing and then choose Refresh. Adjust Browser settings On the browser screen, press MENU and then touch More > Settings to set the browser settings and options. Page content settings Text Size: Touch to define the text size, Tiny, Small, Normal, Large or Huge.
one. Set Home Page: Touch to set the home page web address. Invert Color: Touch to activate/deactivate display pages in an inverted color. Privacy settings Clear Cache: Touch to delete all cached page content. Clear History: Touch to clear the browser navigation history. Accept Cookies: Touch to set it on or off. If on, your phone will allow sites to save and read “cookie” data. Clear All Cookie Data: Touch to clear all “cookie” data.
phone. Advanced settings Set search engine: Touch to select a search engine from Google, Yahoo!, and Bing. Website settings: Touch to open a screen where you can view advanced settings for particular Warning: Applications downloaded from the web can be from unknown sources. To protect your phone and personal data, only download applications from sources you trust, such as the Android Market. websites. Reset to default: Touch to clear all browser data and reset all settings to default.
5. Calendar whether the event is recurring in Repetition. When finished, touch Done. Event reminders To open the calendar, press HOME, touch the application tab and touch Calendar. You can use the calendar to create and manage events, meetings, and appointments. If you have set Status Bar Notifications in More > Settings > Set Alert & Notifications, the upcoming event will appear in the left side of the status bar to icon remind you.
2. 3. Week view, touch it. A quick view window appears on the lower part of the screen. Touch the quick view window to view details about the event. Touch and hold an event to open a window with options for viewing, editing, or deleting that event, or creating a new event.
Camera & Camcorder Taking a photo You can take photos in various modes, the camera produces JPEG photos. 1. Access the Camera menu to turn on the camera. If you are in camcorder mode, press MENU and then select Switch to camera. Before you take a photo, you should insert an SD card. 2. Frame your subject on the screen. Your mobile phone features a 2.0 megapixel digital camera that allows you to take and share pictures and videos.
Recording a video 1. 2. 3. Press HOME, touch the application tab and then touch Camcorder. If you are in camera mode, press MENU and then touch Switch to video. You can change the capture video quality by touching the related icons on the bottom of the screen. Touch to starting recording the video. Touch to stop recording. View your photos and videos To view the pictures and videos you have captured, as well as any you havestored on your SD card, please go to Gallery menu to view the details.
Auto search Your phone supports to auto scan the radio stations and the stations searched will be memorized in the channel list. FM Radio This feature allows you to listen to your favorite FM radio station anytime with frequencies ranging from 87.5 MHz to 108.0 MHz. To open FM radio, press HOME, touch the application tab and touch FM radio. Note: The FM radio will not work unless the headset is attached. Attach the headset to the USB port located at the right side of the phone.
1. 2. 3. wish to play. 4. To turn on the Speaker, press MENU, select Settings, To access the FM radio menu, touch the icon to turn on FM. Press MENU and select Auto search to auto scan the radio stations. The stations that are found will be automatically and then touch check box saved in the channel list. You can touch the icons to access previous/next available channels. Add to favorites 1. In the FM radio playing interface, press MENU and then select Add to favorites. 2.
Palringo Palringo is a server-based instant messaging client for various platforms. It supports various protocols such as AIM, Yahoo! Messenger, Windows Live Messenger, Google Talk, Facebook and others. Palringo is an award-winning rich messaging client which enables you to send text, voice or photo messages to groups or contacts for free. To Setup Palringo Press HOME, touch the Application tab, and then choose Palringo.
1. Touch the in the main Palringo display or press the MENU Key and select Add service. 2. In the services list, choose a service to add. 3. Enter your account details including User Name and password, then touch OK. 4. The service will be displayed correctly on the service list when added successfully. To delete a service: 1. Choose one service in the services list, touch and hold until a context menu appears. 2. Touch Remove service to remove the selected service.
2. Waze Find a location Waze is a free social traffic and navigation application that uses real-time road reports from drivers nearby to save commuting time and improves your everyday driving. Waze gives drivers the power to work together to report and receive the most relevant traffic information available at any given moment. 1. 2. 3. To open Waze 4. To open the Waze, press HOME, tap the applications tap, and then touch Waze. 5.
Creating a contact Use this menu to add a new contact to the Phone book. 1. Press HOME, and touch the application tab, and then select Contacts. 2. Press MENU to access the option and choose New contact. 3. Enter the information to the new contact, such as phone number, email address, first and last name etc. Slide your finger up or down to see more labels. Contacts You can store phone numbers on your phone’s memory. This menu gives you quick and easy access to the people you want to search.
with preset labels, such as Mobile and Work for a phone number, or touch Custom in the menu to create your own label. 5. 6. Communicate with a contact From the contacts list, you can quickly call or send an SMS or MMS to a contact. To open a contact’s details screen, simply touch their name from contacts. To dial a number of the contact, touch the contact’s name, to select a Touch the Picture Frame icon picture to display next to the name in your lists of contacts and in other applications.
2. 3. Press Menu and touch Import/Export > Import from SD card, if you have more than one account on your phone, touch the account into which you want to import the contacts. A list of the contacts on the SD card appears. Touch & hold a contact and touch Import in the menu that opens. Or press Menu and touch Import all. Call log Use this menu to view the calls you have dialed, received, or missed, and the length of the calls.
2. Phone Use this menu to call your friends. To access this menu, press HOME, touch the application tab, and select Phone. 3. 4. Or you can press the Call icon in the home screen. How to dial a number? Enter the number you want to dial, and then press the Call icon to dial. To know the detail, see calling in page 20. Dial by using Bluetooth devices You can place and receive calls using a hands-free Bluetooth headset or hands-free car kit.
Gallery Use this menu to access photos and videos you have taken. For photos, you can also do basic editing tasks, set them as wallpaper or contact picture, or share them with your friends. To open pictures and videos, press HOME and touch the application tab. Then touch the Gallery icon. Viewing an image Gallery presents the pictures and videos on your microSD card, including those you’ve taken with the camera and those you’ve downloaded from the web or other locations. .
message. For information about addressing and sending the message, see the section on that application. Touch a picture or video in an album to view it. Return to the main Gallery screen at any time by touching its icon at the top left of the screen. Touch the screen to open the zoom-in and zoom-out controls . Touch the + control to zoom in; touch the – control to zoom out. Image options You can do the following while in pictures.
a picture to view the controls and then touch Slideshow. Touch a picture to end the slideshow. Details Select to show detailed information of the picture including its name, type, the date taken, album and location Set as Select to set the selected picture as wallpaper or contact icon. Before you do that, you can crop the picture. The operation is the same as the above descriptions. Crop Select to crop the selected picture.
new emails and to synchronize your emails with Email account on the web. Create and send an email Email Compose a new email Your mobile phone supports Email. Before using Email, you need to configure Email accounts. 2. To Set up Email 3. Press HOME, touch the Application tab, and then touch Email. You can configure your Email account in just a few steps. 1. In the Email set up menu, enter your Email address and password and then press button 2. 4. 5.
7. To discard the email you just now composed, touch Discard. Note: If you want to view the messages in Draft box, press MENU and then touch Folders > Drafts. Note: If you want to view the messages in Outbox, press MENU and then touch Folders > Outbox. Open an unread email Press HOME and then touch and hold the status bar. Now slide your finger down on the screen to open the Notification panel. Touch the new email to view it. While in the Inbox, touch the unread email to view it.
To reply all, touch the Reply all button . To forward the email, press MENU and then touch the Forward icon . Compose your message and then touch Send or Save As Draft when ready. Pressing BACK will also save as draft. Set Email account settings Notification settings In the Inbox, press MENU and then touch Account Settings. You can access the following options: General settings frequency here. The frequency can be set as Every 5/10/15/30/60 minutes.
Messaging Use the Messages menu to send and receive text messages and multimedia messages. To access this menu, press HOME, touch the application tab and touch Messaging. Messages list Touch the Messaging icon in the Launcher on the Home screen or The Messaging window opens, where you can create a new message or open an ongoing message thread. Reading text messages Press HOME, touch and hold the status bar, and then slide it down to open the notifications panel.
3. Note: If a link is included in a message, touch the link to open Browser and view the web page. If a phone number is included in a message, touch the message to open the Dialer so you can call the number. View message details To view details about a particular message, touch and hold the message to open the option menu in the Read view. Touch View Thread. Reading multimedia messages If you have selected to auto-retrieve your multimedia messages, both the message header and body will download.
from phone to phone or from phone to email. 1. Press MENU,touch the application tab and touch Messaging. 2. Touch New Message to compose a new message. 3. In the To field, you can enter the receiver’s number or email address by using the onscreen keyboard. 4. In the Content field, you should enter the MMS content. 5. To add a subject, press MENU and touch Add Subject. 6. To add an attachment such as picture, melody, video, and so on, you should press MENU and select Attach.
7. 8. Audio: Opens the select audio menu. Touch an audio file to select. Record Audio: Open a voice recorder to record a new audio. It can also can be inserted into MMS. Slide Show: List all the slides that the MMS has. Tap Add Slide to add a new slide. Note: If you want add more attachments, you should add a Slide Show first.
2. of messages to save per thread of text messages. When the limit is reached, older messages are deleted if Delete Old Messages is checked Multimedia message limit: Touch to set the number of messages to save per thread of multimedia messages. When the limit is reached, older messages are deleted if Delete old messages is checked.
Select ringtone: If you want your phone to ring when a new message arrives, select the check box. Note that when you check a ringtone, it plays briefly. Vibrate: If set to on, your mobile phone will vibrate while a new message arrives. In the above on / off feature, you can touch the on off / icon to set the feature on / off.
All the music you can listen to on your phone is stored on an SD card. 1. Connect the phone to your computer with a USB cable and mount the micro SD card. 2. To organize your audio files, you can use the computer to create a music folder at the top level of the micro SD card. 3. Use the computer to copy music and other audio files into the folder that you created on the micro SD card 4.
2 Open the Notifications panel and touch USB connected. 3 Touch Mount in the dialog that opens to confirm that you want to transfer files. When the phone is connected as a USB storage, you receive a notification. Your phone’s micro SD card is mounted as a drive on your computer. You can now copy files to and from the micro SD card. For more information, see the documentation for your computer.
1. Pause/resume play: Touch to pause; 2. touch to resume play. . Fast forward: Touch and hold once. Go to next song: Touch Rewind: Touch & hold 3. 4. 5. . Go to beginning of the song: Touch once. 6. Go to previous song: Touch twice. View current playlist: Touch From the home screen, touch the application tab, and then touch Music. Select a category. From the list that appears, navigate to the artist, album, or song that you want to add in the playlist.
Encrypt: On the consideration of personal privacy and protect the notes from exposing to other persons, you can choose to encrypt and add a password to the notes. Delete: Select to delete the note that opened. Theme: You phone supports to pick a theme for note. Choose a theme from the menu that appears and press to search for more themes online. Settings: List sorting order: Touch to set the order in which notes are shown in the notes list.
To read notes Press HOME Key, touch the application tab and then touch OI Notepad to open OI Notepad. Choose a note that you want to read from the note list and touch to open.
connect to Wi-Fi networks. Settings This menu allows you to control and customize phone settings on the Settings screen. Press Home, tap the application tab and touch Settings. You can also press MENU in the home screen and touch Settings. Wireless & networks Airplane mode: When airplane mode is selected, all wireless connectivity is off. This icon will display in the status bar when airplane mode is selected.
carriers’ mobile networks when you leave an area where your phone can access your own carrier’s mobile networks. Scan for device: Touch to search for and display information about nearby Bluetooth devices. Tethering & portable hotspot In this menu, you can share your phone’s mobile data connection via USB or as a portable Wi-Fi hotspot.
your Caller ID preference (if available) and turn on/off call waiting. beside the number box to search in the contact list. Finally, touch the OK button to save the setting. Sound Silent mode: Select to silence your phone, all TTY mode: TTY stands for “text telephone” or “teletypewriter”. It is a technology that allows a person with speech or hearing impairments to use a home or cell phone to communicate. sounds except media & alarms will be silenced if it is on.
your device. when you select an item on the screen. Screen lock sounds: Select to enable or disable the screen lock sounds. Haptic feedback: Check to have the phone vibrate briefly when you touch and hold the Menu/Home/Back/Search key to perform actions. Location & Security Use the Location & Security settings to set your preferences for using and sharing your location when you search for information and use location-aware applications, such as Maps.
Set up screen lock: Select to set the Pattern/PIN/Password. Set up SIM/RUIM card lock: Opens a screen where you can configure the phone to require entering the SIM/RUIM PIN to use the phone, and where you can change the SIM/RUIM PIN Clear storage: Deletes all secure certificates and related credentials and erases the secure storage’s own password, after prompting you to confirm that you want to do this. Applications This menu allows you to manage applications.
application from the Android Market, you will be able to uninstall it from this screen by selecting Uninstall. own schedules, and whether all applications can synchronize user data automatically. Privacy Running services: Open a list of services—applications or parts of applications that provide services to other applications or that run even when their main application isn’t running. You use the Privacy settings to manage your personal information.
you have already unmounted it, or if you have mounted the microSD card on your computer. Accessibility Format SD card: Permanently erases everything on a micro SD card and prepares it for use with your phone. You must remove a micro SD card before you can format it. You use the Accessibility settings to configure any accessibility plug-ins you have installed on your phone.
you are currently using, the type of network, signal strength, roaming status, any Wi-Fi addresses you’re connected to, and more. Select Legal information for copyright and licensing information, as well as the Google Terms of Service for the Google applications on your phone. Read about the Contributors to the Android phone. Select the System Tutorial to learn how to use your phone. You can view the model number and version information for your phone.
4. Sound recorder The sound recorder is a simple recording tool that provides all of the required functionalities for you to manage voice files. To start recording 1. In any mode, press Home Key, touch the application tab and then touch Sound Recorder. 2. 3. Touch button to start recording. During the recording, you can pause the voice . Then recording anytime by touching button choose Use this recording to save the recording file to File Manager in the condition that your SD card is inserted.
Videos This menu allows you to play the video. Press Home, tap the application tab and touch Videos. On the screen, touch a video you want to watch to start playing back the video.
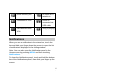
Troubleshooting Common issue Bad connection Aftersound or cacophony Idle time becomes short Cause reason Using mobile phone in an area where the network connection is not good, such as around a tower or basement, and radio wave cannot be sent effectively. Using mobile phone when network is busy, such as an on-off duty time, line busy. Related to the distance of the send basis of the network. It is caused by network connection and it’s a regional problem. Network connection is not good in some areas.
Cannot switch on Wrong SIM card Battery is drained. SIM card is damaged. SIM card is not inserted properly. Dirt on metal side of SIM card. Cannot connect to network SIM card is unusable Check battery volume or charge battery. Contact your operator. Make sure SIM card is inserted properly. Wipe metal point of SIM card with a clean cloth. Contact your operator. Out of GSM service area. Feeble signal.
Safety Information and Notices Using the Cell Phone and Charger Danger: Only use the battery and charger approved by the manufacturer. Using other brands may cause battery leakage, overheating, explosion or even fire. Caution: Keep the phone away from dust, water and damp areas. Dust, water or other liquids may cause overheating, electrical leakage, and/or phone failure. The phone, battery, charger and AC adapter are not waterproof. Keep them away from liquid.
with the battery or its connectors as it may cause the battery to short circuit, overheat or explode. Do not weld the polarities of the battery directly together. This may cause battery leakage, overheating, explosion or even fire. Battery liquid is severely harmful for your eyes. If battery liquid gets in your eyes, do not rub them. Instead, wash your eyes with water first and then go directly to a doctor for help. Do not use or store your phone in high temperature areas.
the power cable to prevent overheating, fire or another type of break. Do not use the charger in places with high humidity like a bathroom. This may cause a fire. Do not touch the charger, power cable or socket with wet hands. This may cause an electric shock. Caution: Keep the environment temperatures within the range of 0ºC ~40ºC while charging. Temperature below 0ºC or higher than 40ºC will cause insufficient charging, terminate charging or even cause the battery to explode.
It is recommended that you do not use your mobile phone near a telephone, TV set, radio or other radio frequency sensitive devices. Specific Absorption Rate (SAR) information The SAR limit of USA (FCC) is 1.6 W/kg averaged over one gram of tissue. This models (FCC ID: T38PCD8560) has also been tested against this SAR limit. The highest SAR value reported under this standard during product certification for use at the ear is 0.588 W/kg and when properly worn on the body is 1.099 W/kg.
Operation is subject to the following two conditions: (1) This device may not cause harmful interference, and (2) this device must accept any interference received, including interference that may cause undesired operation. Cleaning and Maintenance The mobile phone, the battery and the charger are not waterproof. Do not use them in places with high humidity like a bathroom and also avoid spilling any liquids on the phone, battery or charger.
12 MONTH LIMITED WARRANTY PERSONAL COMMUNICATIONS DEVICES (the Company) warrants to the original retail purchaser of this PCD handheld portable cellular telephone, that should this product or any part thereof during normal consumer usage and conditions, be proven defective in material or workmanship that results in product failure within the first twelve (12) month period from the date of purchase, such defect(s) will be repaired or replaced (with new or rebuilt parts) at the Company’s option, without charg
consumer’s return address, daytime phone number and/or fax number and complete description of the problem, transportation prepaid, to the Company at the address shown below or to the place of purchase for repair or replacement processing. In addition, for reference to an authorized Warranty station in your area, you may telephone in the United States (800) 229-1235, and in Canada (800) 465-9672 (in Ontario call 416-695-3060).
province to province. OF 18 MONTHS FROM DATE OF ORIGINAL PURCHASE. IN NO CASE SHALL THE COMPANY BE LIABLE FOR AN SPECIAL CONSEQUENTIAL OR INCIDENTAL DAMAGES FOR BREACH OF THIS OR ANY OTHER WARRANTY, EXPRESS OR IMPLIED, WHATSOEVER. THE COMPANY SHALL NOT BE LIABLE FOR THE DELAY IN RENDERING SERVICE UNDER THIS WARRANTY OR LOSS OF USE DURING THE TIME THE PRODUCT IS BEING REPAIRED OR REPLACED. IN USA: PERSONAL COMMUNICATIONS DEVICES 555 Wireless Blvd.