
Installation Guide


24
windows and door trim
accessories installation
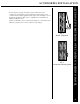
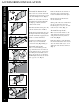
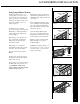
8" - 12"
1
/16"
1
/
16
"
8" - 12"
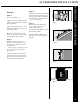
Fig.1
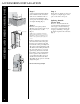
Fig. 2
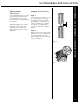
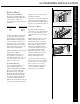
Fig. 3
Lineals
Step 1
Create a watertight seal:
Apply a 1/8˝ bead of caulk around the
perimeter of the window or door frame
before installation.
Apply caulk around the corner of the
nail fin and where the window or door
meets the sheathing.
Measure the width of the top of the
frame and cut a piece of starter strip
1/8˝ less than the frame. (Fig.1)
Step 2
Butt the starter strip against the
opening, center it and nail every 8˝ to
12˝ being sure to nail in the center of
the nailing slots.
(Starter strips are available for both
new construction and remodeling
applications.)
Continue to measure and cut starter
strips for the other sides of the frame.
Be sure to cut starter strips 1/16˝ less
than each measurement. (Fig.2)
Step 3
Install the starters. For vertical starter
strips, nail the first nail in the upper
most edge of the first slot. All other
nails should be centered in the slots
every 8˝ to 12˝. (Fig.3)
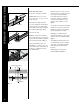
Step 4
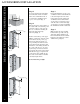
Measure and cut the lineals. For
3-1/2˝ lineals add 7˝ to your
measurement in order to
accommodate their widths at corners
For 5˝ lineals, add 10˝.
Lineals should be installed in the
following order: top, sides, bottom.
(Fig. 4)
5" Lineal
=
Window Width +10"
3-1/2" Lineal =
Window Width + 7"
3-1/2" Lineal
=
Window Height + 7"
5" Lineal
=
Window Height + 10"
Width
Height
Fig. 4