
Installation Guide


55
porch ceiling installation
porch ceiling installation
Porch Ceilings
The procedures to install a porch
ceiling are in many ways similar to
those used to install soffit. These
procedures vary slightly, depending
on whether the installation is a new
construction or a residing project.
INSTALLATION TIP: In hot climates or in
attics with limited ventilation, it is advisable
to install solid sheathing to the underside of
the porch ceiling joists. This will protect vinyl
soffit panels from excessive heat.
New Construction
Step 1
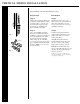
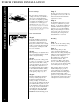
Begin by installing receiving F- or
J-Channels on all four sides of the
porch (Fig. 1). If F-Channels are
being used, nail them to the existing
walls or porch beams. If J-Channels
are being used, a nailing base will
have to be installed.
Step 2
When planning to use light blocks to
attach external light fixtures, install
them to adequate backing.
Step 3
Plan the layout of the ceiling panels
to achieve an even balance or to align
with adjacent work. If the ceiling
joists run parallel to the direction of
the soffit panels, additional 1˝ x 3˝
wood furring nailing strips will have
to be installed. Install these nailing
strips perpendicular to the ceiling
joists, placing a strip every 12˝.
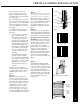
Step 4
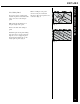
Install an undersill trim shimmed
down by a furring strip into the
J-Channel or F-Channel on the
starting end (Fig. 2). Cut the hook
side (opposite the nailing hem) off the
panel and install snap locks every 6˝
to 10˝. Install the soffit panel locking
the cut edge into the undersill trim
and nailing the other side through
the nailing slots. DO NOT NAIL
TIGHTLY. Install remaining panels.
Step 5
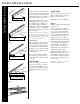
For large areas where more than one
panel length is needed, use a H or T
mold or back-to-back J-Channel to
separate the sections.
Step 6
To install last soffit panel, use same
technique as outlined in step 4 and
Figure 2, except that the nailing hem
sidewall be trimmed and snap lock
punched every 6˝ to 10˝. Install the
final panel by locking the hook side
of the panel on the previous panel
and inserting the cut edge into the
undersill trim for a secure fit.
Residing
Step 1
Check to be sure the existing ceiling
can serve as a solid nailing base.
Step 2
If the existing ceiling is solid,
remove all existing moldings and
fixtures from the ceiling and begin by
nailing inverted J-Channels along the
perimeter of the ceiling area.
Then follow Steps 2 through 6 in
the instructions under “New
Construction”. With a solid ceiling,
however, additional nailing strips are
not necessary. Use the existing ceiling
as the nailing base for the panels.
If the existing ceiling is not solid,
install nailing strips to provide a
secure nailing base, then install the
J-Channels. Additional nailing strips
should be installed if the ceiling
panels are to run parallel to the ceiling
joists. Follow the instructions in Steps
2 through 6 for “New Construction”.
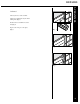
Quarter round
or other trim
Vertical panels
J-channel
or other trim
Fig.1
Porch Beam
J-Channel
Furring Strip
Soffit Panel
Undersill Trim
Ceiling
Joist
Fig. 2