
Installation Guide
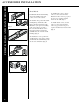
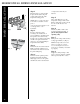
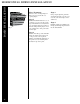

J Channel
Siding
L-Flashing
1/2˝
Install the flashing before the
J-Channel to prevent water
infiltration along the intersection of
a roof and wall.
Keep the J-Channel at least 1/2˝
from the roofline. Chalk a straight
line up the roof flashing to guide
J-Channel installation.
NOTE: Vinyl J-Channels should not
be in direct contact with roofing
shingles, since the shingles may
transfer enough heat to the vinyl
J-Channel to cause distortion.
With dark shingles, or a south or
west exposure, it is recommended
to either use a metal J-Channel
or raise the vinyl J-Channel
approximately 2˝ off the shingles
and install, having first ensured that
there is sufficient flashing behind
the J-Channel to prevent water
infiltration.
Overlap the J-Channel (lapping the
upper piece over the lower piece) if
it is necessary to use more than one
piece.
Extend the J-Channel past the edge
of the roof, channeling water into
the gutter, in order to ensure proper
runoff.
Fig.1
accessories installation
42
J-Channel at roof line
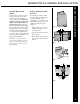
J Channel
J-Channels are designed to receive
the siding panels and must be
installed around all windows,
doors, other large openings and in
the gables where built-in J-channels
are not present. J-Channels can be
installed over old wood casing or
placed next to the casing leaving
the old window casing exposed.
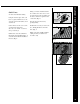
Water runoff can also be
accomplised by making a series of
notches and tabs in the J-Channel.
(Fig. 2)
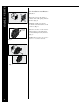
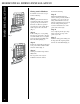
Install J-Channel in this order:
Bottom, Sides then top.
Miter J-Channels at corners to
prevent gaps and allow for proper
water drainage. (Fig. 3)
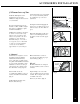
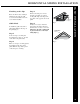
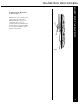
Flex-J
Flexible J-Channels are designed
for curved surfaces such as arched
windows.
Begin nailing at one end of the
arch one-half inch of the end of the
channel. Nevver begin at the crown
or middle of the arch.
Nail every six inches. (Fig. 4)
Fig. 2
Fig. 3
Begin Nailing
within 1/2" of
End of Channel
Work Around
Arch, Nailing
Every 6"
Fig. 4