
Installation Guide


shingle installation
shingle installation
63
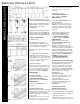
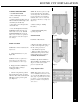
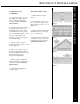
INSTALLING PANELS
INSTALLING PANELS
Align the top left side below the arrow on
the previously installed panel (See Figure 2).
Apply pressure to middle butt and slide
panel up until the top of the panel aligns
with the bottom of the nail slot
(See Figure 3).
Apply pressure to bottom butt and slide
panel up to fully engage (See Figure 4).
Slide panel left or right to align witht the
proper temperature mark (See Figure 5).
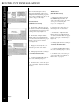
NAILING PROCEDURE
Do NOT nail tight.
First, nail through center nail hole –
not nail slot. If using partial panel, find
center of nail hem and drive nail through
center of nail hem (not in nail slot).
Next, nail every 8˝ through center of four
nail slots.
Last, nail through slot in right side tab.
NOTE: When nailing through slots,
always nail in center of slot, and DO NOT
NAIL TIGHT. Panels must be able to move
to allow for expansion and contraction
caused by temperature change.
1st Course, 1st Panel
Measure and cut 1˝ from bottom left end
of panel (See Figure 1). Leaving ¼˝ gap
at end of panel, insert left end of panel
in to corner post and lock onto starter.
Nail panel according to “NAILING
PROCEDURE”.
1st Course, 2nd Panel
Use full panel and install according to
“INSTALLING PANELS”.
Nail panel according to “NAILING
PROCEDURE”.
Repeat for remaining full panels in
1st course.
Last Panel of Each Course
Measure from the appropriate temperature
mark on the previous panel into the corner
post, allowing ¼˝ gap for movement.
Mark and cut this distance from top left
corner of panel.
NOTE: To reduce waste, pieces cut from
last panel on each course can be used
as starter pieces on adjacent walls; or,
if larger than 14˝ can to cut to length as
starter piece for next course on the
same wall.
Install panel according to
“INSTALLING PANELS” and
nail according to “NAILING
PROCEDURE”.
2nd Course (and all remaining even
courses), 1st Panel
Measure from inside of corner post to
EVEN line on nail hem of 1st panel of
course below. Cut piece by measuring
this distance from bottom right end of
new panel.
Install panel by aligning the bottom
right end with the EVEN line on
nail hem below. Install according
to “INSTALLING PANELS”
and nail according to “NAILING
PROCEDURE”.
Install remaining panels in course.
3rd Course (and all remaining odd
courses), 1st Panel
Measure from inside of corner post to
ODD line on nail hem of 1st panel of
course below. Cut piece by measuring this
distance from bottom right of new panel.
Install panel by aligning the bottom right
side with the ODD line on nail hem below.
Install according to “INSTALLING
PANELS” and nail according to
“NAILING PROCEDURE”.
Install remaining panels in course.
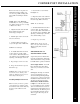
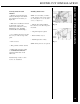
INSTALLING AROUND WINDOWS
Keep the panel pattern across all openings.
When installing under windows, cut
panels to required width. Use snap lock
tool to punch tabs in top edge of panel.
Cut small pieces of utility trim, Install and
nail into J-channel. Install cut panels into
trim, avoiding grooves on panels
(See Figure 6).
Last Course on Wall
Cut panels to required width. Use snap
lock tool to punch tabs in top edge of
panel. Cut small pieces
of utility trim, Install and nail into
J-channel. Install cut panels into trim,
avoiding grooves on panels
(See Figure 6).
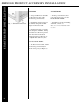
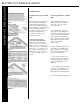
INSTALLING ABOVE
HORIZONTAL SIDING
Options for transition include:
• Starter Strip with Drip Cap (see Figure 7).
• Field-formed T-Channel (see Figure 8).
• Lineals (see Figure 9).
NOTE: When starting with any channel
or lineal, a base flashing should be used.
Fig.6
Fig.5
Fig.2
Fig.3
Fig.4
Fig.7
Fig.8
Fig.9
Fig.1