
Installation Guide


19
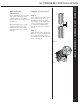
starter strip
accessories installation
1/4"
Fig. 1
Step 1
In order for the vinyl siding to be
installed properly in a level
fashion, the starter strip at the
bottom of the wall must be level.
Step 2
The starting chalk line should be
located so that it represents the
top, not the bottom, of the starter
strip.
Chalk lines are normally
established from the lowest corner
of the house. In situations where
the ground at the corner of the
house is not level, chalk lines
must be measured from the soffit
location to assure a uniform panel
at the top of the walls.
Step 3
Attach a chalkline: go to the next
corner and pull the line taut.
Step 4
Snap the chalkline and repeat the
procedure around the entire house.
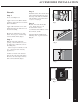
Step 5
Using the chalkline as a guide,
install the top edge of the starter
strip along the bottom of the
chalkline, nailing at 10˝ intervals.
Allow space for accessories
(corner posts, J-Channels, etc.)
Step 6
Keep the ends of starter strips at
least 1/4˝ apart to allow for
expansion (Fig. 1).
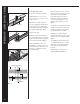
Step 7
Nail in the center of the starter
strip nailing slots.
Step 8
Starter strip fasteners should be
driven just flush in the center
of the slots to take out starter
looseness, but should not be
overdriven to where it indents the
starter.
Before the vinyl siding itself can be installed, a number of accessories
must be installed first, including starter strips, corner posts, window
flashing, trim and J-Channels.