
Installation Guide


1"
1"
3
/8"
1
/8"
Center Nail
in Slot Every
8" - 12"
Fig.1
Fig.2
Fig. 3
window and door trim
accessories installation
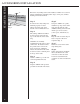
To install the bottom lineal
Cut a notch on each side of the back
of the lineal as shown. Cut a 1˝ notch
out of the nailing hem side. (Fig.1)
Make a 1/8˝ curved sliver cut on the
bottom front of the lineal. Push the
locking leg of the lineal into the
channel of the starter.
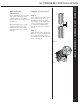
Nail the bottom lineal into place only
after the side lineals are installed.
Work the bottom lineal into place by
flexing the material to fit it together
with the side lineals, lapping the side
lineals over the bottom lineal.
Complete by nailing the bottom
lineal every 8˝ to 12˝with nails
centered in slots. (Fig.2 & Fig. 3)
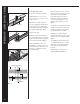
To install side lineals
Cut a 1˝ notch off the legs for the
top of the lineal and a 45° miter cut
for the bottom. Cut a 1˝ notch out of
the nailing hem side. Make curved
sliver cuts on the top of the lineal.
NOTE: Right and left lineals should
have opposite cuts. (Fig. 4)
Push side lineals into the channel of
the Starter about 2˝ down from the
header and slide the lineal into place.
Fit tabs of the header lineal down
into the side lineals.
Nail top nail of the side vertical lineal
into the top of the slot, then nail
lineals into place every 8˝ to 12˝ with
nails centered in slots. (Fig. 5)
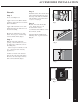
To install the top lineal...
Miter each end of the lineal at a 45°
angle. Notch the channel 1˝ to form
a flap and bend it down (do this on
both ends) (Fig.6)
Push the locking leg of the lineal into
the channel of the starter and center it
above the frame. Nail every 8˝ to 12˝
with nails centered in slots of lineal.
(Fig. 7)
Notch 1" and
Bend Tab Down
Cut at 45ϒ Angle
Cut at 90ϒ Angle
8" - 12"
Fig.6
Fig. 7
1"
1"
Cut at 90ϒ
and dispose
Right Side
Lineal Shown
Fig. 4
Fig. 5
25