
Installation Guide

54
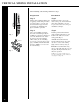
aluminum fascia installation
aluminum fascia installation
Step 1
Install soffit per instructions stated
previously. Choose the soffit
installation method that applies to
your specific needs.
Step 2
Install metal drip edge, gutter trim,
undersill trim, etc. along the top of the
fascia board to receive and secure the
top edge of the aluminum fascia.
Step 3
Measure from the lower side of the
soffit panels to the top of the trim
installed on the upper side of the
fascia board. Deduct approximately
1/8˝ from this dimension and cut
fascia panel using snips, or score and
break with a utility knife and straight
edge.
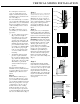
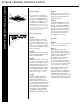
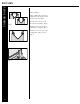
Step 4
For the best appearance, we suggest
that you do not face nail aluminum
fascia. The recommended procedure
is to slip the top edge of the fascia
into the drip edge (or utility trim) and
secure the fascia in place with trim
nails installed through the bottom side
(Fig.1). Nail no greater than 2´ on
center.
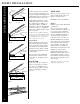
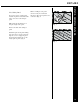
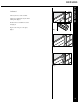
Step 5
Outside corners: bend a 1˝ flange at a
90-degree angle so it turns the corner.
Then cut the overlapping fascia and
position as shown (Fig. 2).
Inside corners: Use same technique as
outside corners.
Fig. 1
Bend 1"
Fig. 2
NOTE: Nails or fasteners installed through the bottom of the aluminum fascia panel may
penetrate the ends of the soffit panels in some installations. The following procedures
are recommended if this situation occurs.
* Line up the aluminum fascia fasteners with the V-grooves in the soffit panels to
avoid cupping the soffit panel faces.
* If vinyl soffit panels are over 24˝ in length, enlarge the fastener hole in the soffit
panel 1/4´ larger than the fascia fastener diameter. This will allow the soffit panels to
expand normally and avoid potential buckling.
* When fastening aluminum trim, you can only use aluminum or stainless steel painted trim
nails. You should always pre-drill (1/8”) diameter hole in the aluminum and do not drive
the nail tight.