
Installation Guide

70
round cut installation
round cut installation
Mansard Roof Installation
Instructions
Cedar Dimensions
TM
can only be
installed on mansard roofs with
a slope of 45/12 or greater (15-degree
angle or less). It must be attached
with standard siding nails into a solid
wood substrate.
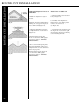
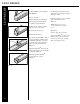
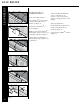
The sheathing must be covered
with either:
1 layer 30 lb. roofing felt with a 6˝
minimum horizontal and vertical
laps.
2 layer 15 lb. roofing felt
(see Figure 1).
A field formed flashing must be
installed at the bottom of the
mansard. This can also be the cap for
the soffit. The flashing should go up
the roof a minimum of at least 4˝.
(see Figure 2).
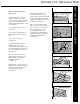
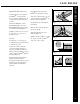
The Cedar Dimensions
TM
starter
strip should be installed onto the
flashing. Follow the standard
installation guidelines.
(see Figure 3).
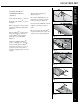
Install any 3/4˝ corner post system
at all transitions. The bottom of these
corner posts should be closed off
by bending flaps as shown
(see Figure 4).
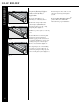
Install all Cedar Dimensions
TM
courses cutting the last course as
required. Slot nail holes and nail into
top of mansard following standard
installation guidelines for last panel
installation (see Figure 5).
Form a cap from trim sheet that
will cover the top of the mansard
and come down to cover the nails
that are holding the last course
of Cedar Dimensions
TM
. It is
recommended that this flashing be
installed under the top roofing or
behind the sidewall system
(see Figure 6).
4”
Minimum
Flashing
4"
Flashing
2-1/2"
Starter Strip
30 lb.
6" Minimum
Felt Overlap
Less than 15ϒ
(Greater than
45/12 Slope)
Use Trim Sheet to Form Cap.
Install to Cover Nails Holding
Last Course of Cedar Dimensions
TM
Follow Standard Installation
Guidelines to Cut, Slot and
Nail Last Course
Close Corner
Post Bottoms
Miter
1"
Fig. 1
Fig. 2
Fig. 3
Fig. 4
Fig. 5
Fig. 6