
Installation Guide


52
soffit installation
5-step procedure continued:
Step 2
Measure soffit panels 1/2” shorter
than opening. Mark this dimension on
a soffit panel and cut using a power
saw with a reversed finetooth blade
or snips.
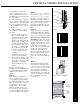
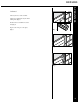
Step 3
Insert one end of the panel into the
channel on the wall, nail the other end
to the wood fascia. (Fig. 1)
• Make certain the panel is
perpendicular to the wall, and then
nail. Depending on the installation
method being used, nails will be
hammered either into a nailing
strip or fascia board.
• Do not nail soffit panels tightly.
• Continue the installation by
locking and nailing the panels.
Make certain the panels are fully
locked along their entire length.
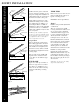
Step 4
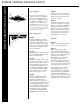
To turn a corner, measure from the
channel at the wall corner to the
channel at the corner of the fascia
board (Fig. 1). Subtract 1/4˝ for
expansion. Cut and install H-Molding
lineal or back-to-back J-Channel. If
necessary, install nailing strips to
provide backing for the lineal. Miter
cut the corner soffit panels and install
as described in Step 3.
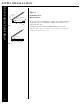
Step 5
Install aluminum fascia as needed
to finish installation. (see section on
fascia installation)
Soffit double
channel lineal
Fascia
Miter soffit
panels
Fig. 1