
Installation Guide

45
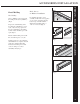
basic installation
horizontal siding installation
Fitting under Windows
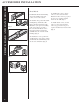
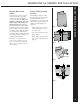
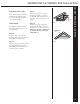
To mark the section to be cut, per-
form the following:
Step 1
Hold the panel under the window
and mark the width of the window
opening on the panel. Add 1/4˝ to
both sides to allow for expansion
and contraction of the siding. These
marks represent the vertical cuts
(Fig. 1).
Step 2
Lock a small piece of scrap siding
into the lower panel next to the win-
dow. This will be used as a template
for the horizontal cuts. Mark it 1/4˝
below the sill height (Fig. 1).
Step 3
Transfer the horizontal measurement
to the panel, which will be installed
under the window (Fig. 1).
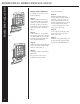
Step 4
Cut the panel with tin snips and/or a
utility knife.
The cut panel is now ready for
installation under the window.
Perform the following:
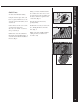
Step 5
Install undersill trim under the
window, inside previously installed
J-channel as a receiver for the cut
siding. Undersill trim is used any
time the nail hem has been removed
from the siding. Furring may be
needed to maintain the face of the
panel at the desired angle.
Step 6
Use a snaplock punch to place lugs
facing out in the cut edge of the
panel every 6˝-10˝.
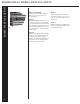
Step 7
Install the siding panel, making sure
the lugs (from the snaplock punch)
lock into the undersill trim (Fig. 2).
1/4"
1/4"
Fig. 1
J Channel
Undersill trim
Snaplock lugs