
Installation Guide


14
Step 4: Identifying Top Line
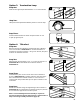
4A: Identify Top Line
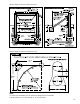
55”
The first step to identifying the top line is determining your final post height. In the example above, a post
height of 55” has been chosen. Starting on level terrain, mark the first post at 55” and attach a string.
Continue along with the string, wrapping it around each post or a small nail may also be used to hold the
string in place on each post. Once the string has been pulled from end to end, stand back and make sure
the string follows in a gentle, smooth flow. If not, with assistance, move the string up or down to achieve
a gentle smooth flow. Do not be concerned that the bottom rail is not always the same distance from the
ground. The illustration below shows how a fence should flow along an irregular terrain.
A - Typical 55” post height on level terrain.
B - Over abrupt rise of terrain post could be 50” in height.
C - Over abrupt fall of terrain post could be 58” in height.
D - Typical 55” height on level terrain.
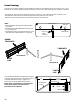
Next:
Mark all line posts where the string touches with a lumber crayon or marker. This will be your final post
height.
NOTE: If you have excess post above your final post height, this would be the best time to re-
move it using a chain saw. If you choose to cut off the excess post, it is recommended to slope the top
of the post approximately 1”. Make sure the post slopes AWAY from the rail.
FENCE TIP: For an improved appearance on end and corner posts it is also recommended to add an addi-
tional 1” to the height and cut the posts flat.
NOTE: If you plan to paint the posts, this would be the best time, prior to attaching brackets.