
Use and Care Manual


17
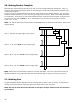
5D:
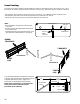
Attach the brackets to the line posts using the marks you made in Step 5C. Nail or screw the bottom of the
brackets to the posts, then open the brackets as shown in Illustration 5-A below. Brackets must be square
to the post and the rail so that the rail will look smooth and react properly when required to flex. Refer to
Illustration 5-B below to see how the brackets should look when the rail is installed.
NOTE: The top nail or screw should NOT be inserted until the rail has been paid/pulled out, inserted into
brackets and deemed to be of acceptable quality.
Step 6: Installing the Rail
Important: Be sure to remove and keep the stickers on the rail packaging as the production dates will be
needed to complete the Warranty Registration Card in order to receive the warranty.
6A: Terminations
At this point you need to decide how you want to terminate your rails. There are four options:
Option 1: One-way barrel tensioners (See page 23)
Option 2: Termination Bracket
Option 3: Termination Loop
Option 4: T-Bracket
NOTE: Terminating one end of your rail will make Step 6B easier to complete.
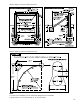
Illustration 5-A
CenFlex
®
Bracket
BRACKET
RAIL
LINE
POST
Illustration 5B
by Centaur HTP
by Centaur HTP