
Use and Care Manual


22
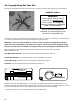
6B: Paying/Pulling Out Your Rail
This step is completed with ease and care for your rail when utilizing a spinning jenny, pictured below.
The spinning jenny can be placed on the ground at one end of your fence, in the back of a pickup truck, or
on a trailer. Proceed down your fence line paying/pulling out your rail.
FENCE TIP: If you are using the back of a truck or trailer and you have adequate manpower,
place the rail in the brackets as you pass each line post. This eliminates the possibility of get-
ting rails crossed around each other or walking on the rail as you pay/pull out additional rails.
When reaching the opposite end, pull the rail by hand to remove as much slack as possible.
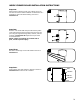
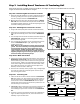
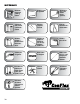
Before cutting the rail:
One-Way Barrel Tensioner: Cut rail flush with far side of termination post (Ill. A).
Termination Bracket: Cut rail flush with far side of termination post (Ill. A).
Termination Loop: Allow enough rail to wrap around post plus 4” (Ill. B).
T-Bracket: Cut rail flush with far side of termination post (Ill. A).
Repeat until all rails are paid/pulled out. At this point, complete all terminations on both ends. If not
already completed, walk back up along the fence line placing the rails into the brackets. Make sure not to
get the rails crossed around each other. Repeat this process until all rails are complete.
If a splice is required, refer to the section titled “Splicing Techniques”.
4”
B
A
DIRECTION
OF PULL
CUT HERE
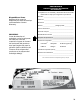
IMPORTANT:
Remove labels from all rolls of
material. The Product Label
will be needed to complete the
warranty registration. SEE PAGES
2 AND 3 FOR WARRANTY.
PRODUCT LABEL #
On-line Warranty Registration
available at www.centaurhtp.com/
Installation Center/Warranty.