
User's Manual


3. Once the vehicle is raised and secured, clear the area underneath the vehicle of
people and tools. Then, wheel the Transmission Jack under the transmission.
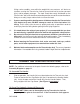
4. To raise the Saddle Assembly (12) of the Transmission Jack, turn the Release
Valve (47)
clockwise
to its closed position. Pump the Handle, using full, smooth
strokes. (See Figure A.)
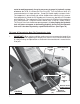
5. Stop just below the transmission, and level the Saddle Assembly (12) with the
Forward Adjusting Knob (24) and Side Adjusting Knob (6). Turning the Forward
Adjusting Knob
clockwise
will lift the front of the Saddle Assembly upward, and
turning it
counterclockwise
will return the Saddle Assembly to a level position.
Turning the Side Adjusting Knob
clockwise
will tilt the Saddle Assembly up,
raising the left side. Turning it
counterclockwise
will bring the Saddle Assembly
back to level. (See Figure B.)
SADDLE ASSEMBLY (12)
FORWARD ADJUSTING KNOB (24)
SIDE ADJUSTING KNOB (6)
6. Continue raising the Saddle Assembly (12) up to the transmission to determine
where you will need to adjust the four Fingers (16). All four Fingers need to grip
and make contact with the transmission. (See Figure B.)
7. After determining where the four Fingers (16) need to be set, loosen the Hex Bolt
(14) on each Finger and adjust the Fingers to the proper setting for the transmis-
sion. Then, retighten the Hex Bolts. (See Figure B.)
8. Secure the Chain (13) to the
Chain Bracket
, and wrap the Chain securely around
the transmission. Attach the other end of the Chain to the Hook (17) on the other
side of the Saddle Assembly (12). Then, tighten the Wing Nut (20) on the other
end of the Hook. (See Figure C, next page.)
FIGURE B
FINGER (16)
HEX BOLT (14)
SKU 91020 PAGE 7
2. WARNING! Do not use the Transmission Jack with the vehicle’s engine running.
Make sure to set the emergency brake, use adequate vehicle support stands if
needed, and block the tires opposite the tire(s) being lifted.