
User's Manual


SKU 92189 For technical questions, please call 1-800-444-3353 PAGE 8
3. Install the desired size Ceramic Nozzle (37) and Rubber Adapter (38) on the
Sandblaster Gun. (See Figure B.)
4. Connect the grit supply hose to the Sandblaster Gun. In order to keep the grit
supply hose out of the way, hang it over your shoulder. (See Figure A.)
5. Turn on the sandblaster unit (not included).
6. IMPORTANT! Grip the Sandblaster Gun firmly.
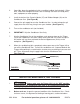
7. Aim the Sandblaster Gun at the workpiece, and squeeze down on the Trigger
(42) of the Sandblaster Gun while slowly moving the tool in a circular or right to
left motion until you have achieved the desired appearance (finish) on the
workpiece. (See Figure C.)
8. When the sandblasting job is completed, release pressure on the Trigger (42) to
turn off the Sandblaster Gun. Turn off the sandblaster unit. Squeeze downon the
Trigger, while pointing in a safe direction, to release any remaining air pressure and
grit. Then, disconnect the grit supply hose from the Sandblaster Gun.
(See Figure C.)
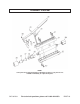
FIGURE C
TRIGGER (42)
GRIT SUPPLY HOSE
(NOT INCLUDED)
INSPECTION, MAINTENANCE, AND CLEANING
1. WARNING! Always make sure the Trigger (42) is in its “OFF” position,
and disconnect the Sandblaster Gun from its grit supply hose before per-
forming any inspection, adjustments, maintenance, or cleaning.
2. Before each use, inspect the general condition of the Sandblaster Gun. Check
for loose screws, misalignment or binding of moving parts, cracked or broken
2. If possible, place the workpiece inside a sandblast cabinet (not included). Other-
wise, isolate the workpiece to make sure no damage can occur to nearby walls,
tools, equipment, or other property.