
User Manual


Starting up the Accessories
All the rest of your AlertMe Kit, and any extra Accessories you may have bought, will communicate with the
Hub using a wireless network. Before you position these items around your home, you should introduce them
to your Hub. This process ensures that your AlertMe Accessories only communicate securely with your Hub,
and no one else's systems. It sets up an encrypted wireless network around your home, and also makes sure
that as you position the Accessories, you are able to pick locations where they can stay in contact with the
Hub. Once your Hub is set up and you have confirmed this on the secure website, you can move on to the
accessories. The website will display a screen showing numbers 2 to 7 (number 1 was your Hub!), and as you
set up each Accessory, an icon for that Accessory will appear. The numbers correspond to the packaging, but
you can turn on the Accessories in any order.
Setting up the wireless network between Accessories and Hub
For each Accessory, you will turn it on, and then position it right next to the Hub so that the wireless network
is set up correctly. You will do this with all your Accessories at once, and then move on to the next stage of
installation. There's more information on how to turn on each type of Accessory below.
Most Accessories (although not the Lamp!) are turned on by putting in their battery (see below). When you
first turn on any Accessory, it will light up (every Accessory has a light on it somewhere!). The light will be off
most of the time but will "blink" twice every 4 seconds or so. Once you bring the Accessory near the Hub, or
after a few moments, the light will turn off. This means that the Accessory has successfully found the Hub and
is communicating with it.
If you turn on an Accessory close to the Hub, it may not light up for very long at all before finding the Hub and
stopping blinking.
Once you have turned on your Accessories, group them together around the Hub, like ducklings around the
mother duck. When you have finished, you should have a set of Accessories with their lights turned off. If any
still have their lights turned on, move them closer to the Hub and wait a few minutes; if that doesn't help, click
here.
You can check that all the Accessories successfully found the Hub by checking that the website is displaying the
correct number of each type of Accessory. The Accessory page you are currently looking at on the website has
a section for each type of Accessory, illustrated with a number which matches the packaging number for that
Accessory type. If any are missing, click here. If all your Accessories are present and correct on the website,
click on to the next page.
The rest of the installation is quite straightforward. One by one, we will go through each system or service
offered by AlertMe, and will install the Accessories for that service in turn. For each Accessory, you will then
position that Accessory in your home, with guidance from its light as to where is a good spot, and then you will
return to the website to give it a name. The website will walk you through the installation and test the wireless
network signal strength as you position each Accessory, ensuring that it will work well. The guidelines give
more information about Accessory positioning.
You can now move onto Installing the Lamp system.
Turning on Accessories
The Lamp
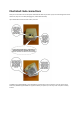
The Lamp may go dark if you unplug it from the mains, but should light up after being plugged in, and
flash twice every 4 seconds or so for a short while. (The Lamp power supply cable fits into a little hole
on the bottom of the Lamp, which may contain a plastic "bung" when you first receive the Lamp -
you'll need to remove this if you have one!) If the light does not turn on at all, then click here for help.