
Troubleshooting guide


15
16
25
G
23
I
A
K
1
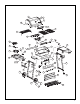
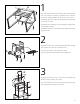
After removing the unit from carton please make sure that all hard-
ware is present. Before starting to assemble the unit, read these
instructions carefully. Assemble the unit on a flat, clean surface.
Assemble the upper panel (16) to the left & right legs using machine
screws (Key I) as shown.
Assemble the front panel (23) to the left & right legs using machine
screws (Key G) as shown.
Assemble the rear brace to the left & right legs using machine screws
(Key K) as shown.
37
N
A
39
45
24
2
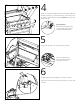
Assemble the wheels (37) to the left legs using wheel bolts & flange
nuts (Key N, A) as shown, clip on the wheel covers.
Insert the end caps (45) on the right legs as shown.
Insert the wire bottom (24) in between left and right legs.
5
6
H
E
L
15
A
3
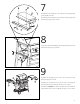
Assemble the burner box (15) onto the bottom assembly using
machine screws, nut (Key L, A) as shown.
Attach the lid handle (5) and the handle backing (6) using wing
nuts and spring washers (Key E, H) as shown.