
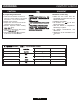
Specifications


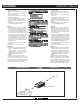


FLIGHT PREPARATION
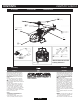
CENTURY LAMA 6
P.5
Flight preparation
The “4-in-1 Unit” is a device with a
receiver, gyro, mixer and ESC built-in
one box. Our factory has installed the
“4-in-1” Unit and connected main mo-
tors, battery pack and two
servos to the Control-box. The 4-in-1
Unit is equipped with a fail safe device.
If the battery is connected to
the 4 in 1 Unit without having turned
on the transmitter, the helicopter will
refuse to operate. The same applies if
the throttle stick and/or the throttle
trims are not properly positioned.
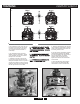
1. VERY IMPORTANT: Before turning the
transmitter on, set the throttle stick as
well as its trim to the lowest (power
off) position. The trim of the eleva-
tor and aileron sticks should be set to
neutral position.
2 & 3. Turn the transmitter on and extend
the antenna.
4. Installation of the Battery Pack ; shove
the battery into the battery tray and
connect the cables while paying attention
to the polarity.
5.
ash immedi-
ately. If the LED lights up, the helicopter
ashes slowly,
the battery voltage is low, and you will
ying and recharge the
battery.
Flugvorbereitungen
Die “4 in 1” Einheit enthält Gyro,
Mischer, Empfänger und zwei Drehzahl-
steller in einem Gehäuse. Sie ist bereits
eingebaut und beide Motoren, beide
Servos und der Stromversorgungs-
stecker sind daran angeschlossen.
Die Einstellregler “Gyro Trim” (für der
Gyro) ist werkseitig voreingestellt. Die
4 in 1 Einheit ist mit einer Fail-Safe
Sicherheit ausgerüstet. D.h. wenn Sie
der Akku anchliessen ohne der Sender
ein zu schalten, der Hubschrauber nicht
funtionieren wird. Wenn Sie der Gas-
stick und/oder Gashebel nicht richtig
positioniert haben wird der Heli auch
nicht funtionieren.
1& 3. Korrekt alle Trimmscheiber auf Mitte
stellen. Gasknüppel auf „Nullposition“.
Sender einschalten. Achten Sie darauf
dass alle Servo-Reverse Tasten auf die
richtige Positionen stehen.
2& 4. Sender einschalten und Antenne
ausschieben.
5. Akku einschieben wie abgebildet.
6.Die Batterie mit dem Mixer-Fahrtregler
verbinden, 1 bis 2 Sekunden warten
bis die Elektronik aktiv ist. Die grüne
LED wird blink euchten.
Dies bedeutet dass die elektronischen
Anschlüsse korrekt sind und dass die
Elektronik aktiv ist. Ihr Gasknüppel auf
„Stop“ halten und die Funktionsrich-
tung der Steuerungen überprüfen. Am
Nickknüppel ziehen um zu sehen ob die
Taumelscheibe korrekt reagiert. Nochmals
überprüfen ob alle Bauteile richtig sitzen.
Leuchtet der grüne LED schnell, soll man
unbedingt landen und Akku laden. Nach
dem Flug, trennen Sie den Akku vom 4in1
und schalten Sie dann den Sender aus.
1.
Antenna
Power switch
An/Aus Schalter
Servo reverser
2.
3.
4.
Gyro Trim
Green LED
LED
Grüner LED
5.
4