
Instruction manual


Robinison 22HP Manual
33
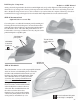
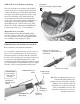
STEP 51 Cutout Window & Navigation Lights
Taking the navigation lights, continue trimming as they are
fitted to the front of molded lights on the main cabin. Once
trimmed, paint the navigation lights from the inside to preserve
the high gloss outside surface. General aviation: red on the left
and green on the right. Bond in place using “goop” adhesive
applied to the edge of the lenses.
#CN1076-3 Top Fairing with
Antenna
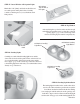
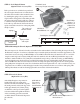
STEP 52 Top Fairing
The fasteners between the top fairing and the cabin
needs to be marked, drilled and installed. Start by
positioning the top fairing to the cabin and secure using
tape. Make 6 center marks for the fasteners, equally
spaced along each side. Notice that the front left side of
the fairing has an accomodation for the extra thickness
of the top window. It in not recommended to install a
fastener here. After marking, drill all holes using a 1/16”
[1.5mm] drill bit through both the cabin and the fairing.
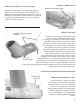
Remove the fairing and bond the matching wooden
squares against the bottom of the fairing using epoxy. After
completely dry, re-drill the six holes using a 3/32” [2.4mm]
drill bit and using one screw, tap all holes ahead of time. Finally,
the wooden blocks can be painted to match the inside color of the
cabin. The antenna hole needs to be drilled carefully into the mount.
Using a 5/64”[2mm] drill bit, hand drill 3/4”[19mm] down into the mount and test fit. After
painting white, bond into place using bepoxy.
#CN1076-2 Navigation Lights
6 Holes to
attach to cabin
M2.5 Self Tap
Screw x 6
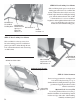
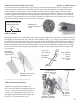
STEP 53 Top Fairing Fitted to Cabin
After all assembly is completed, bond the
antenna to the mount at the back of the fairing
and paint the M2.5 screw heads to match the
cabin color. Note that we have shown the
fairing installed, initially do not mount the main
shaft while preparing the fairing as is creates
too many other fitting isses. We detail the final
installation of the fairing a little further in this
manual.