
Assembly Instructions

MISSING OR DEFECTIVE PARTS? DO NOT CALL THE DEALER, Please contact us:
CALL 1-800-466-9626 • CEPCO TOOL • 1580 LAKE STREET • ELMIRA, NY 14905 • FAX: 607-739-4583
© 2013 Cepco Tool Company
DECKING, PLYWOOD, & PANELING TOOL
TOOL ASSEMBLY & PARTS LIST:
Pull Config.
Push Config.
Pull
Push
OPERATING IN THE ‘PULL’ CONFIGURATION:
(Preferred setup shown at left)
1. Slip joist gripper over joist, stud, or rafter at distance away from board which will allow for self-locking (depends on gap size-
quickly learned).
2. Swing handle in direction of arrows shown in upper right, lightly holding joist gripper until it bites.
3. When handle is nearly perpendicular to board, tool will self hold. If handle is perpendicular to board, but gap is not closed,
goto step 1 with joist gripper closer to board. If gap is closed, but handle will not swing far enough to self hold, go to step 1 with
joist gripper farther away from board.
HINT: Nail material at joist adjacent to tool or check layout before nailing the joist that the tool is on.
CAUTION! When working on a wall, ceiling, or elevated surface keep a hand on the tool to avoid injury.
TONGUE & GROOVE PLYWOOD:
Follow the steps above. Install plywood with tongue side in unless
using a 1x T-n-G Cam, and push on groove side. Kneel on sheet
with your weight as close to seam as possible. Ride sheet into
place while “ratcheting” tool. See figure at right. Do not nail
previous sheet near edge until new sheet is seated. Do not allow
plywood to “weather” prior to installation.
TONGUE & GROOVE PANELING/PLYWOOD/DECKING:
To use the tool on the tongue side of materials, order a 1x T-n-G™ Cam (#BW-4) for 3/4" or 1" (5/4) thick materials with a tongue
thickness up to 5/16". For materials such as 2x (1-1/2" thick) decking, order a 2x T-n-G™ Cam (#BW-6). The T-n-G cams have a
groove which mates with the tongue to protect it from damage and keep the tool engaged. T-n-G cams are not included with the
tool.
ANGLED DECKING/PANELING:
Apply tool on ‘short’ angle side of joist or stud.
T-n-G™ Cam
FOR USE ON JOISTS/STUDS/RAFTERS THAT ARE NOT 1-1/2" THICK:
To use the tool on engineered lumber, timbers, rough-cut joists, etc., you can order the
Universal Gripper (#BW-9 or BW-10) from Cepco Tool Co. This will attach in place of the
stock joist gripper. These adjust to accommodate joist widths up to 10”. We sell other
useful accessories as well, see back of box or check out our website!
MISSING OR DEFECTIVE PARTS? DO NOT CALL DEALER, Please contact us:
CALL 800-466- 9626 · CEPCO TOOL · 133 PHILO ROAD W ELMIRA, NY 14903 · FAX: 607-739-4583
© Copyright 2002 Cepco Tool Company www.cepcotool.com
DECKING, PLYWOOD
& PANELING TOOL
DECKING, PLYWOOD, & PANELING TOOL
TOOL ASSEMBLY & PARTS LIST:
Pull Config.
Push Config.
Pull
Push
OPERATING IN THE ‘PULL’ CONFIGURATION:
(Preferred setup shown at left)
1. Slip joist gripper over joist, stud, or rafter at distance away from board which will allow for self-locking (depends on gap size-
quickly learned).
2. Swing handle in direction of arrows shown in upper right, lightly holding joist gripper until it bites.
3. When handle is nearly perpendicular to board, tool will self hold. If handle is perpendicular to board, but gap is not closed,
goto step 1 with joist gripper closer to board. If gap is closed, but handle will not swing far enough to self hold, go to step 1 with
joist gripper farther away from board.
HINT: Nail material at joist adjacent to tool or check layout before nailing the joist that the tool is on.
CAUTION! When working on a wall, ceiling, or elevated surface keep a hand on the tool to avoid injury.
TONGUE & GROOVE PLYWOOD:
Follow the steps above. Install plywood with tongue side in unless
using a 1x T-n-G Cam, and push on groove side. Kneel on sheet
with your weight as close to seam as possible. Ride sheet into
place while “ratcheting” tool. See figure at right. Do not nail
previous sheet near edge until new sheet is seated. Do not allow
plywood to “weather” prior to installation.
TONGUE & GROOVE PANELING/PLYWOOD/DECKING:
To use the tool on the tongue side of materials, order a 1x T-n-G™ Cam (#BW-4) for 3/4" or 1" (5/4) thick materials with a tongue
thickness up to 5/16". For materials such as 2x (1-1/2" thick) decking, order a 2x T-n-G™ Cam (#BW-6). The T-n-G cams have a
groove which mates with the tongue to protect it from damage and keep the tool engaged. T-n-G cams are not included with the
tool.
ANGLED DECKING/PANELING:
Apply tool on ‘short’ angle side of joist or stud.
T-n-G™ Cam
FOR USE ON JOISTS/STUDS/RAFTERS THAT ARE NOT 1-1/2" THICK:
To use the tool on engineered lumber, timbers, rough-cut joists, etc., you can order the
Universal Gripper (#BW-9 or BW-10) from Cepco Tool Co. This will attach in place of the
stock joist gripper. These adjust to accommodate joist widths up to 10”. We sell other
useful accessories as well, see back of box or check out our website!
MISSING OR DEFECTIVE PARTS? DO NOT CALL DEALER, Please contact us:
CALL 800-466- 9626 · CEPCO TOOL · 133 PHILO ROAD W ELMIRA, NY 14903 · FAX: 607-739-4583
© Copyright 2002 Cepco Tool Company www.cepcotool.com
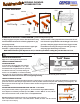
1. Slip joist gripper over joist, stud or rafter at a distance away
from board which will allow for self locking (depends on gap
size-quickly learned).
2. Swing handle in direction of arrows shown in upper right
illustration. Lightly hold joist gripper until it bites.
3. When handle is nearly perpendicular to board, tool will self
hold. If handle is perpendicular to board but gap is not closed,
go to step 1 with joist gripper closer to board. If gap is closed
but handle will not swing far enough to self hold, go to step 1
with joist gripper farther away from board.
OPERATING IN THE “PULL” CONFIGURATION: (preferred setup shown top left)
HINT: Nail material at joist adjacent to tool, or check layout before nailing the joist that the tool is on.
CAUTION! When working on a wall, ceiling, or elevated surface, keep a hand on the tool to avoid injury.
ANGLED DECKING/PANELING:
Apply tool on ‘short’ angle side of joist or stud.
TONGUE & GROOVE PANELING/
PLYWOOD/DECKING:
To use the tool on the tongue side of the materials,
use the 1x T-n-G™ Cam (#BW-4) for ¾” or 1” (5/4)
thick materials with a tongue thickness of up to 5/16”.
For materials such as 2x (1-1/2” thick) decking, use
the 2x T-n-G™ Cam (#BW-6). For increased versatility
with a single cam, use the Combi-Cam™ (#BW-12), which includes a 1x groove on one side and a 2x groove on the other.
NOTE: T-n-G™ Cams can also be used on straight-edge decking.
TONGUE & GROOVE PLYWOOD:
Follow the steps above. Install plywood with tongue side in (unless using a 1x T-n-G™ Cam or the 1x side of the Combi-Cam™) and push on
groove side. Kneel on sheet with your weight as close to seam as possible. Ride Sheet into place while “ratcheting” tool (see gure A ). DO
NOT nail previous sheet near edge until new sheet is seated. DO NOT allow plywood to weather prior
to installation.
FOR USE ON JOISTS/STUDS/RAFTERS THAT ARE NOT 1-1/2” THICK:
For engineered lumber, timbers, rough-cut joists, etc., use the Universal Gripper (#BW-9 or BW-10).
These adjust to accommodate joist widths up to 9.5” (#BW-9: 1.5”-4.25” / #BW-10: 1.5”-9.5”). We sell
other useful accessories as well, see back of box or visit cepcotool.com.
DECKING, PLYWOOD, & PANELING TOOL
TOOL ASSEMBLY & PARTS LIST:
Pull Config.
Push Config.
Pull
Push
OPERATING IN THE ‘PULL’ CONFIGURATION:
(Preferred setup shown at left)
1. Slip joist gripper over joist, stud, or rafter at distance away from board which will allow for self-locking (depends on gap size-
quickly learned).
2. Swing handle in direction of arrows shown in upper right, lightly holding joist gripper until it bites.
3. When handle is nearly perpendicular to board, tool will self hold. If handle is perpendicular to board, but gap is not closed,
goto step 1 with joist gripper closer to board. If gap is closed, but handle will not swing far enough to self hold, go to step 1 with
joist gripper farther away from board.
HINT: Nail material at joist adjacent to tool or check layout before nailing the joist that the tool is on.
CAUTION! When working on a wall, ceiling, or elevated surface keep a hand on the tool to avoid injury.
TONGUE & GROOVE PLYWOOD:
Follow the steps above. Install plywood with tongue side in unless
using a 1x T-n-G Cam, and push on groove side. Kneel on sheet
with your weight as close to seam as possible. Ride sheet into
place while “ratcheting” tool. See figure at right. Do not nail
previous sheet near edge until new sheet is seated. Do not allow
plywood to “weather” prior to installation.
TONGUE & GROOVE PANELING/PLYWOOD/DECKING:
To use the tool on the tongue side of materials, order a 1x T-n-G™ Cam (#BW-4) for 3/4" or 1" (5/4) thick materials with a tongue
thickness up to 5/16". For materials such as 2x (1-1/2" thick) decking, order a 2x T-n-G™ Cam (#BW-6). The T-n-G cams have a
groove which mates with the tongue to protect it from damage and keep the tool engaged. T-n-G cams are not included with the
tool.
ANGLED DECKING/PANELING:
Apply tool on ‘short’ angle side of joist or stud.
T-n-G™ Cam
FOR USE ON JOISTS/STUDS/RAFTERS THAT ARE NOT 1-1/2" THICK:
To use the tool on engineered lumber, timbers, rough-cut joists, etc., you can order the
Universal Gripper (#BW-9 or BW-10) from Cepco Tool Co. This will attach in place of the
stock joist gripper. These adjust to accommodate joist widths up to 10”. We sell other
useful accessories as well, see back of box or check out our website!
MISSING OR DEFECTIVE PARTS? DO NOT CALL DEALER, Please contact us:
CALL 800-466- 9626 · CEPCO TOOL · 133 PHILO ROAD W ELMIRA, NY 14903 · FAX: 607-739-4583
© Copyright 2002 Cepco Tool Company www.cepcotool.com
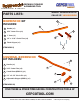
1x Tongue &
Groove Cam
2x Tongue &
Groove Cam
T-n-G
™
Cams
DECKING, PLYWOOD, & PANELING TOOL
TOOL ASSEMBLY & PARTS LIST:
Pull Config.
Push Config.
Pull
Push
OPERATING IN THE ‘PULL’ CONFIGURATION:
(Preferred setup shown at left)
1. Slip joist gripper over joist, stud, or rafter at distance away from board which will allow for self-locking (depends on gap size-
quickly learned).
2. Swing handle in direction of arrows shown in upper right, lightly holding joist gripper until it bites.
3. When handle is nearly perpendicular to board, tool will self hold. If handle is perpendicular to board, but gap is not closed,
goto step 1 with joist gripper closer to board. If gap is closed, but handle will not swing far enough to self hold, go to step 1 with
joist gripper farther away from board.
HINT: Nail material at joist adjacent to tool or check layout before nailing the joist that the tool is on.
CAUTION! When working on a wall, ceiling, or elevated surface keep a hand on the tool to avoid injury.
TONGUE & GROOVE PLYWOOD:
Follow the steps above. Install plywood with tongue side in unless
using a 1x T-n-G Cam, and push on groove side. Kneel on sheet
with your weight as close to seam as possible. Ride sheet into
place while “ratcheting” tool. See figure at right. Do not nail
previous sheet near edge until new sheet is seated. Do not allow
plywood to “weather” prior to installation.
TONGUE & GROOVE PANELING/PLYWOOD/DECKING:
To use the tool on the tongue side of materials, order a 1x T-n-G™ Cam (#BW-4) for 3/4" or 1" (5/4) thick materials with a tongue
thickness up to 5/16". For materials such as 2x (1-1/2" thick) decking, order a 2x T-n-G™ Cam (#BW-6). The T-n-G cams have a
groove which mates with the tongue to protect it from damage and keep the tool engaged. T-n-G cams are not included with the
tool.
ANGLED DECKING/PANELING:
Apply tool on ‘short’ angle side of joist or stud.
T-n-G™ Cam
FOR USE ON JOISTS/STUDS/RAFTERS THAT ARE NOT 1-1/2" THICK:
To use the tool on engineered lumber, timbers, rough-cut joists, etc., you can order the
Universal Gripper (#BW-9 or BW-10) from Cepco Tool Co. This will attach in place of the
stock joist gripper. These adjust to accommodate joist widths up to 10”. We sell other
useful accessories as well, see back of box or check out our website!
MISSING OR DEFECTIVE PARTS? DO NOT CALL DEALER, Please contact us:
CALL 800-466- 9626 · CEPCO TOOL · 133 PHILO ROAD W ELMIRA, NY 14903 · FAX: 607-739-4583
© Copyright 2002 Cepco Tool Company www.cepcotool.com
1x & 2x
Combi-Cam™
T-n-G™ Cams have a groove which mates with
the tongue to protect it from damage & keep
the tool engaged.
(or T-n-G™ Cam)
(or Adj. Gripper)
A