
Installation Instructions


CertainTeed Vinyl Siding Installation Guide
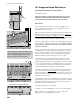
101
Second course
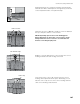
Cut off of the right side of the D9 shakes at indicator “B,”
which is located above the nail slots, cutting straight through
the panel. Drill a 3/16" hole in the center of the nail hem and nail
the siding through this hole to control the direction of expansion
and contraction. Another option is to nail each end of a nail slot
located at the center of the panel.
Starting on the right side of the wall, hook the bottom locking leg
of the panel into the previous course and slide the panel into the
cornerpost or receiving channel. Leave 1/4" space between the
panel and the corner for expansion.
Set the spacing of the remaining panels using the
PanelThermometer and temperature indicator lines.
Continue to stagger panel courses, alternating each time to ensure
a random shingle pattern up the wall.
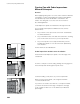
Installing under a window or opening
Install Cedar Impressions undersill trim. Cut the panel to fit under
the window. Drill a 3/16" hole in the upper center of the panel.
Using a snap lock punch, raise tab faces on the outside of the
panel 1/4" from the trimmed edge, 6" apart. Lock the panel into
the previous course, and center nail the siding through the 3/16"
hole drilled earlier. (Center nailing controls the direction of the
panel’s expansion and contraction.)
Lock the panel into place.
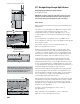
Installing over a window or opening
Cut the panel to fit over the window by measuring from the locking
tab of the previous row to the bottom of the receiving pocket.
Add 1/8" to this measurement. Turn the panel over and, using this
measurement, measure from the bottom of the return leg. Cut the
panel to this dimension.
Install the cut panel by positioning the panel over the window
and into the receiving pocket. Lock the cut panel into the previous
course by pushing in and up. The cut edge should be 1/4"
below the top of the receiving pocket.
Finishing the top course
See instructions on page 65.
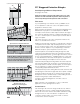
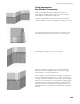
Installing Cedar Impressions Mitered Cornerpost
Install the siding on both sides of the wall before you install the
cornerpost. Space the siding 3" from the edge of the corner. The
corners are designed to fit over the panels that are used to start a
new course. If you have followed the A + B cut pattern, the mitered
cornerpost will fit easily over the panels. Lock the first corner over
the siding, making sure it also locks into the starter strip. The top
of the corner must be in line with the top of the panel. Nail the
corner through the top two nail slots.
The right-side corner gap has cut marks at 1/8" increments; they
allow you to fit the corner to the different panel heights you may
encounter as you finish a course. Trim the corner gap as needed
to fit the panel.
To finish the top of the cornerpost with cornice molding
and cornice cap, see page 106 to 107.
drill 3/16" dia. hole at midpoint
of remaining panel
measure from
the locking tab
to the bottom
of the receiving
channel and
add 1/8”
bottom of
receiving channel
trim as
needed to
fit corner
“B”
back side of
panel to be cut
bottom of
return leg