
Installation Instructions


CertainTeed Vinyl Siding Installation Guide
104
D7" Staggered Perfection Shingles
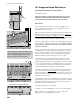
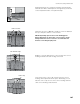
Panel Spacing at Different Temperatures
See pages 94 and 95.
Note: Do not drive center-pin nails tight. Leave 1/8"–1/16"
between the nail head and the panel to allow the panel to
move freely during normal expansion and contraction.
First course
If you are planning to use mitered corners, you MUST use an
A + B cut pattern to start each course. This pattern ensures
proper fit into mitered corners.
Strike a level line around the house and install Cedar Impressions
Metal Starter. If you plan to use Cedar Impressions Mitered
Cornerpost, make sure the starter strip is installed to the edge of
the corner. An alternative method of starting Cedar Impressions
is to use J-channel in place of starter strip to receive the bottom
edge of the panel.
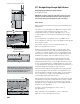
Cut off the end of the top course of the panel at indicator “A,”
which is located above the nail slots.
Starting on the right side of the wall, hook the bottom locking leg
of the panel into the starter strip and slide panel into the corner-
post or receiving channel. Leave 1/4" space between the panel
and the corner for expansion. If you are planning to install the
Mitered Cornerpost, space the panel 3" from the corner.
Fasten the panel to the wall by first nailing through the round
center hole in the nailing hem at the top of the panel. Continue
nailing the panel with 5 nails: one in the right-end nail slot and one
at each of the QuickReference
™
Nail Mark Indicators. Leave 1/8"
to 1/16" between the nail heads and the panel to allow freedom
of movement during normal expansion and contraction.
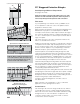
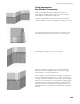
Install the next panel by positioning it below the starter strip and
next to the first panel. Push in and up to lock the panel into the
starter strip and the side tabs of the first panel, as shown. Space
the second panel according to the panel temperature at the
corresponding temperature indicator lines.
Nail the panel into position starting with the round center hole and
then placing the next nail in the right-end nail slot (which overlaps
the previous panel’s left-end slot) so that the nail goes through
both panels’ nail slots simultaneously. Continue nailing the rest of
the panel using the procedure outlined above.
Continue to install remaining panels of the first course as
described earlier.
When a window or doorway breaks a course, continue the
application as if the opening were not there.
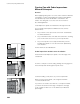
Second course
Cut off the right side of the D7 shingle at indicator “B,” which is
located above the nail slots, cutting straight through the panel.
Drill a 3/16" hole in the center of the nail hem and nail the siding
through this hole to control the direction of expansion and
contraction. Another option is to nail each end of a nail slot
located at the center of the panel.
quick reference nail mark indicators
1/4"
1/4"
drill 3/16" dia. hole at
midpoint of remaining pane
“B”
“A”
PRO TIP: When installing Cedar Impressions
over foam insulation, extra care needs to be
taken to verify that adequate space is left
between all nail heads and the panel.