
Installation Instructions


CertainTeed Vinyl Siding Installation Guide
129
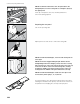
Overlapping panels
On factory-cut panels, the foam is set back from both ends of the
panel. The adhesive begins 2" back from the end of the foam.
To correctly overlap the panels, slip the vinyl edge of the bottom
portion of the seam between the foam and the vinyl panel.
For standard length CedarBoards, slide the panels together until
the foam ends touch or you achieve a minimum overlap of 1". The
maximum overlap should not exceed 1-1/2" because exceeding
an overlap of 1-1/2" can compromise the appearance of the lap.
For CedarBoards XL:
• Above 40°F, overlap the panels 1-1/4" to 1-3/4"
• 40°F and below, overlap panels 1" to 1-1/2" and leave
a 1/4" space between the foam
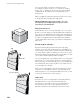
TIP: For ease of handling extended length product,
we recommend carrying the panels on edge, not flat.
Two-person installation is also suggested.
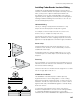
Measuring CedarBoards
When lapping two factory laps, you will often butt the panel foam
and not lap 1" as in standard vinyl applications. This mandates
a different approach from standard practice when you measure
CedarBoards panels.
When filling in a piece to end a course of siding, hold the tape
tight into the receiver of the corner post, J-channel, etc., and
measure the distance to the foam of the existing piece already
hung. Subtract the proper amount for expansion and contraction,
depending on the temperature.
As you measure on the full piece to be cut, measure from the foam
on the factory end that butts to the existing piece to your desired
measurement. This will ensure a butt fit on the foam and the
proper room in the receiver for expansion and contraction.
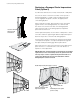
Creating a field lap
For best appearance, lap factory ends only. If you must lap a non-
factory end, you will first have to remove the foam and adhesive.
Cut the foam back approximately 3/4" on the field cut, fabricate
the top and bottom panel end notches, and always use a factory
notch as the overlapping panel. Place the field-cut end into the
factory end.