
Installation Instructions


CertainTeed Vinyl Siding Installation Guide
135
SECTION 11 — Special Situations
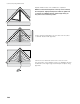
Trimming Curved Openings
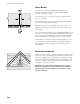
Flexible J-channel simplifies installations around curved objects
such as half and full round windows. To install around the top of
an arched window, follow these simple steps:
Measure the circumference of the arch, then add 1-1/2" to allow
for overlap of the bottom J-channel.
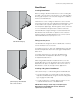
Place the channel along one side of the window, leaving a 3/4"
section below the bottom edge of the window sill (shown). Position
the first nail at the base of the arch. Drive the nail through the
flange, tightly securing the flexible channel.
NOTE: This is an exception to the rule that says don’t fasten
vinyl tightly. When installed around curved objects, flexible
channel must be nailed tightly.
Place additional nails every 6" along the flange. Again, nail tightly.
Be sure the last nail is positioned at the base of the opposite arch.
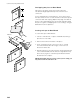
Using a utility knife, cut through the back of the channel, at the
point where it extends beyond the bottom edge of the window sill.
Make a second cut perpendicular to the first at the base of the
channel face. The length of the cut should equal the length of the
extension (shown).
Put a 90° bend in the channel, then nail the resulting tab under
the window (shown).
Repeat at the opposite ends of arch.
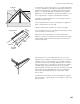
To install the bottom J-channel, square cut the corners to overlap
the flexible J-channel. Use the same technique described under
“Installing window and door trim” (page 39). Use pop-rivets to
secure corners (shown). Use washers on the inside of the rivets
to prevent pull through.
NOTE: Remember to properly flash all windows.
window
bottom
6"
3/4"
3/4"
pop rivet