
Installation Instructions


CertainTeed Vinyl Siding Installation Guide
30
Steel framing
When installing CertaWrap Weather-Resistant Barrier over steel
framing, use screws with minimum 1" diameter washers every
32" vertically and horizontally.
STUDfinder
™
installation instructions
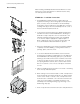
1. The STUDfinder Installation System combines precisely
engineered fastening locations with graphics that help ensure
quick, accurate, and secure installation. Install CertaWrap
horizontally to exterior walls prior to the application of exterior
cladding. Vertically position the CertaWrap roll at the corner of
the structure with the printed side out.
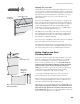
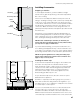
2. Locate the first stud and verify that it is plumb. Align the first
stud with the nearest vertical STUDfinder line, allowing for a
minimum 12" flap to wrap the corner for attachment to the
adjoining wall. Extend the bottom edge of the CertaWrap
2"–4" over the sill plate. Apply plastic-capped staples or
plastic-capped nails every 32" vertically along the first stud
to secure the Weather-Resistant Barrier into position.
3. Unroll the CertaWrap along the exterior wall. Wrap CertaWrap
completely around the building, covering window and door
openings, plates, sills and corners.
4. To secure the Weather-Resistant Barrier, use the fasteners
and fastening schedule that is appropriate for your application.
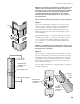
The STUDfinder marks will quickly guide you to your desired
fastening location without the need for chalk lines. Each letter
is spaced 1.6" apart, and each series spans 16". To achieve
32" spacing between fasteners, first locate the letter that the
first row of fasteners covers. The second repeat of that letter
is at 32".
5. Pull the CertaWrap snug and fasten it to the studs or sheathing
and to the top and bottom plates.
6. When starting a new roll in the middle of a wall, overlap vertical
and horizontal laps in the field a minimum of 6". When starting
a new roll at an inside or outside corner, overlap vertical and
horizontal seams a minimum of 12". All vertical and horizontal
seams are to be installed in a weatherboard fashion. Lap
CertaWrap over all existing flashings (e.g. z-flashing, roof-to-
wall flashing, drip cap).
7. Flash or tape all vertical and horizontal seams and penetrations.
12"
(min.)
flap