
Installation Instructions


CertainTeed Vinyl Siding Installation Guide
33
Applying over steel studs
Pre-planning is the key when installing vinyl siding and accessories
over steel studs. Pre-planning includes the selection of siding style
and the types of accessories. Pre-planning proper stud placement
will eliminate many of the problems that could surface once the
job has been started, such as at corners, windows, and
transitional areas.
Follow the same guidelines as in a wood surface—except for the
type of fasteners used. Wall sheathing must be installed over the
studs. This will provide a straighter, smoother and more rigid wall
surface and help prevent studs from twisting. Siding must be
secured into metal studs if the substrate is not a nailable surface
such as exterior dry wall, gypsum board, etc.
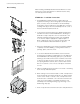
The application of vinyl siding, soffits and accessories over steel
stud framing rather than typical wood framing is straightforward.
The main difference is the use of screws to hang components
that make up a completed siding job.
Use noncorrosive, self-tapping screws with at least 5/16" diameter
head, 1/8" diameter shaft, and at least 1-1/8" long.
Although the fastening method for steel studs differs from wood
construction, all other procedures still apply, including fastening in
the center of the nail slot and not overtightening the fasteners.
Nailing, Stapling and Other
Fastening Methods
If you want to ensure a quality vinyl siding installation, focus your
attention on nailing techniques. Unfortunately, a lot of installers
don’t. They feel nailing is a routine task, something everyone
knows how to do. But that’s not the case. At CertainTeed, we
analyzed reported installation problems, and we found that
more than half of them can be traced back to improper
nailing. So if you want to save yourself lost time and frustration,
carefully observe the following guidelines when installing
accessories, siding panels, soffit, or porch ceilings.
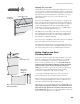
Lock the panel and begin nailing at the center of the panel,
working toward the ends. This helps maintain a level line.
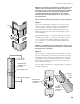
With horizontal accessories and panels, position the nails in the
center of the elongated nailing slots to allow for expansion and
contraction. Never nail through the panel surface.
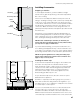
With vertical accessories and panels, position the first nail at the
upper edge of the topmost nailing slot. This allows a panel to
hang from the nail. Position the remaining nails in the center
of the nailing slots. Allow for 1/3 of the total expansion at the top
and 2/3 of the total expansion at the bottom.
center nail in slots
sheathing
or substrate
center nail in slots
upper edge
of topmost
nailing slot
Note: See pages 35-36 for general
fastening guidelines