
Installation Instructions


CertainTeed Vinyl Siding Installation Guide
34
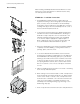
NOTE: Do not nail too tightly. To permit expansion and
contraction, panels should hang freely from nails. This allows
the panels to move as the temperature changes. Drive the
nails until there is between 1/8" to 1/16" of space between
the nail head and the nailing flange.
Drive the nails straight in. Do not angle nails.
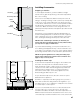
Per the ASTM specification for vinyl siding installation (D4756),
proper nail penetration is at least 3/4". In most cases, that
requires anchoring to studs.
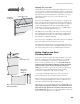
Fastener spacing
Fasteners are typically spaced a maximum of 16" apart. In new
construction, fasten to studs on 16" centers. Do not skip studs.
Some vinyl siding may be used in 24" on center construction in
areas without special wind-load requirements (fasteners spaced a
maximum of 24" apart). Check with your local building code official
for special requirements and ICC-ES Evaluation Report ESR-1066
for specific wind-load requirements.
Other fastening techniques:
Manual nailing is the most common way of fastening vinyl
siding to a wall. That’s because it offers greater control, making
it easier to learn how to fasten panels securely, but not tightly.
You also can use power screwdrivers or pneumatic staplers/
nailers to attach vinyl siding to a wall, but you must take the time
to develop the proper skills. If you choose to use one of these
alternate techniques, follow all the recommendations above for nail
positioning and spacing and the recommendations for substrate
preparation on pages 28 to 32 for horizontal applications and
page 80 for vertical, including Board & Batten. In addition, be sure
to observe the following guidelines:
Power screwdrivers
Use noncorrosive, self-tapping truss head screws. Screws must
have at least 5/16" diameter head and 1/8" diameter shaft. Screws
must be at least 1-1/8" long. If underlayment is less than 3/4"
thick and is not considered a nailable surface (for example, foam
or exterior grade gypsum), be sure screws are long enough to
penetrate at least 3/4" into wood studs or substrate, 1/8" through
a steel stud. Be sure screws are centered in the nail slot. Leave
1/16" to 1/8" space between the screw head and the panel
nailing flange.
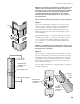
Pneumatic staplers/nailers
Use corrosion-resistant fasteners only. Fasteners must be centered
in the nail slot, no more than 16" on center.
NOTE: Some power staplers/nailers use an attachment that
helps position the fastener in the nail slot. If your unit does
not have that feature, you must carefully position the fastener
by sight.
Too Tight
Too Loose
Correct
Up to 1/8"
Center staples in slots