
Installation Instructions


CertainTeed Vinyl Siding Installation Guide
37
Installing Accessories
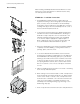
Snapping a chalk line
To ensure proper installation, you must establish a straight
reference line to guide the positioning of the starter strip and the
first course of siding.
If the house is reasonably level, find the lowest point of the old
siding (or sheathing if working on new construction). Partially drive
a nail at one corner, starter height minus 1/4" above the lowest
corner. Attach chalk line. Go to other corner and pull the chalk line
taut. Stretch the chalk line from this nail to the opposite corner
of the house. Make sure the line is level, using a line level or 4'
(minimum) level. Snap chalk line and repeat the procedure around
the entire house.
A water level, a long clear plastic tube 90% filled with water, is
useful in marking level points around the house and on opposite
sides of openings such as doors. Water will always seek a level
state, ensuring the markings will always be at the same level.
NOTE: If after establishing a chalk line you find that your
starter strip will be positioned below an easily nailed surface,
you may have to apply a nailable base.
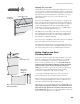
If you have added sheathing, you may want to bend trim coil to
act as flashing and help prevent entry of insects. Bend the coil in
a “Z” shape so the top edge of the coil is on the chalk line and the
bottom edge extends down over the foundation. (See illustration.)
NOTE: The general guidelines for cutting and nailing vinyl
panels and for allowing for expansion and contraction also
apply to vinyl accessory items.
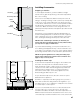
Installing the starter strip
Position the starter strip with the top edge on the chalk line and
the ends 6-1/2" away from the outside and inside corners
(when using lineal systems or wide corners), 4" if using standard
one-piece corners. Nail to wall following previously mentioned
nailing instructions. When hollows occur in the wall surface,
shim out the starter strip to avoid a wavy appearance in the
finished siding job. Nail every 8" to 10".
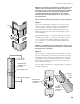
As you add starter strip sections, be sure to leave 1/4" space
between them for expansion.
Sometimes—especially at sills above garage doors, porches or
brick surfaces where the siding has been cut lengthwise —you
may find it easier to use a combination of utility trim and J-channel
as a starter strip to secure a panel.
If you are concerned that the house is not level, measure down
from the soffit at one corner of the house to the top of the
foundation and subtract the width of the starter strip minus 1/4".
Mark the wall, then transfer the measurement to the other corner
of the wall. Snap a chalk line in between the corners at the marks.
sheathing
housewrap
starter
strip
metal
flashing
foundation
6-1/2"
for wide
corners
& lineals
4" for
standard
corners
8" to 10"