
Installation Instructions


CertainTeed Vinyl Siding Installation Guide
39
NOTE: If the transition material allows, the bottom 3/4" of the
channels may be removed from the outside cornerpost so
that the face of the corner may be positioned lower and more
in line with the bottom of the siding. This method creates
a transition with more pleasing aesthetics. The outside
cornerpost face must still maintain 3/8" or 5/8" clearance
from obstructions.
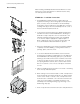
If posts must be spliced for high walls, you have two options:
Option 1
Cut 1" off the nailing flanges and back so just the face of the
outside cornerpost remains. Then lap 3/4" of the upper post
over the lower post, allowing 1/4" gap for expansion. This
method will provide an obvious joint between the two posts,
but will allow water to flow over the joint, reducing the chance
of water infiltration.
When the bottom edge of a cornerpost terminates into a porch,
deck, brick, stone ledge, or roof line, etc., allow 3/8" for every
10' of corner when the ambient temperature is above 40°F;
1/2" for every 10' of corner when the ambient temperature is
40°F or below.
NOTE: It is acceptable to reverse lap outside corners as long
as the corners are properly flashed and water can drain from
the bottom of the cornerpost.
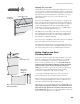
Option 2
Cut a 6" length of cornerpost and trim the nail flange, receiving
channel, and sides until you have just a 90° bend of vinyl. Using
PVC primer and PVC cement, glue the bent piece to the inside
of the upper post and lower post. Butt the two posts together.
Nail the entire assembly as one post with all nails in the lower
post centered in the nail slots.
Also see additional instructions covering installation of four-piece
cornerposts (page 40).
flashing behind
finished corner
assembly
butted splice joint
splice backer (hidden)
1 pc. outside
corner piece
PVC adhesive
on backside of
cornerposts
PVC primer
and PVC
cement must
be used
splice
backer
cornerpost
1/4"
1"