
Installation Instructions


CertainTeed Vinyl Siding Installation Guide
40
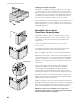
Capping an outside cornerpost
One method of capping an outside cornerpost is to cut a piece
of J-channel twice as long as the width of the corner-post face.
Mark a 90° angle from the center and cut out this area. Then cut
7/8" away from each end, except for the nailing flange. Bend the
J-channel in the center and nail it to the outside of the corner of
the house. Then insert the cornerpost into the J-channel.
Another alternative is to trim the nail flange, receiving channel, and
sides from the bottom 1" of the cornerpost. Notch 1" at the 90°
bend, fold the bottom 1" of the cornerpost face, and fasten these
“flaps” with a pop rivet.
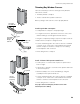
Extra Wide Corner Posts
(Four-Piece Corner System)
Extra-wide cornerposts give you a distinctive, easy-to-install
method of finishing outside corners. Each cornerpost consists
of four parts: corner starter, two lineals, and a quarter-round
snap-in insert.
Lineals are available in two board styles: 5" smooth and
3-1/2" smooth.
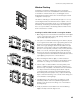
The installation procedure is identical for all lineals and inserts.
To install this four-part accessory, follow these steps:
Before you begin, make sure the corners are flashed properly.
Measure the vertical span, and allow 1/4" from the underside of
the eave if the post is 12' or shorter and 3/8" from the underside
if the post is longer than 12'. Extend the cornerpost 3/4" below
the bottom of the starter strip. Cut all four pieces using a power
circular saw.
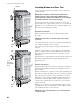
Hang a starter strip. Position the starter strip, leaving 1/4"
allowance for expansion at the top and 3/8" at the bottom.
Position the first nail at the uppermost edge of top nail slot
(shown). Nail loosely. Working from the top down, position the
remaining nails every 8" to 10", with the nails centered in the slots.
Attach the side lineals. Lock the first lineal into the starter strip.
Nail it to the sheathing, following the procedure described above.
Repeat the process for the other lineal.
Snap in the quarter-round corner insert. Working from the bottom
up, begin by inserting the longer leg of the insert into the nail flange
side of the starter strip first; then snap in the shorter leg. Lightly
press along the length of the insert as you snap it into place.
NOTE: For a more secure installation, use a pop rivet to
attach the molding insert to a side lineal. The rivet should be
positioned at the top of the cornerpost.
7/8"
long leg insert