
Installation Instructions


CertainTeed Vinyl Siding Installation Guide
41
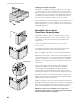
Inside Cornerposts
There are three options for trimming inside corners: Standard
3/4" inside cornerpost, single J-channel, and two J-channels.
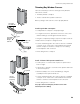
To flash the inside corner, bend a 20"-wide piece of aluminum
coil stock 90° so you have two 10" legs. Insert the flashing into
the corner. If you use more than one piece of flashing, overlap
the upper pieces of the flashing over the lower pieces.
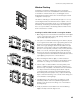
To install inside cornerpost, hang the post from the top of the eave.
The bottom should extend 3/4" below the starter strip. Remove
the bottom 3/4" of the nailing flange so it does not show below
the siding. Set the post straight and true. Position the top nail in
the top of the nailing slot. All other nails should be in the center
of the nail slots
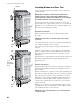
If you have to splice the inside cornerpost, cut 1" off all but the
outer face of the lower post. Lap 3/4" of the upper post over the
lower post, leaving 1/4" for expansion.
If you are using two pieces of J-channel instead of inside
cornerpost, flash the corner with a 10" x 10" “L” corner fabricated
from aluminum coil stock or any weather-resistant barrier. Hang
the J-channel from the top of the eave. The bottom should extend
3/4” below the starter strip. Remove the bottom 3/4" of the nailing
flange so that it will not show below the siding. Use the same
positioning and nailing guidelines as inside cornerpost.
To create a narrower corner, you can also use a single length
of J-channel and flashing. First, install the siding on one wall.
Then place the J-channel lightly against the siding and nail it to
the substrate on the adjacent wall. Follow the same positioning
and nailing guidelines as inside cornerposts.
inside cornerpost splice
hang from top
nail, center
remaining nails
8" to 10"
1/4" to 3/8"
3/4"
solid nailable
substrate
corner flashing
(scrap aluminum coil, for example)
standard 3/4"
inside corner post
single J-channel
two J-channels