
Installation Instructions


CertainTeed Vinyl Siding Installation Guide
45
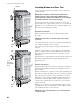
Window Flashing
If installing a new window and flashing, refer to the window
manufacturer’s instructions and ASTM E2112, Standard Practice
for Installation of Exterior Walls, Doors, and Skylights for the
proper flashing installation method for the window type and wall
configuration of the project.
The width of all flashings is determined by the type of accessory
surrounding the window and where the final complete course of
siding stops below the window (in the case of the flashing under
the window). The flashing should extend past the nail flanges of
the accessory. The width of the flashing under the window must
allow for the diversion of water.
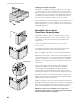
Installing CertaFlash BA around a rectangular window
1. Make diagonal cuts in the weather-resistant barrier at the upper
corners of the top (head) of the rough opening. Gently lift and
tape the flap temporarily in place.
2. Cut a piece of CertaFlash Flex flashing for the bottom (sill) that
is 12" longer than the width of the rough opening. Remove the
backer from the flashing and begin applying one end to the
jamb of the rough opening 6" above the sill. (NOTE: the tape
will extend over the exterior edge of the jamb.) Applying even
pressure to the tape with your hands, work your way down the
jamb, across the sill, and up the opposite jamb, finishing 6"
above the sill. Flex the overhanging tape down onto the wall,
covering the weather resistant barrier in weatherboards fashion,
again applying even pressure to ensure adhesion.
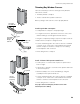
3. Before installing the window, apply a continuous bead of
sealant to the interior of the window’s mounting flange. Install
the window according to the manufacturer’s instructions.
4. Cut two strips of CertaFlash BA for the sides (jambs) of the
window. Jamb flashing tape should extend a minimum of 3"
above the top of the jambs of the window unit and a minimum
of 1" beyond the bottom flashing tape installed in step #2,
covering the width of the previously installed flashing at the
base. Slowly peel release paper off as you press the flashing
in place. Ensure the flashing covers all nails and mounting slots
on the window’s mounting flange.
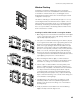
5. Cut BA flashing for the top (head) of the opening so it will
extend beyond both ends of the jamb flashing Ensure the
flashing covers all nails and mounting slots on the window’s
mounting flange.
6. Finally, lay weather resistant barrier over the head flashing.
Apply CertaTape over both diagonal cuts.
1
2
3
4
5
6