
Installation Instructions


CertainTeed Vinyl Siding Installation Guide
66
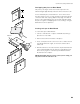
Installing J-Channel as Gable End Trim
Install J-channel to receive siding at gable ends, as shown in the
illustration. To create a clean, professional look, follow these steps:
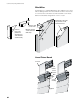
To create an angle template, hold a piece of J-channel against
the slope while transferring the angle to another J-channel with
a pencil.
Next, transfer the angle of the template to the end of a length
of J-channel. Be sure to extend the line onto the nail flange.
Cut away the channel face and the nail flange.
Turn the pattern over and transfer the opposite angle to the
second J-channel, being sure to extend the line onto the nail
flange. Cut away the nail flange and return lip, but do not cut the
J-channel face.
Insert the full-faced J-channel into the mitered J-channel. If the nail
flange or return lips butt and prevent a tight fit, trim off additional
material from the second J-channel.
NOTE: For a more decorative appearance, you also can
use 3-1/2" or 5" lineals to trim gable ends (see next page
for details).
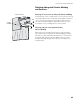
To splice the J-channel, follow these steps:
Cut out a 1" section of the nailing flange and face return as shown.
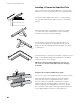
Install inverted J-channel along the top of the wall, under the
eave. Here again, leave a 1/4" gap between the J-channel
and the cornerposts. Overlap the J-channel 3/4" to allow for
expansion. When positioning the upper J-channel, be sure to
allow for expansion of the siding panel. In most cases, position
the J-channel at a point equal to the length of the panel plus 5/8"
(1/4" for upper expansion and 3/8" for lower expansion).
90º
90º
1"
3/4"