
Installation Instructions


CertainTeed Vinyl Siding Installation Guide
69
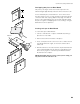
Installing Trimboards around exterior doors
Flash the door according to the manufacturer’s specifications.
Once the opening is properly flashed, begin by determining the
length of the trim along the sides of the door by measuring each
side. Start at the top of the door and drop down to the desired
termination point. Using these measurements, cut the second and
third sections of Restoration Millwork. Apply these pieces to the
left and right sides of the door, verifying that the top edge of each
section lines up with the top of the door.
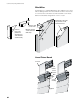
To determine the length of the top piece of trim, begin at the left
side of the left piece of trim and measure to the right side of the
right piece of trim. This measurement should equal the width of
the door plus two times the actual width of the trimboards being
applied. Cut the final piece of trim and apply it at the top of the
door, again verifying that the left and right edges of the cut section
line up with the left and right edges of the trimboards in place at
the sides of the door.
Once the top section of millwork is in place, apply flashing in
compliance with local building codes.
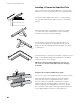
Occasionally you will need to create a pocket to accommodate a
nailing flange:
1. Measure the width of the nailing flange of the window at the
opening where you plan to apply the trim.
2. Set the blade depth of your table saw approximately 1/8"
higher than the width of the window nailing flange.
3. Set the table saw fence so you are cutting away only the
thickness of the saw blade from the trimboard.
4. Make one cut from the back side of the trimboard on your
table saw.
5. Check to be sure the trimboard will lay flat against the wall and
that all joints are tight before fastening. If the boards do not
lay flat against the wall or joints are not tight, repeat the above
instructions starting at step 3.