
Installation Instructions

CertainTeed Vinyl Siding Installation Guide
82
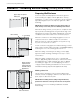
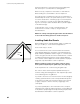
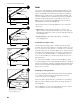
If a wall requires more than one course of siding, you can proceed
in one of three ways:
Use two lengths of J-channel, back-to-back, at the joint between
the two courses (illustration a).
Use a combination of one length of J-channel and one length of
drip cap (illustration b).
Use a double channel lineal and flashing where required.
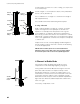
If using J-Channel
Snap a chalk line parallel to the bottom J-channel, at a height
equal to the length of the lower panel plus an allowance for
expansion. For example, if the lower panel is 144" long and
you’re adding 1/2" for expansion (because the temperature is
above 40°F), you strike a line 144-1/2" from the bottom J-channel.
Nail inverted J-channel along this line to receive panels from below.
Leave a 1/4" gap between J-channel and cornerposts. Overlap the
J-channels 3/4".
Prepare for the second course by applying head flashing above
the just-installed J-channel. Then nail J-channel over the flashing
to receive the upper panel.
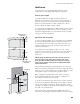
NOTE: Some installers prefer to use formed aluminum
flashing in place of vinyl drip cap as the receiving channel
for the lower panel. This is also an acceptable approach.
J-Channel at Gable Ends
Follow the procedure described earlier under the section
“Preparation for Horizontal Siding” beginning on page 28.
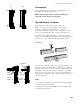
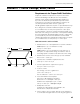
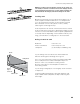
If using double channel lineal: Measure the length of the lower
panel, then add an allowance for expansion. Snap a chalk
line parallel to the bottom J-channel, at a height equal to your
measurement. Position the lineal so the interior peak of the lower
channel runs along the chalk line. Leave a minimum 3/8" gap
between lineal and cornerposts when the ambient temperature is
higher than 40°F. When the ambient temperature is below 40°F,
leave a 1/2" gap.
If necessary, overlap lineals 1-1/4".
vertical
siding
J-channel
J-channel
vertical
siding
flashing
vertical
siding
J-channel
vertical
siding
drip cap
a b
double
channel
lineal
chalk
line